
SSL TLS (Transport Layer Security) and its predecessor SSL (Secure Sockets Layer) are protocols for establishing authenticated and encrypted links between networked computers. Network Operations provide actions for managing SSL network definitions and controlling network scans, including adding and editing networks, initiating manual scans, and monitoring scheduled scan jobs.
The Network Definitions tab is used to create, edit, and delete SSL networks, as well as to run and view discovery and monitoring scans. This tab also provides access to scan results by linking directly to the Results tab for a selected network.
Locations → SSL Discovery → Network Definitions Tabd
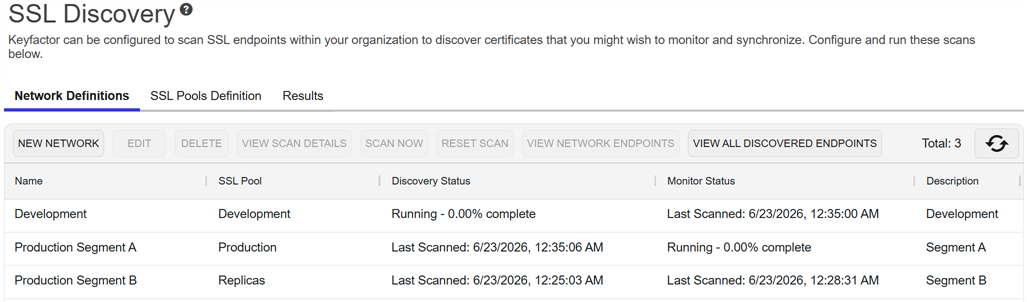
Figure 333: SSL Network Discovery
- Job segments for Scan Now jobs (see Initiate a Manual Scan) are run ahead of those for scheduled jobs.
- New job segments for in-progress jobs with multiple segments are prioritized based on job age—segments for jobs that have been running the longest move to the front of the line.
- New job segments for in progress jobs with multiple segments start ahead of job segments for jobs that have not yet started.
How Discovery and Monitoring Jobs Work
-
Discovery jobs
Discovery jobs attempt to initiate TLS
TLS (Transport Layer Security) and its predecessor SSL (Secure Sockets Layer) are protocols for establishing authenticated and encrypted links between networked computers. connections to specified IP addresses and ports, or ranges of IP addresses and ports. If a TLS connection is successful, the certificates presented by the target server during the TLS handshake are downloaded for inspection and import into the Keyfactor Command database.Locations that respond during the connection attempt are included in the results grid, even if no certificate is downloaded. If a TCP connection is established but TLS fails, an SSL connection is attempted. If a TLS connection succeeds, an SSL connection is not attempted.
-
Monitoring jobs
Monitoring jobs scan locations that were previously identified by a discovery job. As certificates are expected at monitored endpoints, monitoring jobs report on connection successes, failures, and timeouts.
Use the sections below to perform actions on SSL networks, such as creating or modifying networks, running scans, and viewing results.
Add or Modify an SSL Network
Use the New Network action to create an SSL nework or the Edit action to update an SSL network by defining the domains and endpoints to be scanned.
Risk Intelligence Hosts Network
When Risk Intelligence is implemented, a predefined network named Risk Intelligence Hosts is created to store the list of domain names to be monitored by the CT Log & Host Scan Sync process.
When the CT Log & Host Scan Sync process runs, the Risk Intelligence service reads the host names from the Risk Intelligence Hosts network and queries external data sources for certificates that match those domains.
Risk Intelligence augments the standard Keyfactor Command view by providing historical records, Certificate Transparency (CT) log entries, and certificate subjects for your domains, including certificates hosted on endpoints outside your environment.
To update the list of domains to be scanned, modify the, Risk Intelligence Hosts network. For more information, see Add or Modify an SSL Network.
To define a new network or edit an existing one:
- On the SSL Network Discovery page, select the Network Definitions tab (the default when you first visit the page).
- On the Network Definitions tab, choose New Network to setup a network to scan, or select an existing network from the grid and choose Edit.
-
The SSL Network Definition dialog is divided into four tabs: Basic, Advanced, Network Ranges, and Quiet Hours. Enter the network information for each tab, as required. Each tab is described in detail below.
Basic Tab
In the SSL Network Definition dialog on the Basic tab, enter the following information:
-
Name: Enter a name for the network. The network name can be anything; however, it is recommended that the name reflect the subnet or location that you will be discovering with the network.
Tip: The SSL network name is searchable with certificate search and also appears in the location details grid of the certificate details, if the certificate was found during an SSL scan. - Description: Enter a description for the network.
-
SSL Pool: Enter an SSL pool that contains orchestrators with SSL discovery and monitoring capabilities in the search select dropdown. To narrow the list of results in a search select dropdown, begin typing in the input field. Matching results will appear as you type, and you can scroll to locate a record.
Note: Keyfactor Command is installed with a Default Agent Pool and orchestrators with SSL discovery and monitoring capabilities created in Keyfactor Command are automatically assigned to that pool. -
Discovery/Monitoring Schedule: Select the discovery and monitoring job frequency. Possible options are:
- Off—No jobs will run.
- Daily—Enter selected time.
- Interval—Enter an interval from every 10 minutes to every 12 hours.
- Weekly—Enter a selected day or days of the week at a selected time.
- Monthly—Enter a selected day of the month (1st through 27th) at a selected time.
Note: The configured schedule determines when the scan is requested to start. The actual start of the scan is dependent on the orchestrator Keyfactor orchestrators perform a variety of functions, including managing certificate stores and SSH key stores. heartbeat or registration interval. Refer to the Agents > General > Heartbeat Interval (minutes) application setting (see Application Settings) for older orchestrators and the Registration Interval (minutes) orchestrator pool setting (see Orchestrator Pool Management) for highly available orchestrators. The default is 5 minutes.Tip: If you plan to use the certificate owner functionality, you may wish to configure a default certificate owner on one or more enrollment Certificate enrollment refers to the process by which a user requests a digital certificate. The user must submit the request to a certificate authority (CA). patterns or at the system-wide settings policy level (see Configure System-Wide Settings and Enrollment Pattern Enrollment Pattern: Policies Tab) before doing any SSL scans to assure that certificate owner information is associated with certificates imported into Keyfactor Command. Certificates already in Keyfactor Command are not updated on subsequent scans. - Notification Recipients: Enter one or more email addresses of recipients who should receive monitoring results. Each address must be on its own line.
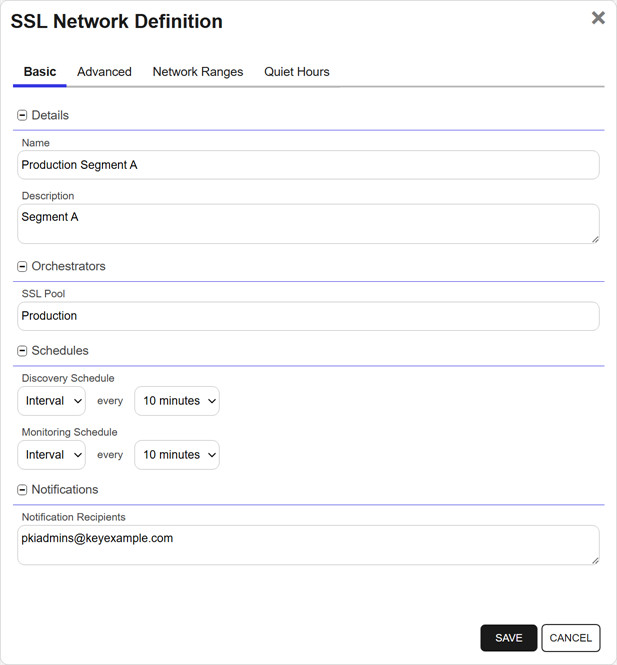
Figure 334: Define a New Network—Basic Tab
Advanced Tab
In the SSL Network Definition dialog on the Advanced tab, enter the following information:
- Scanning Enabled: Click to turn on scanning for the network. If this setting is turned off, no new network scans are scheduled, but any scan currently in progress finishes. If the setting is changed during a scan, the network appears as Disabled on the SSL Network Discovery page.
- Automatically monitor network endpoints during discovery: Turn on this option to instruct the orchestrator to tag endpoint An endpoint is a URL that enables the API to gain access to resources on a server. certificates, found during discovery scanning, for monitoring. Keyfactor recommends turning on this option.
- Request robots.txt: Each network definition contains an option to do a GET on robots.txt on endpoints. Orchestrators perform a GET /robots.txt request to behave like a webcrawler and provide an explanation of network activity.
- Discover Timeout (in ms): Enter the amount of time (in milliseconds) the scan will wait (before timing out) to discover the endpoint. Shorter timeout periods will increase the overall scanning throughput, however will also increase the chance of missing a certificate on a slow or congested network
- Monitor Timeout (in ms): Enter the amount of time (in milliseconds) the scan will wait (before timing out) to receive the discovered endpoint certificate expiration details.
- Expiration Alert (in days): Enter the number of days within which to begin warning regarding upcoming expiration in notification email messages.
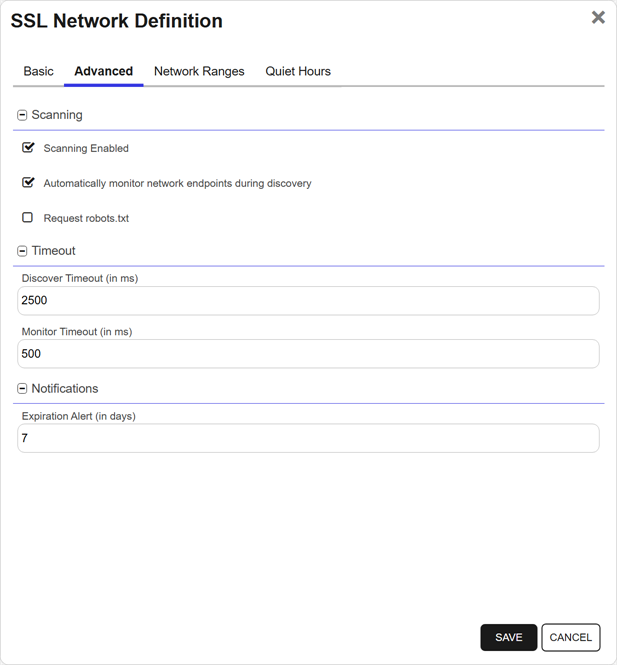
Figure 335: Define a New Network—Advanced Tab
Network Ranges Tab
There are two sections to the Network Ranges Tab: Add Range and Ranges. For each named network defined, multiple ranges are allowed. New networks can be added by using either the add range tool, or pasting the IP address, host name
The unique identifier that serves as name of a computer. It is sometimes presented as a fully qualified domain name (for example servername.keyexample.com) and sometimes just as a short name (for example servername)., or network notation into the Network Ranges box.The Add Range Section
The Add Range section is for adding new networks via the add range tool. When you open the Network Ranges tab, the Add Range section shows default values of:
- Type: Network Notation
- CIDR Block: 0.0.0.0/24:443
Notice that the details grid reflects the default value and the default type, network notation. As you begin entry of a new network range of the type network notation, the details section will reflect your entries as you type, allowing you to verify your entry. The details grid will not show if you chose another type of notation.
Define new network locations, using the add range tool, as follows:
-
In the Add Range section of the page, select your desired method for adding a location in the Type dropdown. The available options are:
-
Network Notation: Enter an IP address range using CIDR notation by populating the CIDR Block field and selecting the desired subnet in the dropdown. The default subnet is /24, which is one full octet of variability, or 254 locations.
-
IP Address: Enter a single IP address by populating the IP Address field and adding one port.
-
Host Name: Add a single location using a host machine name by filling in the Host Name field in the host name section and adding one port. During scans, host names are converted to IP addresses and scans are conducted via IP address. Keyfactor Command will do two scans against that address, one using the host name as the SNI
Server name indication (SNI) is an extension to TLS that provides for including the hostname of the target server in the initial handshake request to allow the server to respond with the correct SSL certificate or allow a proxy to forward the request to the appropriate target. (server name indication Server name indication (SNI) is an extension to TLS that provides for including the hostname of the target server in the initial handshake request to allow the server to respond with the correct SSL certificate or allow a proxy to forward the request to the appropriate target.) and one not using SNI. This is because different servers can be hosted on the same IP address but are accessed via different SNIs (or without one at all).
Note: All methods support adding multiple ports, either comma separated (433,450), or as a range (433-450). -
- Enter the desired network notation, IP address, or host name, and click the Add action button.
- Repeat this step for multiple IP addresses or host names. Each entry will be added as a newline in the Network Ranges box at the bottom of the dialog.
- Click Save.
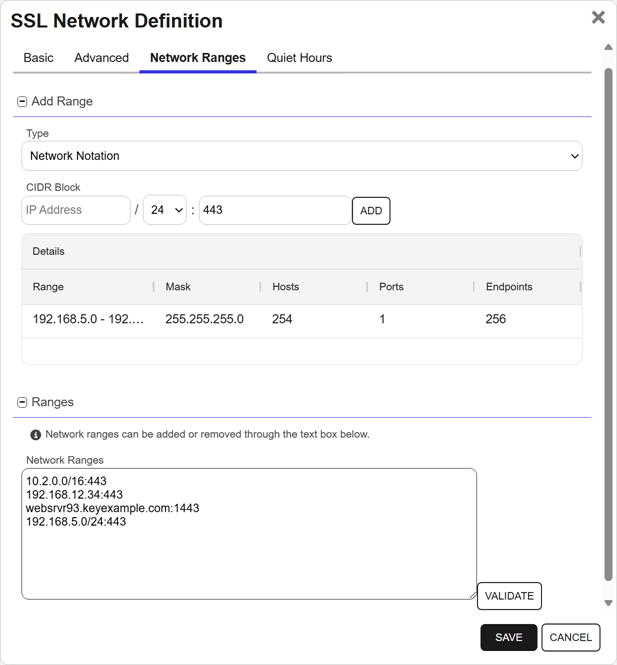
Figure 336: Define a New Network—Network Ranges Tab
The details grid displays only for the type network notation and will only display the value being typed in the CIDR block, or the last value entered. The fields in the details grid are defined as follows:
- Range: This is the range of addresses reflected by the CIDR notation entered.
- Mask: Defined by the bitmask (between 1 and 30) applied to the address in the CIDR block to identify the IP addresses included. The bigger the mask, the fewer IP addresses will fall under the defined range. For example, with a /24, the first 3 sections of the IP address must match exactly, while the last section can be any value from 0 to 255.
- Hosts: This is the number of useable IP addresses in a given CIDR. (This is always two less than the number of endpoints. This is because the smallest address is reserved as the address of the overall network the CIDR represents, while the largest is used as the broadcast address).
- Ports: This is the number of ports the given CIDR will have.
- Endpoints: The endpoints number reflects the number of endpoints based on the network size (/24, /25, etc) times the number of ports defined. Each time you go up in network size the network number will double (/24 has 256, /23 has 512, /22 has 1,024 etc). So if you have just one port defined, the number of endpoints will be 256 for a /24 network, but if you had 3 ports (like say 443-445) that number would jump to 768. The same scenario for a /23 network would be 512 for one port and 1,536 for three ports.
The Ranges Section
The Ranges section contains a text box that displays the network ranges defined for the SSL network. You can edit this list directly.
You can add, edit, or remove ranges by typing in the text box or pasting values from your clipboard. To edit a range, select the text and replace it with the desired value. To remove a range, select it and press the Delete key.
Ranges entered directly into the text box must include port notation (for example, :443).
To validate the defined ranges, select Validate. If all ranges are valid, a confirmation message is displayed. If any ranges are invalid, an alert lists the invalid entries.
Quiet Hours Tab
Quiet hours are ranges of hours or days during which scanning will not take place. Any scans in progress when the quiet hour window is reached pause while the window is in effect and resume when it ends. SSL scans will show a status of In Quiet Hours if scanning is currently in that status.
In the SSL Network Definition dialog on the Quiet Hours tab, define quiet hour periods as follows:
- In the Add Quiet Hours section of the page, select a day and time to begin a quiet hour period in the Start section.
- Select a day of the week and time to end the quiet hour period in the End section.
- Click Add to add the quiet hour period to the Quiet Hours section of the page.
- Repeat the above steps for any additional quiet hour periods.
Note: Quiet hours replace and expand upon the blackout period option that existed in previous versions of Keyfactor Command.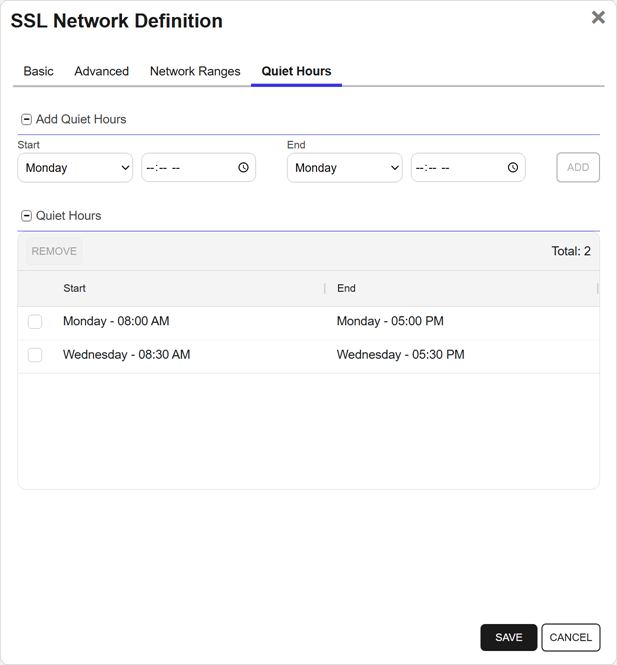
Figure 337: Define a New Network—Quiet Hours Tab
-
- Click Save to save the new network definition or changes.
Delete an SSL Network
- On the SSL Network Discovery page, select the Network Definitions tab (the default when you first visit the page).
- On the Network Definitions tab, select a row in the SSL network grid and choose Delete from the toolbar or right-click menu.
- On the Confirm Operation alert, click OK to confirm or Cancel to cancel the operation.
Monitor Network Scan Jobs with View Scan Details
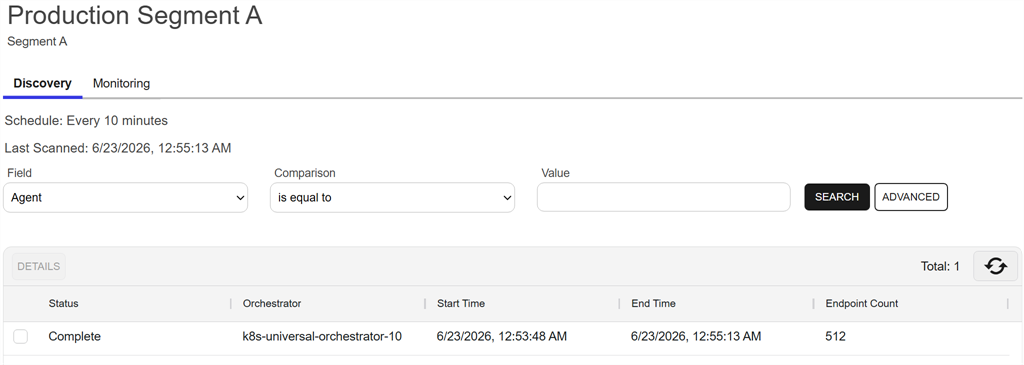
At any time, you can view the status of the latest scan jobs by viewing scan details from the SSL Discovery page. Select the network location in the grid and choose View Scan Details from the toolbar or right-click menu.
This takes you to a separate page with tabs for Discovery and Monitoring jobs (see Figure 338: SSL Network Scan Details Page). Details for the most recent scan appear above the grid in each tab, and the scan segments for that job populate the grid.
More than one row appears in the grid only when an SSL management job is split into segments because the number of endpoints exceeds the configured job size. By default, each segment includes up to 16,384 endpoints. This value can be changed using the SSL Maximum Scan Job Size setting (see Application Settings: Agents Tab).
The grid displays the latest completed job and refreshes with new scan details when the next scan begins.
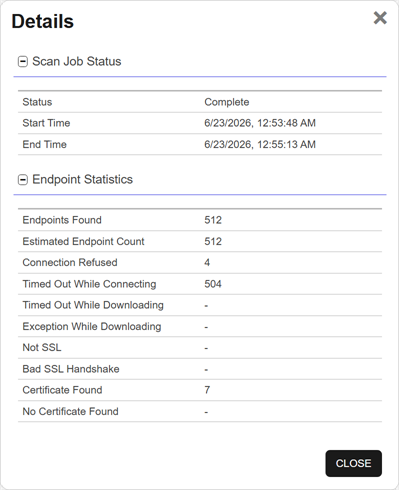
To view details for a segment, double-click the segment or select the segment and choose Details from the toolbar or right-click menu (see SSL Network Scan Detail Segment Details).
Searching SSL Network Scan Details
This page supports the standard query format described in Using Search in the Management Portal and includes its own set of query parsers specific to this operation. Use the following parsers to filter and refine results for this page.
-
Agent
Complete or partial matches with the orchestrator name as listed in the Orchestrator field.
-
The number of endpoints scanned in the segment. The maximum number of endpoints per segment is configurable (see the SSL Maximum Scan Job Size setting in Application Settings: Agents Tab).
-
The time at which scanning of the segment began. Supports the %TODAY% token (see Advanced Search).
-
The time at which scanning of the segment began. Supports the %TODAY% token (see Advanced Search).
-
Status
Status matches or doesn’t match the selected category—Not Started, In Progress, Complete
The SSL scan will show a status of In Quiet Hours if scanning is currently in that status. See Quiet Hours Tab.
Initiate a Manual Scan
The Network Definitions tab includes a feature that allows you to manually initiate a scan for a configured network at any time that a scan is not already running for the network or the network is not in quiet hours. When you initiate a scan using the scan now feature, you can choose whether to run a discovery scan, a monitoring scan, or both.
To initiate a manual scan for a network:
- On the SSL Network Discovery page, select the Network Definitions tab (the default when you first visit the page).
- On the Network Definitions tab, select a row in the SSL network grid of the network to scan and choose Scan Now from the toolbar or right-click menu. The scan will begin immediately.
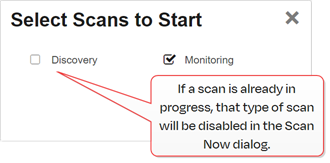
Figure 340: SSL Network Scan Now
Reset a Scan
Resetting an SSL scan deletes all scan jobs, scan job parts, logical scan jobs, and current schedules associated with the selected network. The agent job status relating to the SSL scans is set to failed and completed, and the agent is forced to register for a new session. Afterward, the Scan Now action becomes available, allowing you to initiate a manual scan.
When you select Reset Scan, you will receive a Confirm Operation message. Select OK to proceed or Cancel to exit.
View Network Endpoints and View All Discovered Endpoints
These actions open the Results tab to display discovery and monitoring results.
-
View Network Endpoints opens the Results tab filtered to show only endpoints associated with the selected network definition.
-
View All Discovered Endpoints opens the Results tab with no network filter applied, showing all discovered endpoints across networks.
For more information about working with discovery results, see SSL Results.
Network Definitions Grid Fields
The network definitions grid includes these fields:
Name
The name of the network.
SSL Pool
The name of the SSL pool (see SSL Pool Definitions).
Discovery Status
The current status of the discovery job for the network, if configured. The possible statuses are:
- Scheduled: A job has been scheduled but has not yet run.
- Last Scanned: A job has completed. The date indicates when the job finished.
- Running: A job is currently in progress. For small jobs, the percentage complete may remain at zero until completion.
- In Quiet Hours: A configured quiet hours window is in effect and jobs cannot run.
- Disabled: Scanning is turned off in the network definition. No discovery jobs will run.
Monitor Status
The current status of the monitoring job for the network, if configured. The possible statuses are the same as those for discovery.
Description
The description entered in the network definition.