Create the Database
-
Create the database using the DatabaseManagementConsole.exe create command or build the structure in a pre-created database using the populate command.  Show database creation steps.
To run the database creation script, you identify the SQL server and the database name to be created by passing those required parameters with the DatabaseManagementConsole command (see Overview of the Database Management Console). If you're using SQL server authentication, you also pass in authentication credentials with the command.
If you prefer, you may manually create a blank database in SQL ahead of time and then use the populate command to build the appropriate structure in the database.
Tip: If you do not already have a PowerShell window open as administrator, open a PowerShell window and prepare to execute commands as follows:
- Open a PowerShell window using the “Run as administrator” option.
Navigate to the installation directory. By default, this directory is:
C:\Program Files\Keyfactor\Keyfactor AnyGateway\
To create or populate the AnyCAGateway DCOM database, from the command line at the installation directory execute a command similar to:
.\DatabaseManagementConsole.exe create --server <Database-Server>\<SQL-Instance>,<Port> --database <Database>
For example, to create a new database using the default instance and port (using appropriate values for the server name and database name):
.\DatabaseManagementConsole.exe create --server sqlsrvr.keyexample.com --database CAGateway
For example, to create a new database using the default instance and port and specify an Active Directory service account for the gateway service (using appropriate values for the server name, database name, Active Directory service account name, and password):
.\DatabaseManagementConsole.exe create --server sqlsrvr.keyexample.com --database CAGateway --service-user KEYEXAMPLE\svc_kyfgateway --service-password MySecurePassword
For example, to populate a pre-created database using a custom instance and port (using appropriate values for the server name, database name, instance name, and port):
.\DatabaseManagementConsole.exe populate --server sqlsrvr.keyexample.com\MyInstance,1434 --database CAGateway
For example, to create a new database using the default instance and port and SQL authentication (using appropriate values for the server name, database name, username, and password):
.\DatabaseManagementConsole.exe create --server sqlsrvr.keyexample.com --database CAGateway --username MySQLUser --password MySecurePassword
A confirmation message will be returned: "Database successfully created." or "Database successfully populated." If desired, you can validate that the database was created or populated correctly (see Appendix - Verify the AnyCAGateway DCOM Database).
See Overview of the Database Management Console for more information on the parameters available for creating the AnyCAGateway DCOM SQL database. For instance, the --service-default option can be used when SQL authentication is used to create the database (the --username and --password parameters), but you want to revert to using NETWORK SERVICE to operate the gateway rather than the SQL account specified to create the database.
Important: If you opt to specify the --service-username or --username (and related password) option, the account you reference must exist in SQL before you execute the command in order for permissions to be configured correctly on the database.
Tip: You have the option to provide the parameters
(e.g., server and database values) in a JSON configuration file or via environment variable, if desired, rather than with command-line flags. See
Overview of the Database Management Console.
Note: If you are using clustering, run the
create command only once, from the owner node. Once you have created the database, you must grant access in SQL to each of the other nodes in the cluster (see
Appendix - Verify the AnyCAGateway DCOM Database). By default, only the node from which the database is created is given permissions in SQL via the script.
Note: A login and database permissions in SQL Server will be set by the script for the machine account of the server on which you are running the script unless you override this with parameters.
Note: In a multi-tenancy installation, one
AnyCAGateway DCOM database will be used for all configured (s), which will be distinguished by the logical names you give them during the configuration process. For more information, see
Appendix - Multi-Tenancy Environments.
Import PowerShell cmdlets
-
Import the gateway PowerShell configuration cmdlets. You will need to do this any time you return to run any of the PowerShell cmdlets. Show cmdlet import steps.
To import the PowerShell cmdlets:
- If you do not already have a PowerShell window open as administrator, open a PowerShell window using the "Run as administrator" option.
-
Navigate to the installation directory. By default, this directory is:
C:\Program Files\Keyfactor\Keyfactor AnyGateway\
-
Import the PowerShell configuration cmdlets module.
Import-Module ".\ConfigurationCmdlets.dll"
The Import-Module command is a standard PowerShell command. The configuration cmdlets DLLs were delivered to the installation directory during installation. This command imports them into the current PowerShell session.
For more information about the PowerShell cmdlets, see PowerShell Cmdlets for Configuration.
Set the Encryption Certificate
-
Create a self-signed encryption certificate and set permissions on the certificate, using the Set-KeyfactorGatewayEncryptionCert cmdlet. Show encryption certificate steps.
To set the encryption certificate, run the Set-KeyfactorGatewayEncryptionCert cmdlet as follows:
Set-KeyfactorGatewayEncryptionCert
For more information about the Set-KeyfactorGatewayEncryptionCert cmdlet, see Set-KeyfactorGatewayEncryptionCert.
Note: If you are using clustering, run the Set-KeyfactorGatewayEncryptionCert cmdlet on each node of the clustered environment.
Tip: If an existing gateway encryption certificate exists in the local machine store on the server on which you are installing the AnyCAGateway DCOM with sufficient remaining validity (from either an earlier installation of the AnyCAGateway DCOM or an installation of one of the other Keyfactor gateways that generates an encryption certificate) this existing certificate will be used to encrypt the sensitive data for the CA connection and a new certificate will not be generated.
Note: If a
CA Gateway Config Encryption certificate exists in the gateway machine's personal store and it has expired, the users can still retrieve the JSON configuration file because the decryption of the encrypted data will still be performed, and it will continue to allow access going forward, as long as no changes are made to the sensitive data in the JSON configuration file.
If a change is required to any of the "secrets" values in the JSON configuration file, or updates to the database connection string, you must have an active/unexpired
CA Gateway Config Encryption certificate in order to encrypt sensitive data and save the JSON config file. In this case, you must obtain a new certificate. Visit the
Keyfactor Support Portal(opens page in a new tab) to open a support ticket for assistance with this task. See the
CA Authentication Section for more information about this section of the JSON configuration file.
Load a Variable with SQL Credentials
-
If you have opted to use SQL Server Authentication, create a prompt to enter a username and password for SQL and load those SQL credentials into a variable using the following PowerShell command:
$account = Get-Credential
You will use this variable in the next step, so don't close the PowerShell window.
Skip this step if you are using Windows authentication.
Set the Database Connection String
-
Set the connection string the AnyCAGateway DCOM will use to communicate with your Gateway SQL database using the Set-KeyfactorGatewayDatabaseConnection cmdlet. Show database connection steps.
-
To set the connection strings using Windows Authentication, run the Set-KeyfactorGatewayDatabaseConnection cmdlet with a command similar to the following:
Set-KeyfactorGatewayDatabaseConnection -Database <Database> -Server <Database-Server>\<SQL-Instance>,<Port>
For example, using the default instance and port (using appropriate values for the server name and database name):
Set-KeyfactorGatewayDatabaseConnection -Database CAGateway -Server sqlsrvr.keyexample.com
For example, using a custom instance and port (using appropriate values for the server name, database name, instance name, and port):
Set-KeyfactorGatewayDatabaseConnection -Database CAGateway -Server sqlsrvr.keyexample.com\MyInstance,1434
-
To set the connection strings using SQL Authentication, run the Set-KeyfactorGatewayDatabaseConnection cmdlet with a command similar to the following:
Set-KeyfactorGatewayDatabaseConnection -Database <Database> -Server <Database-Server>\<SQL-Instance>,<Port> -Account $account
For example, using the default instance and port (using appropriate values for the server name and database name and the $account variable you generate in the previous step):
Set-KeyfactorGatewayDatabaseConnection -Database CAGateway -Server sqlsrvr.keyexample.com -Account $account
The -Account is required if you are using SQL authentication.
For more information about the Set-KeyfactorGatewayDatabaseConnection cmdlet, see Set-KeyfactorGatewayDatabaseConnection.
Important: If you're upgrading from a AnyCAGateway DCOM version 20.x or earlier, stop after completing this step and return to the upgrade instructions (see Upgrading from AnyCAGateway DCOM Version 20.x or Earlier).
Note: If you are using clustering, run the Set-KeyfactorGatewayDatabaseConnection cmdlet on each node of the clustered environment.
Note: The database version will be validated when you save the connection string. If, for some reason, there is a database version mismatch, the connection string will be successfully set to the old database, but no further action can be taken. You won't be able to run the configuration cmdlets, run a sync, etc. until the database is successfully upgraded. There will be errors in the logs indicating that the database needs to be upgraded. In that case, run the Database Management Console
upgrade command from the PS prompt (see
Overview of the Database Management Console).
Create a JSON Configuration File
-
The AnyCAGateway DCOM uses a JSON configuration file in place of a GUI configuration wizard. For a new install, you generate a new, default configuration file, customize it as needed, and import the information in it to your SQL database. For a configuration change, you export the existing data from SQL to a JSON file, modify it as needed, and reimport it. This process replaces the configuration wizard GUI interface used in previous releases of the gateway.
Generate a JSON Configuration File
The JSON file is created with the Get-KeyfactorGatewayConfig cmdlet. This file is saved to the location and file name specified in the -FilePath parameter when you executed the command. The same cmdlet is used whether you are creating a new file or exporting existing configuration for modification on upgrade (using different parameters). Show get configuration steps.
The Get-KeyfactorGatewayConfig cmdlet can be used to generate a new, default configuration file that you can customize and then import into your SQL database and it can be used to export the current configuration from an already configured SQL database. For a new install, you will use it to create a default configuration file.
To generate a configuration file, run the Get-KeyfactorGatewayConfig cmdlet with a command similar to the following:
Get-KeyfactorGatewayConfig -CAHostname <Gateway FQDN> -FilePath <JSON FilePath>
For example, to create a new, default configuration file that you can customize for a new installation (using appropriate values for the gateway and the configuration file output path and filename):
Get-KeyfactorGatewayConfig -CAHostname mygateway.keyexample.com -FilePath C:\Temp\AnygatewayConfig.json
For example, to export the current configuration from the SQL database for review and possible modification and reimport (using appropriate values for the gateway hostname, the configuration file output path and filename, and the assigned to the gateway CA during configuration—see Edit the JSON Configuration File):
Get-KeyfactorGatewayConfig -CAHostname mygateway.keyexample.com -FilePath C:\Temp\AnygatewayConfig.json -LogicalName MyGateway
Important: The Get-KeyfactorGatewayConfig does not write any file output if no -FilePath parameter is specified.
Note: If you are using clustering, enter the name of the cluster role rather than an individual host name (e.g., AnyGateway.keyexample.com) for the -CAHostname value.
You can also see the content of the configuration in the PowerShell window when you specify the -LogicalName parameter.

Figure 632: View Configuration Settings in PowerShell
Note: A PowerShell variable can be used to modify the gateway configuration directly from the PowerShell command line. For example:
$config = Get-KeyfactorGatewayConfig -CAHostname $FQDN -LogicalName $LogicalName
For more information about the Get-KeyfactorGatewayConfig cmdlet, see Get-KeyfactorGatewayConfig.
Edit the JSON Configuration File
Once you have created either a fresh JSON configuration file for a new install or exported your existing configuration to a JSON configuration file in preparation for an upgrade (see Generate a JSON Configuration File), you are ready to edit the actual configuration. Show JSON file configuration steps.
Note: If you are editing this file from the registry export, you will need to modify the templates section to change the Product ID field to replace the Keyfactor displayname of the product with the DigiCert product code.
To configure your gateway, use a text editor to open the JSON file that is created with the Get-KeyfactorGatewayConfig cmdlet and modify each of the following sections:
Security Section
The security section is used to define which domain accounts can access the AnyCAGateway DCOM and what level of permissions those users will have. To add authenticated users, you will need to edit them to make them available to the domain. The permission levels can be understood in the context of the standard Microsoft CA permission levels:
- READ
Enumerate and read contents of certificates. This is the equivalent of the Microsoft CA Read permission.
- ENROLL
Request certificates from the CA. This is the equivalent of the Microsoft CA Request Certificates permission.
- OFFICER
Perform certificate functions such as issuance and revocation. This is the equivalent of the Microsoft CA Issue and Manage Certificates permission.
- ADMINISTRATOR
Configure/reconfigure the gateway. This is similar to the Microsoft CA Manage CA permission.
Valid permission settings are Allow, None, and Deny. Security can be defined at the user or group level. Deny overrides any Allow permissions. None does not grant permissions, but it also does not deny them.
Permission for users and groups needs to be set as follows:
- Users who will manage the configuration of the AnyCAGateway DCOM need “ADMINISTRATOR”: “Allow” permissions.
- Users who will enroll for certificates from the AnyCAGateway DCOM need “READ”: “Allow” and “ENROLL”: “Allow” permissions.
-
Users who will revoke certificates or approve or deny pending certificates outside of Keyfactor Command need “READ”: “Allow” and “OFFICER”: “Allow” permissions.
-
If you’re using Keyfactor Command, the service account under which the application pool on the Keyfactor Command Management Portal server is running needs “READ”: “Allow” permission and the service account under which the Keyfactor Command (a.k.a. timer) service is running needs "READ": “Allow” permission. “READ”: “Allow” permission is needed for the application pool account to allow the Keyfactor Command Management Portal to display the status of the gateway as "online" on the Keyfactor Command Management Portal dashboard.
-
If you’re using Keyfactor Command and plan to use the renewal event handler in expiration alerts, the service account under which the Keyfactor Command service is running needs “ENROLL”: “Allow” permission and the service account under which the application pool on the Keyfactor Command Management Portal server is running needs “ENROLL”: “Allow” permission if you want to test alerts.
- Depending on your configuration choice for Kerberos delegation for the AnyCAGateway DCOM (see Configure Kerberos Delegation (Optional)), you need one of these:
-
If you’re using Keyfactor Command and you are not planning to use Kerberos delegation for the AnyCAGateway DCOM, the service account under which the application pool on the Keyfactor Command Management Portal server is running needs “READ”: “Allow” and “OFFICER”: “Allow” permissions.
-
If you’re using Keyfactor Command and you are planning to use Kerberos delegation for the AnyCAGateway DCOM, the users who will perform revocation and (approve/deny pending certificates) through the Keyfactor Command Management Portal need "READ": "Allow" and “OFFICER”: “Allow” permissions.
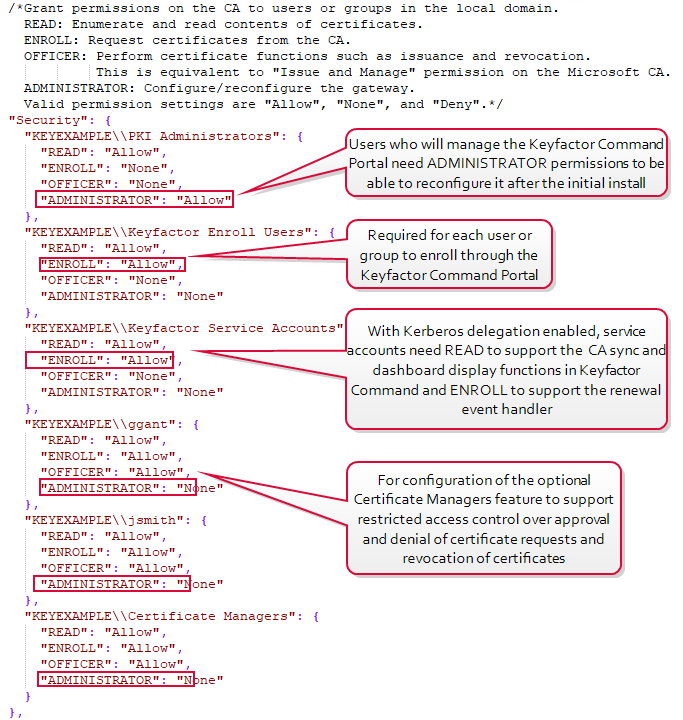
Figure 633: JSON Configuration File Security Settings in a Kerberos Delegation Environment
CA Authentication Section
This section defines the details for connecting the third party CA to the AnyCAGateway DCOM and allowing the AnyCAGateway DCOM to authenticate to the CA. Please consult the Keyfactor AnyCA Gateway DCOM account configuration to determine which details to populate to authenticate to the AnyCAGateway DCOM. In a multi-tenancy situation, this will be specific for each separate CA and require separate configurations for each (see Appendix - Multi-Tenancy Environments).
Important: Secrets
In order to secure the sensitive information about your connection to the CA gateway, Keyfactor AnyCA Gateway DCOM employs secret functionality. The fields that are determined to be secret by the Keyfactor AnyCA Gateway DCOM interface are specific to each third party gateway. The secret works by storing the sensitive data with the file but displaying a blank, commented out line in place of the actual information.
During a new install:
- The secret element fields will be shown at the top of the CAConnection section with no value. Which fields are shown depends on the specific requirements of the interface to the CA being configured.
- The secret fields will accept the values you provide.
- Once the configuration is set (see Import the JSON Configuration File), the secret will show as blank and commented out, however the value, although hidden, will be retained through any other changes to the file, as long as no changes are made to it, and it is still commented out when it is saved.
- Values stored in a secret field can be changed by uncommenting the field and providing a new value, then saving the file and running Set-KeyfactorGatewayConfig with the -FilePath parameter.
During an upgrade from a gateway version of 20.x or earlier:
- The secret elements will initially appear in plain text in the JSON configuration file created during the Registry Export step. See Upgrading AnyCAGateway DCOM prior to Version 20.x.
- Once the configuration is set (see Import the JSON Configuration File), the secret will show as blank and commented out, however the value, although hidden, will be retained through any other changes to the file, as long as no changes are made to it, and it is still commented out when it is saved.
- Values stored in a secret field can be changed by uncommenting the field and providing a new value, then saving the file and running Set-KeyfactorGatewayConfig with the -FilePath parameter.
The following areis considered a secret elements:
Note: Any sensitive information in the CA connection section of the configuration file are encrypted using the encryption certificate identified in the
Set the Encryption Certificate step.
- Username
The username used to authenticate to the CA. For Entrust, this is the user associated with the key generated as part of the step of created a client certificate and API key (see Acquire a Client Authentication Certificate and API Key).
- Password
The password used to authenticate to the CA.
- APIKey
The APIKey for the CA Account (seeCreate API KeysAcquire a New Client Authentication Certificate 1).
The following non-secret parameters are found in this section:
- EndEntityProfileName
The name of the end entity profile in the EJBCA database that should be used for certificate synchronization and .
- CertificateAuthorityName
The logical name of the EJBCA CA.
- ClientCertificate StoreName
For client certificate authentication, the store name where the client certificate is located (e.g., My for the Personal store).
- ClientCertificate StoreLocation
For client certificate authentication, the store location where the client certificate is located (e.g., LocalMachine for local computer).
- Client Certificate Thumbprint
For client certificate authentication, the thumbprint of the client authentication certificate used to authenticate to the cloud provider database for synchronization, enrollment and management of certificates. See Install a Client Authentication Certificate.
- URL
The URL points to the cloud provider CA.
- Email, Name and PhoneNumber
Default values for the email address, name and phone number submitted to Entrust with an enrollment.Note: If an email is not provided in the subject during enrollment (see
Using the AnyCAGateway DCOM in Keyfactor Command), a value for this will be pulled from the SQL database as configured with the JSON configuration file. The default value for the email is configured in the CA section of the JSON file. Default values for the name and phone number submitted with the request are configured either in the CA configuration or the specific configuration section of the JSON file (see
Templates Section). If values for these are configured on a template, these override the settings at the CA level.
- Additional Parameters
Additional parameters, if any, will vary as required by the CA.
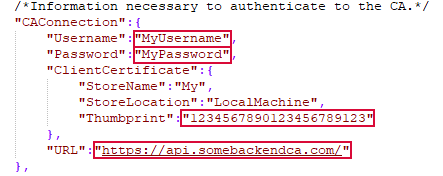
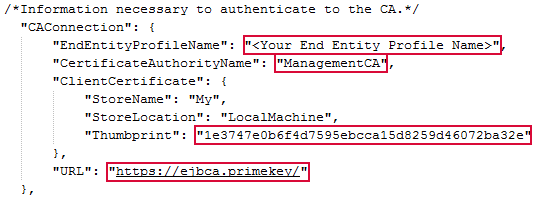

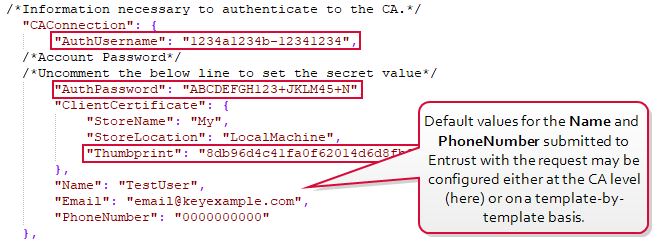
Figure 634: JSON Configuration CA Authentication Settings
Templates Section
In the templates section of the configuration file you create a mapping between Active Directory templates you have created for use with the AnyCAGateway DCOM and certificate types that the CA can issue. This section must have at least one mapping of a real AD template to AnyCAGateway DCOM productID, even if you are not intending to use enrollment functionality. If you do not plan to use enrollment through the gateway, do not allow or enrollment for that template within Keyfactor Command.
Note: For a new Digicert installation, this is a two-step process. First, enter a placeholder template type and productID in the template section. This will allow you to retrieve the product types specific to your Digicert account which will display in the error log and commented out on the JSON file. You will then modify the templates section with the actual types and productIDs. See
Retrieving Product IDs.
For an upgrade from version 20.x or earlier of AnyCAGateway DCOM, the template section will need to be changed from Keyfactor Command's product displayname to the AnyCAGateway DCOM's product code. See Upgrading AnyCAGateway DCOM prior to Version 20.x.
The templates section takes the following input for any templates and certificate types you wish to use with the cloud provider CA:
- Replace MyTemplateShortName (within first level quotes of the templates section) with the short name (often the name with no spaces) of the certificate template in Active Directory created or selected for use with the AnyCAGateway DCOM (see Create or Identify Templates).
- Add the AnyCAGateway DCOMProductID name on the ProductID line (within the quotes) as it is defined in the CA. For EJBCA, these will be certificate profiles configured for support on the end entity profile that you configure in the CA Authentication section.
-
Available ProductIDs will depend on your Entrust account's inventory. Show supported IDs
The following product IDs are supported:
-
STANDARD_
-
ADVANTAGE_SSL
-
UC_SSL
-
EV_SSL
-
QWAC_SSL
-
PSD2_SSL
-
WILDCARD_SSL
-
PRIVATE_SSL
-
PD_SSL
-
CODE_SIGNING
-
EV_CODE_SIGNING
-
CDS_INDIVIDUAL
-
CDS_GROUP
-
CDS_ENT_LITE
-
CDS_ENT_PRO
-
SMIME_ENT
-
The Lifetime parameter is optional and represents the certificate duration in months. If not provided, default is 12 months.
-
The CertificateUsage parameter is required for public SSL certificate types, and represents the key usage for the certificates enrolled against this template. Valid values are “server”, “client”, or “serverclient”. Do not provide this value for cert types that are not public SSL.
Important: A new required parameter, CertificateUsage, has been added to the template section of the JSON file for public SSL certificate types (as the gateway plugins no longer have access to AD to read that from the template). A JSON error will occur if that new parameter is not supplied.
- Using the Parameters settings, parameters can be added to the templates, if the CA requires them, by defining Param1 and Param2 values. The AnyCAGateway DCOM CA does not make use of parameters. These fields can be ignored or removed if they show in your configuration file. For Entrust, the parameters may be used to configure the Name and Phone Number submitted to Entrust with the request on a template-by-template basis. This overrides the Name and PhoneNumber settings configured at the CA level (see CA Authentication Section). Notice that when the phone number is configured in the template section, the parameter name is Phone Number but when it is configured in the CA section, the parameter name is PhoneNumber. The parameters are configured as shown in Figure 635: JSON Configuration File Templates Section.
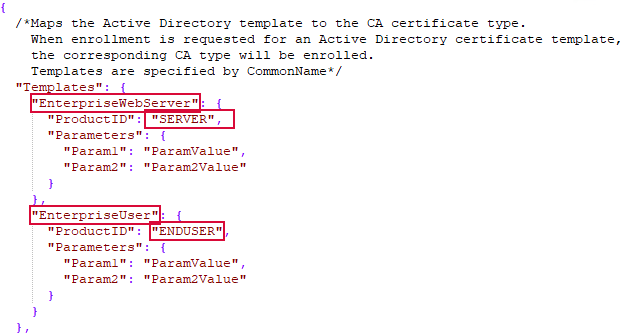
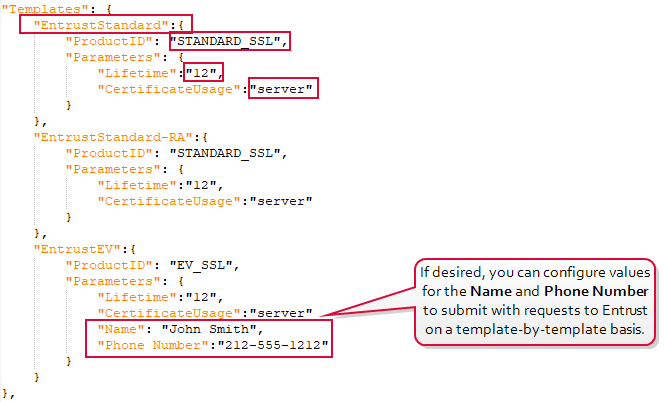
Figure 635: JSON Configuration File Templates Section
Keyfactor Command Connection Section (optional)
If you have mapped a template in the Templates Section that populates from AD (see Build from AD Template), the gateway must establish a connection to a valid Keyfactor Command instance to ensure there is a valid license. The most common application of this would be for auto-enrollment.
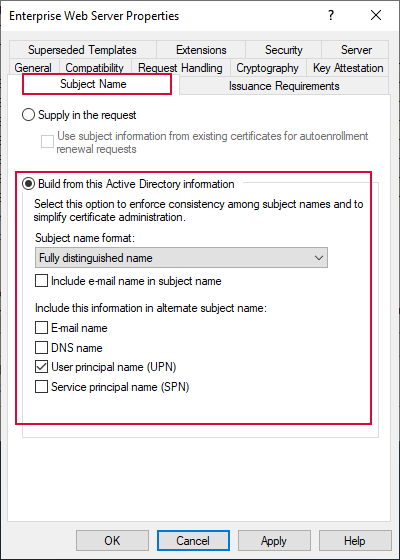
Figure 636: Build from AD Template
Add this section to the JSON File.

Figure 637: JSON File Command Connection Section
- ApiUrl: The URL to the Keyfactor API.
- UseDefaultCredentials: False - Indicates Basic auth will be used. True - indicates that Windows auth will used.
- Username: (*required only if using Basic auth) The username with which to authenticate.
- Password: (*required only if using Basic auth) The user's password.
Note: The authentication scheme specified in the CommandConnection section must match the authentication scheme the Keyfactor API uses (Windows or Basic Auth).
When the Set-KeyfactorGatewayConfig cmdlet is run it will check the connection defined in this section, if this section is enabled. In the case that a valid license is not found the following error message will be displayed for Set-KeyfactorGatewayConfig.
"Message:" "License Check Failed. At least one of the required features were licensed."
Certificate Managers Section (Optional)
Note:
If you are NOT using the Certificate Managers section, the open and close curly brackets { } need to be replaced with
null:

The Certificate Managers section is used to control which certificate actions (e.g., approve and deny certificate requests and revoke certificates) your certificate managers (users with the "OFFICER": "Allow" permission) can take on certificates managed through the AnyCAGateway DCOM. If you don't edit this section, all certificate managers for this AnyCAGateway DCOM will be able to take all supported actions on all certificates and certificate requests for this AnyCAGateway DCOM.
Note: If the certificate managers option is enabled, all users or groups granted OFFICER permissions under the security section must be configured for at least one template and one requester. Use “All” to specify all templates. Use “Everyone” to specify all requesters. Valid permission values are “Allow” and “Deny”.
This section is provided as disabled (commented out) by default as this is an optional configuration.
The Certificate Managers configuration section has three sections for controlling what certificate actions certificate managers can take:
- The CertificateManagers section: At the top level, this is an Active Directory user or group that has been granted the “OFFICER”: “Allow” permissions in the Security section of the configuration file. This is the user or group acting upon the certificate requests and certificates. In the configuration file example snippet, this appears as DOMAIN\\Username.
- Templates section: At the middle level, this is the Active Directory template or templates, identified by short name, that the restrictions in this section will apply to. The template must be in the template list in the Templates section of the configuration file. Enter a separate section for each template and “<All>” for all other templates that do not have specific restrictions. In the configuration file example snippet, this appears as MyTemplateShortName.
- The Requesters section: At the lowest level, this is the Active Directory user that requested the certificate—or an Active Directory group containing that user—that the certificate manager is attempting to act upon. You can list individual users/groups or use Everyone to apply the restriction to all users. Enter Allow or Deny to apply the restrictions. See examples below. In the configuration file example snippet, this appears as “Everyone”:“Allow” and “DOMAIN\\Groupname”:“Deny”.
Example: All members of the Certificate Managers Active Directory group need to have permissions to approve and deny certificate requests for all templates except your web server certificate template that requires manager approval. To configure this, make sure the Certificate Managers group has been granted
“OFFICER”: “Allow” permissions in the Security section of the configuration file (see
Figure 633: JSON Configuration File Security Settings in a Kerberos Delegation Environment). In the Certificate Managers section of the file, make a copy of the example certificate manager configuration snippet and configure it with the short template name for the ECC web server template that requires manager approval in place of
MyTemplateShortName in the example. In the Requesters section under this template, set
“Everone”:“Deny”, remove the comma at the end of that line, and remove the line referencing
“DOMAIN\\Groupname”:“Deny” just below this. Leave the section that sets templates
“<All>” to
“Requesters”“Everyone”:“Allow”. This will allow the members of the Certificate Managers group to act on certificate requests for all templates other than the specifically called out WebServer2012ECC-RA template.
Copy"KEYEXAMPLE\\Certificate Managers":{
"Templates":{
"WebServer2012ECC-RA":{
"Requesters":{
"Everyone":"Deny"
}
},
"<All>":{
"Requesters":{
"Everyone":"Allow"
}
}
}
}
Example: Certificate manager Gina Gant is allowed to approve and deny certificate requests and revoke certificates for the ECC web server certificate template that requires manager approval except when the certificate was requested by CTO John Smith. To configure this, make sure that Gina has been granted
“OFFICER”: “Allow” permissions in the Security section of the configuration file (see
Figure 633: JSON Configuration File Security Settings in a Kerberos Delegation Environment). In the Certificate Managers section of the file, make a copy of the example certificate manager configuration snippet and configure it with the short template name for the ECC web server template that requires manager approval in place of
MyTemplateShortName in the example. In the Requesters section under this template, set
“Everone”: “Allow” and in the line referencing
“DOMAIN\\Groupname”: “Deny” just below this replace DOMAIN\\Groupname with KEYEXAMPLE\\jsmith. Leave the section that sets templates
“<All>” to
“Requesters”“Everyone”: “Allow”. This will allow Gina to act on certificate requests for all templates other than the specifically called out WebServer2012ECC-RA template.
If both example one and example two are configured, Gina cannot be a member of the Certificate Managers group, since deny permissions override allow permissions.
Copy"KEYEXAMPLE\\ggant":{
"Templates":{
"WebServer2012ECC-RA":{
"Requesters":{
"Everyone":"Allow",
"KEYEXAMPLE\\jsmith":"Deny"
}
},
"<All>":{
"Requesters":{
"Everyone":"Allow"
}
}
}
}
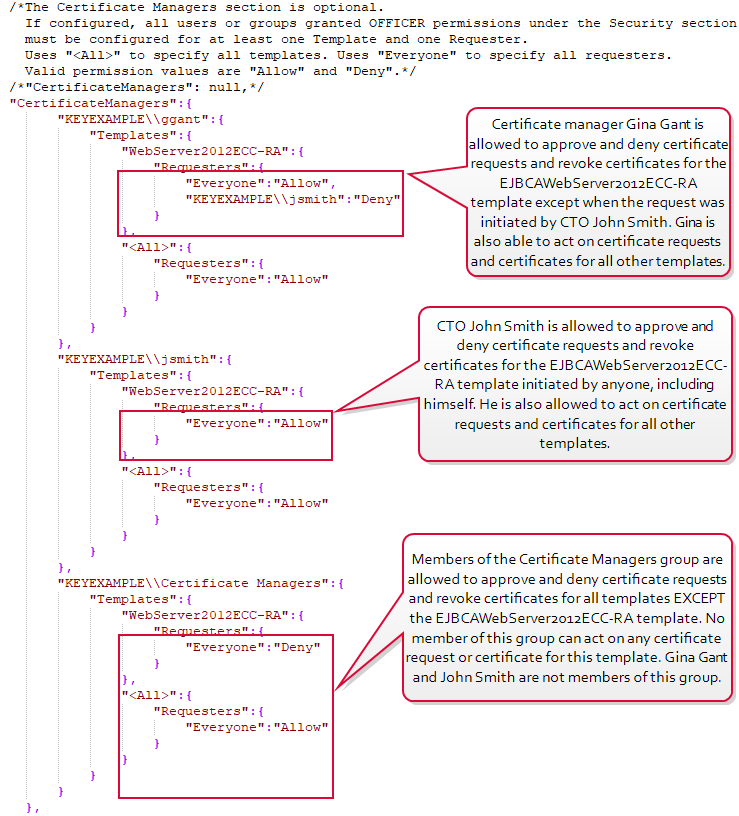
Figure 638: Configure Certificate Managers
Tip: In
Figure 638: Configure Certificate Managers, the section for CTO John Smith is shown with template WebServer2012ECC-RA set to “Everyone”:”Allow” and template “<All>” set to “Everyone”: “Allow”. The separate section for template WebServer2012ECC-RA is not actually necessary in this case, as the allow permissions for it would fall under the <All> functionality, but it is called out for clarity since specific permissions are set in the file for other certificate managers on this template. The functionality is the same either way.
Gateway Connection Section
In the gateway connection section, define the logical name to use and provide certificate information for the intermediate chain certificate you acquired from the CA (see Acquire and Install a Chain Certificate). The certificate will be validated by the AnyCAGateway DCOM configuration program when it is saved, so it must be installed in the referenced store on the AnyCAGateway DCOM server prior to completing this step.
- LogicalName
The logical name being defined for the AnyCAGateway DCOM for this CA (e.g., AnyGatewayCA). This name will be used when referencing the AnyCAGateway DCOM from Keyfactor Command and, optionally, registering the AnyCAGateway DCOM as an enrollment services object in Active Directory to make it discoverable as a CA in the environment. The logical name must be unique for each CA.
- GatewayCertificate StoreName
The store name where the chain certificate from the CA is located (e.g., CA for the Intermediate Certification Authorities store or Root for the Trusted Root Certification Authorities store).
- GatewayCertificate StoreLocation
The store location where the chain certificate from the CA is located (e.g., LocalMachine for local computer).
- GatewayCertificate Thumbprint
The thumbprint of the intermediate or root chain certificate from the CA.
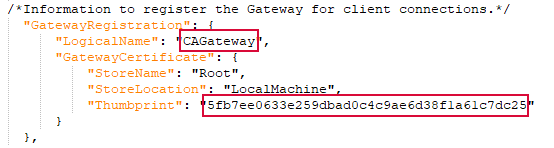
Figure 639: JSON Configuration File Gateway Connection
Service Settings Section
The service settings include:
-
ViewIdleMinutes
Defines how often, in minutes, the gateway's view of the certificate records during synchronizations between the AnyCAGateway DCOM and Keyfactor Command is refreshed. If this value is set to a small number, the view will need to be opened, closed, and reopened frequently, but new changes to certificates that occur in Keyfactor Command during the course of synchronization will be recognized by the gateway sooner and synchronized faster. If this value is set to a larger number, the view will not need to be refreshed as often, but you may need to wait longer to see changes that occurred during synchronization (e.g., revocation) appear on the gateway. By default this value is set to 8 minutes and does not need to be changed in most environments.
-
FullScanPeriodHours
Defines how often, in hours, the AnyCAGateway DCOM will perform a full synchronization from the cloud provider. The default is 24 hours, but can be changed here, if necessary, by editing the value for FullScanPeriodHours. The minimum value is 1. A full scan reads all the certificates and certificate requests in the cloud provider database and synchronizes them to gateway regardless of their current state in the gateway database.
-
PartialScanPeriodMinutes
Defines how often, in minutes, the AnyCAGateway DCOM will perform partial or incremental synchronizations from the cloud provider. The default value is 10, but can be changed here, if necessary, by editing the value for PartialScanPeriodMinutes. A partial scan reads the certificates and certificate requests in the cloud provider database that have been generated since the last full or partial scan and synchronizes them to the gateway.
-
CertificatePruningConfiguration
Defines whether to remove aged certificates from the gateway database, and if so how aged. May take one of three values: Disabled, FromIssuance, and FromExpiration. The default is Disabled. If CertificatePruningConfiguration has a value of FromIssuance or FromExpiration, an additional property called CertificatePruningAgeOutDays is required, which must be an integer greater than or equal to 0. If CertificatePruningConfiguration is set to Disabled, the value (if any) of CertificatePruningAgeOutDays is ignored.
If CertificatePruningConfiguration is set to Disabled, then no pruning occurs. If CertificatePruningConfiguration is set to FromIssuance or FromExpiration, the gateway prunes certificates every time it runs a full synchronization except for the first full synchronization after installation. So as to prevent repeatedly syncing and pruning certificates, any certificate that would be pruned is skipped during a synchronization.
When pruning, the service first computes an age out date by subtracting CertificatePruningAgeOutDays from the current UTC date and time. Then, depending on whether CertificatePruningConfiguration is set to FromIssuance or FromExpiration, it gets certificates whose ResolutionDate or NotAfter date are older than the age out date or certificate records that have null values for either of these columns but include certificate data. If the relevant date has a value, the certificate record is deleted. Otherwise, the certificate itself is parsed and the relevant date is checked again. If it is older than the age out date, the certificate is deleted; otherwise, it's updated with the correct ResolutionDate and NotAfter date. Up to five errors may occur during pruning before the process is terminated.
Note: Upon, gateway upgrades, the CertificatePruningConfiguration in the configuration file will be set to the default value of Disabled.
Copy
JSON Configuration File Service Settings
{
   "ServiceSettings":{
      "ViewIdleMinutes": 8,
      "FullScanPeriodHours": 24,
      "PartialScanPeriodMinutes": 10,
      "CertificatePruningConfiguration": "FromIssuance",
      "CertificatePruningAgeOutDays": 7
    }
 }
Once the JSON file configuration is complete, use the Set-KeyfactorGatewayConfig cmdlet to import the configuration (see Import the JSON Configuration File).
Important:
Retrieving Product IDs
If you don't know the correct product IDs to configure in the JSON configuration file, you will need to run the Set-KeyfactorGatewayConfig cmdlet twice in order to retrieve the available product types for your gateway account. This is because different customer accounts could potentially have enrolled with different products.
To do this:
- First, modify the JSON configuration file to match your configuration, but enter a placeholder template name and productID in the template section. The placeholder template name you enter here must be valid for your environment (e.g., EnterpriseWebServer not the default value of MyTemplateShortName found in the initial configuration file). The placeholder productID should be one of the valid product IDs shown in the comments at the top of the template section in the JSON configuration file. These product IDs may not all be valid for your environment, but the next step must be completed with a valid product ID to avoid an error. See Templates Section.
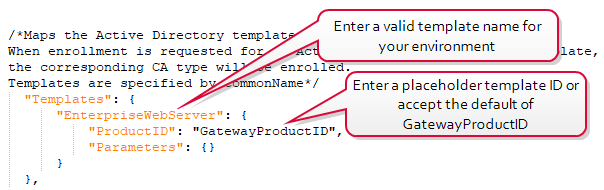
Figure 640: Enter a Valid Template Name and Placeholder Product ID
- Make a copy of your JSON file after editing as a backup since the Get-KeyfactorGatewayConfig cmdlet will overwrite the file if you use the same file name.
-
Run the Set-KeyfactorGatewayConfig cmdlet with the -FilePath and -LogicalName parameters to import the data from your JSON file (see Import the JSON Configuration File. For example:
Set-KeyfactorGatewayConfig -CAHostname CA24.keyexample.com -LogicalName CAGateway -FilePath C:\AnygatewayConfig.json
This will authenticate the CA connection and access the available Product IDs for the specific account identified in the configuration JSON.
Note: This will result in an error if the configuration file contains a placeholder template ID and the
AnyCAGateway DCOM configuration will not have been saved to the database. Review the error output at either the command line or in the log for the list of valid product IDs. For example:
Set-KeyfactorGatewayConfig : Error while trying to send configuration to gateway: The product ID 'GatewayProductID'
does not exist. The following product IDs are valid: ssl_plus, ssl_multi_domain, ssl_wildcard, ssl_ev_plus,
ssl_ev_multi_domain, cloud_dv_geotrust, ssl_ev_securesite_pro, ssl_securesite_pro
Note: The available product IDs that are valid for your account will be retrieved and will be displayed as a commented-out line in the templates section of the JSON configuration file when you do a Get-KeyfactorGatewayConfig in the next step. All of the other configuration details will be saved to the database. The available product IDs also appear in the gateway log's message.
-
Run the Get-KeyfactorGatewayConfig using the -FilePath and -LogicalName parameter values you used in step c).
Get-KeyfactorGatewayConfig -CAHostname CA24.keyexample.com -LogicalName CAGateway -FilePath C:\AnygatewayConfig.json
This will retrieve the JSON configuration with the saved configuration from step a) with the addition of the product IDs available for the account identified.
-
Modify the templates section of the JSON configuration file by creating a template section for each product ID and populating the product ID fields from the list of product IDs along with valid template names for your environment.

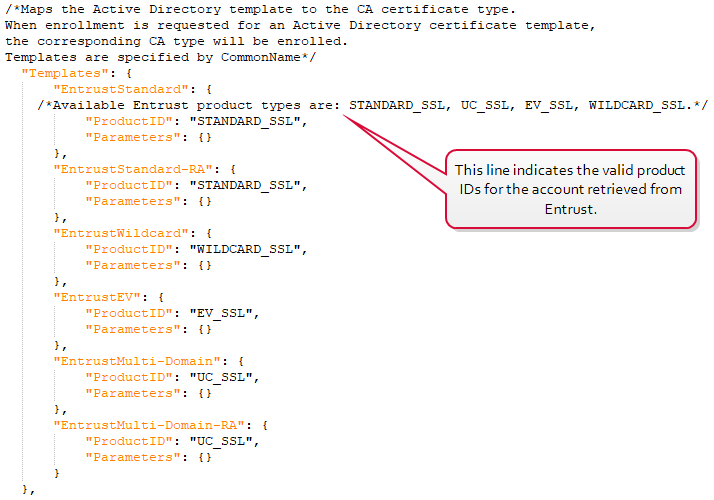
Figure 641: Enter Valid Template Names and Product IDs for all Products to be Supported
- Run the Set-KeyfactorGatewayConfig cmdlet with the -FilePath and -LogicalName parameters again (see Import the JSON Configuration File). This is the point at which you may wish to publish the CA to Active Directory using the -PublishAD parameter.
Import the JSON Configuration File
-
Once you have finished configuring the JSON file, import the configurations in it to the SQL database using the Set-KeyfactorGatewayConfig cmdlet. Show configuration file import steps.
The Set-KeyfactorGatewayConfig cmdlet includes a number of parameters that can be specified when importing the configurations from your JSON file to SQL. Similarly to the Get-KeyfactorGatewayConfig cmdlet, you specify the hostname and logical name of the gateway CA and the location of the JSON configuration file for import. The Set-KeyfactorGatewayConfig cmdlet also includes options to publish the gateway CA to Active Directory to make it discoverable as a CA in the Active Directory environment or remove it from Active Directory.
To import a configuration file, run the Set-KeyfactorGatewayConfig cmdlet with a command similar to the following:
Set-KeyfactorGatewayConfig -CAHostname <Gateway FQDN> -LogicalName <Gateway CA Logical Name> -FilePath <JSON FilePath>
For example, to import a configured JSON file without publishing it to Active Directory (using appropriate values for the gateway hostname, the configuration file output path and filename, and the logical name):
Set-KeyfactorGatewayConfig -CAHostname mygateway.keyexample.com -LogicalName MyGateway -FilePath C:\Temp\AnygatewayConfig.json
For example, to import a configured JSON file and publish it to Active Directory (using appropriate values for the gateway hostname, the configuration file output path and filename, and the logical name):
Set-KeyfactorGatewayConfig -CAHostname mygateway.keyexample.com -LogicalName MyGateway -FilePath C:\Temp\AnygatewayConfig.json -PublishAD
Important: The logical name you specify here with the -LogicalName parameter must match the LogicalName you configured for this gateway CA in the gateway connection section of the JSON configuration file (see
Gateway Connection Section).
Note: If you are using clustering, enter the name of the cluster role rather than an individual host name (e.g., AnyGateway.keyexample.com) for the -CAHostname value.
For more information about the Set-KeyfactorGatewayConfig cmdlet, see Set-KeyfactorGatewayConfig.
-
Go to the Keyfactor GitHub and navigate to the Install section for the gateway integration you are using to complete the configuration steps.
- Congratulations, you have installed a brand-new instance of the AnyCAGateway DCOM. You may now begin using this CA for all your activities in Keyfactor Command. See Optional Configuration.
