Report Operations
Manage all reporting tasks from a single workspace—create new reports, update existing ones, run ad-hoc executions, and remove reports you no longer need. The Reports panel lists your configured reports and their key details, making it easy to refine definitions, test outputs, and keep your catalog tidy.
Main Menu → Reports
Click each report category to display the reports available within the category.
Supported actions on the Reports panel are:
-
Run Report
Click Run Report to the right of the report you want to run. While in progress, the report will display a spinning Running wheel.
Once complete, the report will be available to view and download, see View/Download Report Output.
-
Click the edit icon
 for the report you wish to modify.
Common fields include:
-
Recurring schedule: Run the report/alert on the half-hour, hourly, every morning (8:00 AM), every evening (4:00 PM), or nightly (11:30 PM). All times are local Hub time and may vary depending on DST.
-
Enabled: Enable/disable running of the report/alert.
-
Report Title: Human-readable title shown at the top of the PDF (if generated).
-
Unique component of output filename: A string that becomes part of the saved filename, which can help to local reports using search (see resulting reports in File Management).
Tip: Be sure to edit the title of the report to distinguish it from the existing reports.When you have made your selections, click Save at the bottom of the
The newly
-
-
Delete a Report
Select the report you wish to delete and click the
 delete icon. A confirmation message will pop-up. Click Delete to delete the report.
 -
At the top of the report panel, click Add New Report. A Create Report dialog will pop-up. Select the report category you wish to add a report for from the Plugin dropdown list. See Reports for a description of each category.
Common fields include:
-
Recurring schedule: Run the report/alert on the half-hour, hourly, every morning (8:00 AM), every evening (4:00 PM), or nightly (11:30 PM). All times are local Hub time and may vary depending on DST.
-
Enabled: Enable/disable running of the report/alert.
-
Report Title: Human-readable title shown at the top of the PDF (if generated).
-
Unique component of output filename: A string that becomes part of the saved filename, which can help to local reports using search (see resulting reports in File Management).
When you have made your selections, click Save at the bottom of the
The newly
-
-
There are multiple ways to view report output:
-
From the Reports panel on the Reports page, the most recent reports will display when you open a report category dropdown. Click the
 or
or  icon next to the report you wish to view.
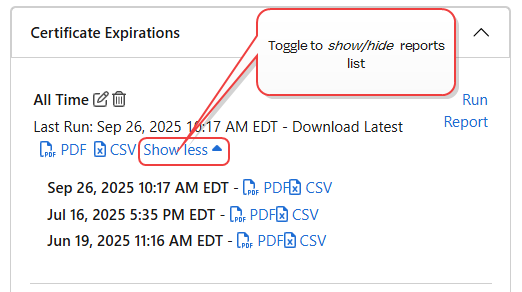
Figure 51: View Reports from the Reports Panel
-
Some reports are also available from the Most Recent Reports panel if the
or icons display next to the report. -
Most reports are also available in File Management. Click the Download link to download the report for viewing.
-
-
Delete Report Output
Previously run reports can be cleaned up in File Management.
Was this page helpful? Provide Feedback