API Keys
Use the API![]() An API is a set of functions to allow creation of applications. Keyfactor offers the Keyfactor API, which allows third-party software to integrate with the advanced certificate enrollment and management features of Keyfactor Command. Keys page to issue and manage credentials for the CipherInsights REST APIs (see REST APIs Overview). API access is role-based; each key carries the permissions of the roles you assign. The APIs are documented by an OpenAPI specification, which can be downloaded on the API Keys page and then imported to Swagger UI, Postman, or other tools that support the OpenAPI specification.
An API is a set of functions to allow creation of applications. Keyfactor offers the Keyfactor API, which allows third-party software to integrate with the advanced certificate enrollment and management features of Keyfactor Command. Keys page to issue and manage credentials for the CipherInsights REST APIs (see REST APIs Overview). API access is role-based; each key carries the permissions of the roles you assign. The APIs are documented by an OpenAPI specification, which can be downloaded on the API Keys page and then imported to Swagger UI, Postman, or other tools that support the OpenAPI specification.
Admin Area → Access Control → API Keys
Use the checkboxes to run actions on one or more API keys. Supported actions on this page are:
-
New API Key: Create a new key for API access (see Create an API Key).
-
Import API Key: Add an existing key (for example, from another Analytics Hub environment). Paste the key and assign the appropriate roles (see Roles). Use this to reuse/standardize automation across hubs.
-
Delete: Permanently revoke the selected key(s). This cannot be undone; any integration using the key will fail.
-
Lock: Temporarily disable the selected key(s) without deleting them—useful for incident response or maintenance. Existing calls using the key will be denied until unlocked.
-
Unlock: Re-enable previously locked key(s). The key value and roles remain the same.
-
Download OpenAPI Spec: Download the OpenAPI specification for the CipherInsights REST API (for use with Swagger UI, Postman, or client code generators).
-
Edit: Open an API key record for editing. The Description, Roles, and Reauthentication timeout may be edited.
Actions may appear as toolbar buttons, links in grid rows, or inside the More actions (![]() ) menu. If you don’t see an action as a button or in the grid, open More actions (
) menu. If you don’t see an action as a button or in the grid, open More actions (![]() ) and look for it there. Availability of actions depends on your selection, item status, and permissions.
) and look for it there. Availability of actions depends on your selection, item status, and permissions.
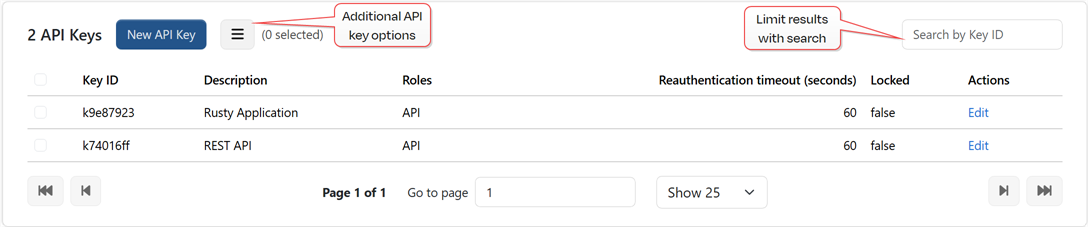
Figure 65: API Keys
Filter the grid using the search, then choose how many items to display in the Rows per page dropdown (e.g., 10, 25, 50). Use the Next/Previous controls to view additional records. Most fields are sortable.
Create an API Key
To add a new API key:
-
Browse to Admin Area → Access Control → API Keys and click New API Key.
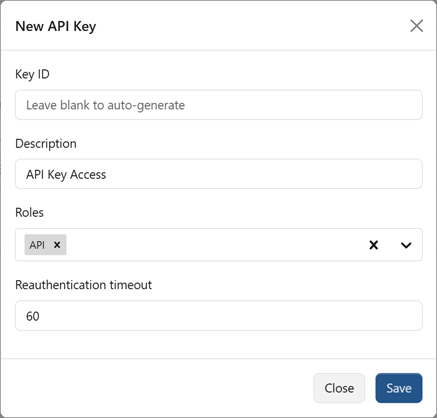
Figure 66: Add New API Key
- In the New API Key dialog, enter a Key ID for the API key, if desired. If you do not enter an ID, one will be generated.
- Optionally, enter a Description. This can be useful for tracking where the API key is intended to be used.
- Select one or more Roles to associate with the key in the dropdown.
- Modify the default Reauthentication timeout of 60 seconds (1 minute), if desired.
-
Click Save to generate the API key. Copy the key now; it won’t be shown again after you close the dialog.
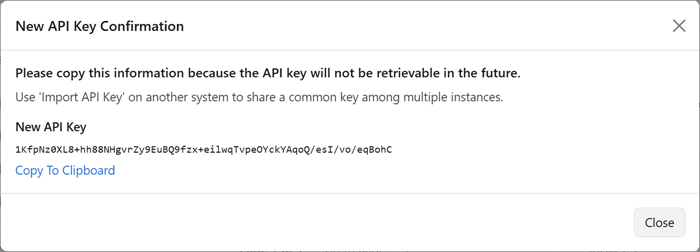
Figure 67: New API Key Confirmation
Was this page helpful? Provide Feedback