
If you’ve opted to use Keycloak as your identity provider for Keyfactor Command, you’ll need to install and configure it before installing Keyfactor Command. Keycloak can be installed in a number of ways. The following instructions cover installing it in a Docker container on a Linux machine and configuring it to use a Microsoft SQL database to store its data (configuration, user and group accounts, etc).
System Requirements
Keycloak has the following requirements:
-
Linux
-
Docker
-
Java version 12 or later
-
Microsoft SQL Server
This guide assumes you are starting from a base of already having a Linux server with Docker installed. Instructions for installing and configuring Linux and Docker are beyond the scope of this guide. Some helpful web pages include:
Preparing
To get ready to install Keycloak you will need to gather a few pieces of information, copy some certificate files to your Linux machine, and set up a database and user in SQL.
 Prepare Certificates
Keycloak uses these certificates:
-
The certificate chain for the certificate used to secure the Microsoft SQL server that will host the database for Keycloak to allow it to connect to the SQL server using an encrypted connection (see Using SSL to Connect to SQL Server).
Note: If you choose to connect to the SQL server using the SQL server’s IP address, the SSL certificate on the SQL server will need to include the SQL server’s IP address as a SAN The subject alternative name (SAN) is an extension to the X.509 specification that allows you to specify additional values when enrolling for a digital certificate. A variety of SAN formats are supported, with DNS name being the most common.. -
An SSL certificate with private key
Private keys are used in cryptography (symmetric and asymmetric) to encrypt or sign content. In asymmetric cryptography, they are used together in a key pair with a public key. The private or secret key is retained by the key's creator, making it highly secure. in the name of the server hosting the Docker container for Keycloak to allow administrators to connect to the web-based administration interface for Keycloak over an encrypted channel.
-
On the Microsoft SQL server, open the certificates MMC for the local machine store using one of these methods:
-
Using the GUI:
- Open an empty instance of the Microsoft Management Console (MMC).
- Choose File->Add/Remove Snap-in….
- In the Available snap-ins column, highlight Certificates and click Add.
- In the Certificates snap-in popup, choose the radio button for Computer account, click Next, accept the default of Local computer, and click Finish.
- Click OK to close the Add or Remove Snap-ins dialog.
-
Using the command line:
- Open a command prompt using the Run as administrator option.
-
Within the command prompt type the following to open the certificates MMC:
certlm.msc
-
- Drill down to the Personal folder under Certificates for the Local Computer. Locate the certificate used to secure connections to your SQL server (see Using SSL to Connect to SQL Server).
- Right-click the certificate and choose All Tasks->Export….
-
Follow the export wizard, choosing not to export the private key, choosing a format of P7B
A PKCS #7 format certificate file is a base64-encoded certificate. Since it's presented in ASCII, you can open it in any text editor. PKCS #7 certificates always begin and end with entries that look something like ---- BEGIN CERTIFICATE---- and ----END CERTIFICATE----. Unlike PEM files, PKCS #7 files can contain only a certificate and its certifiate chain but NOT its private key. Extensions of .p7b or .p7c are usually seen on certificate files of this format., and opting to including the chain certificates.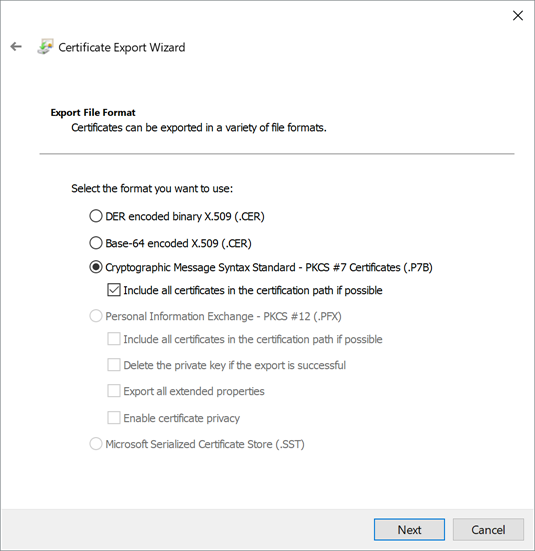
Figure 504: Export the SQL Server Certificate as a P7B
- Copy the exported file to a working directory on the Docker host.
-
On the Docker host, use OpenSSL to extract the certificate and chain from the P7B file with a command similar to the following:
sudo openssl pkcs7 -inform der -in /my/path/mysqlcert.p7b -print_certs -out /my/path/mysqlchain.pemTip: See the next step for a script that completes this step and the following step. -
Split the resulting certificate file into separate files, one for each certificate. One approach to this is to use a script similar to the following (which also includes the preceding command):
Copy#!/bin/bash
# Extract certificates and chain from the .p7b file
openssl pkcs7 -inform der -print_certs -in /my/path/mysqlcert.p7b -out mysqlchain.pem
# Split the chain certificates into separate files
csplit -s -z -f cert_ mysqlchain.pem '/subject=/' '{*}'
# Remove the SQL certificate file generated by csplit leaving only the chain
rm -f cert_00
# Rename the extracted certificates
for file in cert_*; do
subject=$(openssl x509 -noout -subject -in "$file")
filename=$(echo "$subject" | sed -n 's/.*CN = \([^,]*\).*/\1/p')
mv "$file" "$filename.crt"
doneTip: To create this script, use your text editor (e.g. nano, vi) to open a new file, paste the entire contents of the script into the file, and save. Change the permissions on the file to be executable and execute. For example:sudo chmod 755 extract.sh./extract.sh -
Use the Java keytool command to create a Java truststore containing all of the certificates that are part of the chain required to trust the certificate used to secure connections to your SQL server. Each certificate (extracted as per the previous step) needs to be imported into the truststore separately using a command similar to the following:
sudo keytool -import -file /my/path/mychaincert1.crt -keystore /my/path/sql-truststore -alias mychaincert1 -trustcacerts -storepass "MySuperSecureStorePassword"When prompted, review the certificate and answer “yes" to trust it as appropriate.
Tip: To check the contents of the Java Keystore A Java KeyStore (JKS) is a file containing security certificates with matching private keys. They are often used by Java-based applications for authentication and encryption. after you've created it, use a Java keytool command similar to the following:
sudo keytool -list -keystore /my/path/sql-truststore -storepass "MySuperSecureStorePassword"Note: If desired, you can leave the -storepass switch off each keytool command to be prompted to enter the password instead.
-
Acquire the SSL certificate using the Fully Qualified Domain Name (FQDN) of the server or alias used for the Keycloak Docker host. This is the name that you will use to access Keycloak via a browser for management purposes and that Keyfactor Command will use to access Keycloak for authentication purposes.
-
Copy the certificate together with its private key to a working directory on the Docker host.
-
Depending on the method you used to acquire your certificate, you may need to manipulate it on the Docker host to get it into the correct format. You need separate PEM
A PEM format certificate file is a base64-encoded certificate. Since it's presented in ASCII, you can open it in any text editor. PEM certificates always begin and end with entries like ---- BEGIN CERTIFICATE---- and ----END CERTIFICATE----. PEM certificates can contain a single certificate or a full certifiate chain and may contain a private key. In general, extensions of .cer and .crt are certificate files with no private key, .key is a separate private key file, and .pem is both a certificate and private key.-encoded unencrypted private key and certificate files. If your certificate is a PKCS#12 A PFX file (personal information exchange format), also known as a PKCS#12 archive, is a single, password-protected certificate archive that contains both the public and matching private key and, optionally, the certificate chain. It is a common format for Windows servers. file, you can use OpenSSL commands similar to the following to extract the certificate and key:Extract just the certificate, not any chain certificates or the key:
sudo openssl pkcs12 -in /my/path/mycert.pfx -clcerts -nokeys -out /my/path/mycert.cerExtract just the key:
sudo openssl pkcs12 -in /my/path/mycert.pfx -nocerts -out /my/path/mycert-key.pemDecrypt the key:
sudo openssl rsa -in /my/path/mycert-key.pem -out /my/path/mycert-key-plain.pemImportant: The decrypted key file should be handled carefully and stored securely. During the container deployment, the certificate and key files will be copied to:/install/path/certificates/sslPermissions should be set on the key file in this location such that the service account running the Docker container has read permission on it and no other users have access of any kind. By default, Docker containers run as root, so the permissions would look like something like this:
-r-------- 1 root root 1704 Jul 10 09:12 appsrvr18keyexamplecom-key-plain.pem
Following the deployment, the key file in the working directory (not the directory listed above) should be removed.
SQL Setup
Keycloak uses Microsoft SQL Server with SQL authentication, not Windows authentication. Your SQL server must be configured to support mixed mode authentication in order to use the SQL authentication. The database for Keycloak needs to be created in SQL before the deployment is done and appropriate permissions granted for the SQL user you will configure in Keycloak to make the connection to SQL.
On your Microsoft SQL server:
-
Identify an existing SQL login using SQL authentication (not Windows authentication) or create a new login to be used for Keycloak to authenticate to SQL.
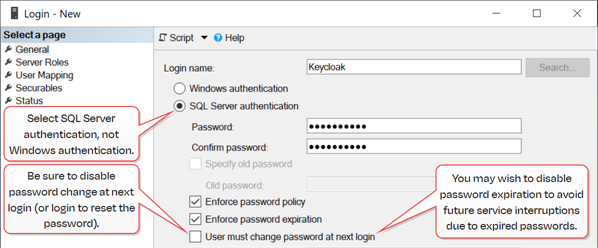
Figure 505: Add a SQL Authentication Login
-
Create a new database in SQL and grant the SQL login you created in the previous step at least dbo permissions on the database. You can do this either by setting it as the database owner while creating the database or by going back into the login after the database is created and granting the access on the User Mapping tab.
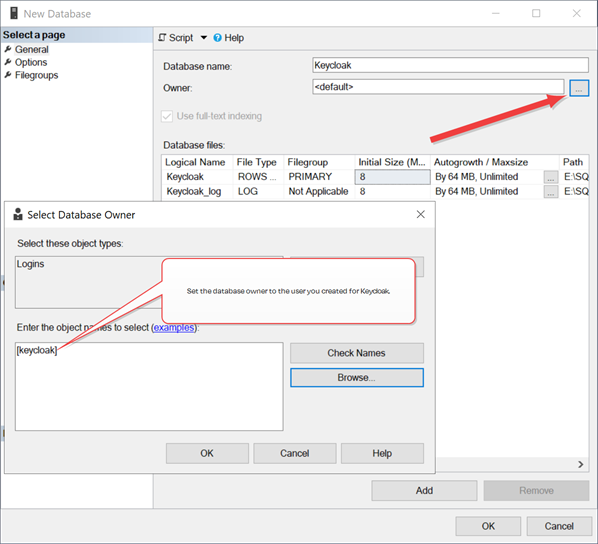
Figure 506: Add a SQL Database
Gather Information
You will need the following information in order to appropriately configure the installation file for the Keycloak container:
-
A username and password for the initial administrative user that will be created in Keycloak. By default, the username admin is used.
-
The fully qualified domain name (FQDN) that you will use to access Keycloak from a browser. This is typically the hostname
The unique identifier that serves as name of a computer. It is sometimes presented as a fully qualified domain name (e.g. servername.keyexample.com) and sometimes just as a short name (e.g. servername). of the container host. -
The FQDN or IP address of the SQL server hosting the database for Keycloak. If you choose to use the IP address, the SSL certificate on the SQL server will need to include the SQL server’s IP address as a SAN. If you configured your database in a non-default instance or your SQL is running on a non-standard port, you will need this information as well.
-
The name of the database you created in SQL for Keycloak.
-
The username and password for the login you created in SQL for Keycloak.
-
The path to the sql-truststore Java keystore you created as per Prepare Certificates.
-
The paths to the server certificate (mycert.cer) and unencrypted private key (mycert_key-plain.pem) you prepared as per Prepare Certificates.
-
The IP address of at least one DNS
The Domain Name System is a service that translates names into IP addresses. server in your environment that can be used to resolve the hostname of the SQL server if that server isn’t publicly routable and you’re not connecting to the SQL server via IP address. -
The path for the Keycloak image you will install. The Keycloak artifactory can be found here:
quay.io/keycloak/keycloak:[version number]Tip: Specify latest as the version to retrieve the latest version.
Installing Using Docker Compose
The following section covers installing Keycloak using a Docker compose file.
To install Keycloak in a Linux container and start the container using Docker compose:
-
Create a directory from which you will run the Docker container. For example:
sudo mkdir /opt/keycloak -
Copy the sql-truststore Java truststore you created (see Prepare Certificates) into the directory you created for the Docker container and set the permissions appropriately. It needs to be readable by the user the Docker container will run as (by default root) and its group. For example:
sudo chown root:root sql-truststoresudo chmod 440 sql-truststore -
Copy the certificate and key for the Docker host (see Prepare Certificates) into the directory you created for the Docker container and set the permissions appropriately. They need to be readable by the user the Docker container will run as (by default root) and its group. For example:
sudo chown root:root mycert.cersudo chown root:root mycert-key-plain.pemsudo chmod 440 mycert.cersudo chmod 440 mycert-key-plain.pem -
From your Docker host, retrieve the Keycloak image from the artifactory with commands similar to the following:
sudo docker pull quay.io/keycloak/keycloak -
Create a Docker compose file (compose.yaml) in the directory you created for the Docker container similar to the following, using inputs as per Table 103: Keycloak Container Parameters and referencing the artifactory you pulled The fields highlighted in red below indicate fields that need to be edited or that you may wish to edit.
Important: When editing the file, be sure to preserve the indenting exactly as shown. YAML requires a very specific file layout to function. If the indenting (multiples of two spaces) or layout is incorrect, you will receive an error when trying to install.services: auth: image: quay.io/keycloak/keycloak:latest # Reference the correct artifactory container_name: keycloak # Give your container a name, if desired ports: - "1443:8443" # The first number is the port you will use to access Keycloak; do not change the second number environment: KC_HTTPS_CERTIFICATE_FILE: /etc/x509/https/tls.crt KC_HTTPS_CERTIFICATE_KEY_FILE: /etc/x509/https/tls.key KEYCLOAK_ADMIN: admin # The initial administrator user KEYCLOAK_ADMIN_PASSWORD: 'MySuperSecureAdminPassword' # The admin user's password needs quotes under some circumstances if it contains special characters CLIENT_SECRET: 'MySuperSecureKeycloakOIDCClientPassword' # FIPS compliant password used to assign a unique and complex secret for the Command-OIDC-Client KC_HOSTNAME: appsrvr18.keyexample.com # The FQDN of your Docker host # This field is only required if you're using a port other than 443 KC_HOSTNAME_PORT: 1443 # This user must be dbo on KC_DB_URL_DATABASE KC_DB_USERNAME: keycloak # The SQL username KC_DB_PASSWORD: 'MySuperSecureSQLUserPassword' # The SQL user's password needs quotes under some circumstances if it contains special characters KC_DB_URL_HOST: sqlsrvr05.keyexample.com # The FQDN of your SQL server KC_DB_URL_DATABASE: Keycloak # The database name created in SQL for Keycloak KC_DB: mssql KC_TRANSACTION_XA_ENABLED: false # The SQL connection string in the following value contains the truststore name and password KC_DB_URL_PROPERTIES: ';encrypt=true;trustServerCertificate=false;sendStringParametersAsUnicode=false;Integrated Security=False;Persist Security Info=True;trustStore=/temp/sql-truststore;trustStorePassword=MySuperSecureJKSStorePassword;' # This value must be configured even if you do not have a reverse proxy KC_PROXY: none command: - start - --import-realm # The first value in each of the following represents a location on your physical server, which is being mapped to a path in the container represented by the second value. volumes: - ./mycert.cer:/etc/x509/https/tls.crt - ./mycert-key-plain.pem:/etc/x509/https/tls.key - ./sql-truststore:/temp/sql-truststore # Optionally set the DNS server(s) for the Keycloak server dns: - 192.168.12.2 - 192.168.12.3 restart: always -
Set the permissions on the compose.yaml file such that the file is owned by root and readable only by root (this assumes your Docker daemon is running as root, which is typical). For example:
sudo chown root:root compose.yamlsudo chmod 400 compose.yamlTip: If you need to make edits to the compose file, you will need to make the file writable again. For example:sudo chmod 600 compose.yaml -
Execute the following command to install and run the container in the foreground:
sudo docker compose upYou can instead run it in the background by adding the -d flag like so, but it can sometimes be helpful to run it in the foreground initially so that you can easily review the log output live:
sudo docker compose up -dTip: To stop and start the container again after installation is complete, use the following commands:sudo docker compose stopsudo docker compose startOr:
sudo docker compose restartIf you need to delete the container and try the install again, use this command:
sudo docker compose downThis will not remove the configurations made in the SQL database.
To review logs generated from the container, identify the container ID or name with this command:
sudo docker container lsOr for a more succinct output:
Copysudo echo "CONTAINER ID NAMES STATUS" && docker container ls --format "{{.ID}} {{.Names}} {{.Status}}"For example, in the following output (this is the succinct version) you could select either the container
CONTAINER ID NAMES STATUS daa0b06986c3 ejbca900 Up 4 weeks 9136a6765450 ejbca900-database Up 4 weeks 7cf64de25b4d ejbca920 Up 4 weeks 4451b1ef5089 ejbca920-database Up 4 weeks 94a373b2f49a rabbit-mq Up 4 weeks
Then use the following command to output the current log (with the optional --follow to make output continuous):
sudo docker container logs [--follow] [container ID or name]
Table 103: Keycloak Container Parameters
| Section |
Parameter |
Description |
|---|---|---|
| image | Required in some cases. The path to the artifactory and image for the Keycloak implementation. | |
| container_name | A name to give to the container, if desired, for ease of reference. | |
| environment | CLIENT_SECRET | Required in some cases. Assign a complex and unique FIPS compliant secret to the Command-OIDC-Client created for Keycloak. This is provided at database initialization and is also entered in Keyfactor Command to create a connection to Keycloak, so be sure to retain this secret is a secure location. |
| environment | KC_HTTPS_CERTIFICATE_FILE | Required. The path and filename of the location within the container where the SSL certificate for the Docker host (see Prepare Certificates) will live. |
| environment | KC_HTTPS_CERTIFICATE_KEY_FILE | Required. The path and filename of the location within the container where the SSL certificate key for the Docker host (see Prepare Certificates) will live. |
| environment | KEYCLOAK_ADMIN |
Required. The username for the initial administrative user for Keycloak. The default is admin. |
| environment | KEYCLOAK_ADMIN_PASSWORD |
Required in some cases. Set a secure password for the initial administrative user for Keycloak. |
| environment | KC_HOSTNAME |
Required in some cases. The is the fully qualified domain name of the Docker host where you are deploying your container. |
| environment | KC_HOSTNAME_PORT |
The port number you will use to access Keycloak via a browser. This field only needs to be populated if you won’t be using 443. If you’ll be using 443, the entry should be commented out or removed. |
| environment | KC_DB | Required in some cases. The type of SQL server. Only Microsoft SQL Server is supported (mssql). |
| environment | KC_DB_URL_HOST | Required in some cases. The fully qualified domain name of the Microsoft SQL server that will host the database for Keycloak. |
| environment | KC_DB_URL_DATABASE | Required in some cases. The name of the Keycloak database you pre-created in SQL per SQL Setup. |
| environment | KC_DB_PASSWORD |
Required in some cases. The password for the SQL login to which you granted database ownership permissions on the Keycloak database per SQL Setup. |
| environment | KC_DB_USERNAME |
Required in some cases. The username for the SQL login to which you granted database ownership permissions on the Keycloak database per SQL Setup. |
| environment | KC_DB_URL_PROPERTIES |
Required in some cases. The SQL database connection string including the password you set to secure the Java keystore that holds the SQL server’s certificate as per Prepare Certificates. |
| environment | KC_TRANSACTION_XA_ENABLED |
A Boolean that indicates whether the database for the installation supports XA transactions. |
| environment | KC_PROXY | The proxy address forwarding mode if the server is behind a reverse proxy. |
| ports | The first number in the ports field indicates the port number you will use to access Keycloak via a browser and that Keyfactor Command will use to access Keycloak. If there are no other containers using this port on this Docker host, you may use 443. If 443 is already in use, you will need to change this to an alternate port (e.g. 1443). The second number in the ports field indicates the port number the Docker container uses internally. Do not change this number. | |
| command | The command to start the container and import the realm JSON. | |
| volumes | In this section you set the file names for the certificate and key files you copied into the directory for your Docker container. The volumes section sets mappings between files that exist on the host and locations in the running container. The first value represents a path and filename that exists on your Docker server. The second value represents a path and filename that will be created in the container containing the same information from the file referenced by the first value. | |
| dns | In this section, add at least one IP for a DNS server that can be used to resolve hostname information for your SQL server from the Keycloak container if the SQL server’s address is not externally routable and you are not referencing the SQL server by IP address. |
Configuring Keycloak and Collecting Data for the Keyfactor Command Installation
Once the Keycloak completes successfully, you should be able to open the administration console for it in a browser and gather the information you will need to complete the Keyfactor Command installation referencing it.
-
Use a browser to open the Keycloak management interface. For example:
https://appsrvr18.keyexample.com:1443Click the Administration Console link and sign in with the initial administrative user and password you defined with the KEYCLOAK_ADMIN and KEYCLOAK_ADMIN_PASSWORD settings.
Note: Keyfactor Command communicates with Keycloak over HTTPS, so be sure that you are working with Keycloak over HTTPS to confirm that it is working correctly with no certificate errors. -
In the Keycloak Administration Console, browse to Manage Realms and create a Keyfactor realm.
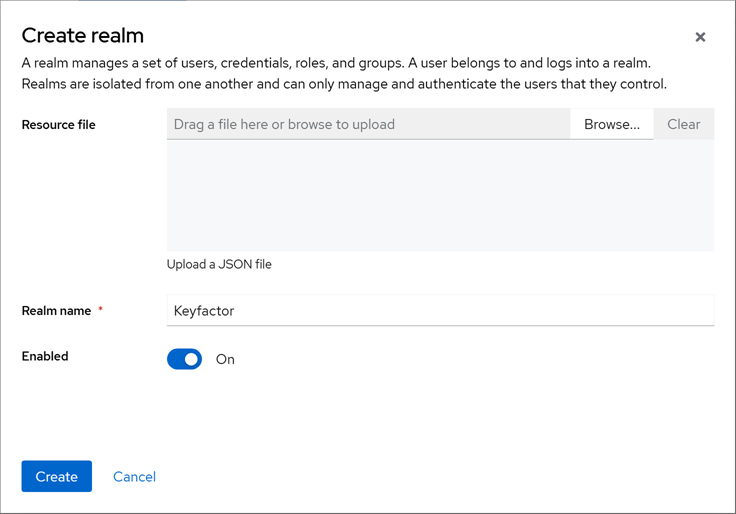
Figure 507: Create a Realm in the Keycloak Administration Console for Keyfactor Data
-
In the Keycloak Administration Console, make sure the Keyfactor realm is the current realm and browse to Clients > Client list. Create a new client for use with Keyfactor Command.
-
General Settings: Give the client a Client ID, Name and Description.
-
Capability Config: Enable Client authentication and check the Standard flow and Service accounts roles boxes.
-
Login Settings: Populate the Valid redirect URIs and Valid post logout redirect URIs fields. The values for these fields are made up of the fully qualified domain name or alias you will use to access your Keyfactor Command server, the virtual directory name you will use to access the Keyfactor CommandManagement Portal (KeyfactorPortal by default), a specific endpoint
An endpoint is a URL that enables the API to gain access to resources on a server. for the URI, and the name you will give to Keycloak when configuring Keyfactor Command (see Authentication Tab). For example:-
Valid redirect URIs:
https://command.keyexample.com/KeyfactorPortal/callback/Command-OIDC -
Valid post logout redirect URIs:
https://command.keyexample.com/KeyfactorPortal/signout-callback/Command-OIDC
Important: Case matters for the virtual directory name—use KeyfactorPortal rather than keyfactorportal if you plan to accept the default virtual directory name.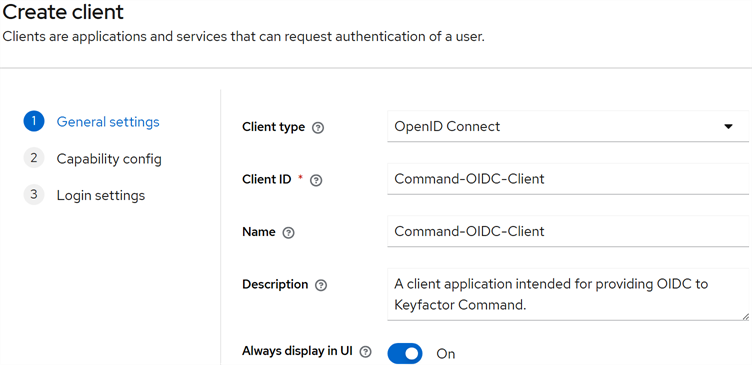

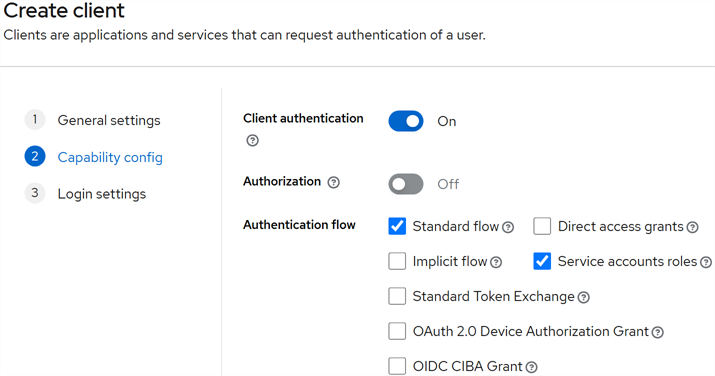

Figure 508: Create Command-OIDC-Client in the Keycloak Administration Console
-
-
-
In the Client details on the Credentials tab click the Copy button next to the Client secret field to copy the unmasked version of the client secret to the clipboard (you do not need to display it unmasked first) and save this in a secure location. You will need it during the Keyfactor Command configuration.
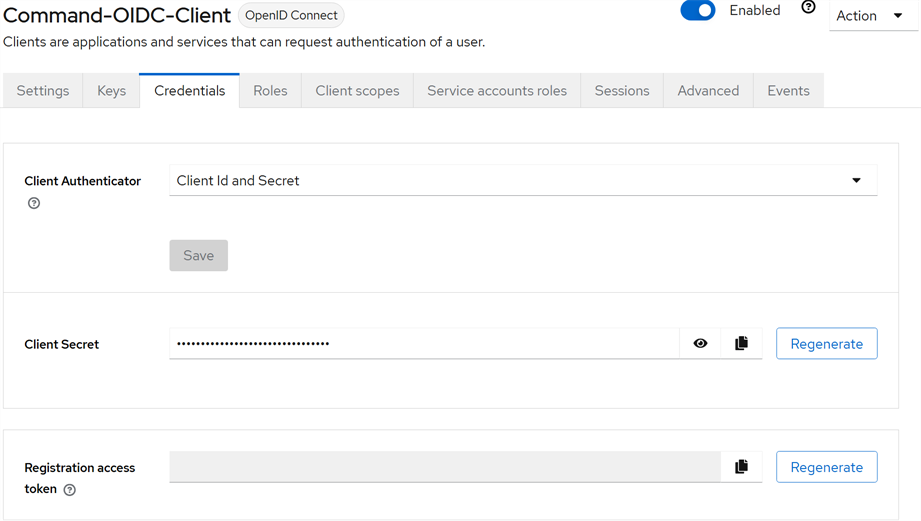
Figure 509: Copy the Keycloak Secret for the Keyfactor Command Client Application
-
In the Keycloak Administration Console, browse to Realm settings and select the General tab. On the General tab, click the OpenID Endpoint Configuration link. This will open in a new browser window.

Figure 510: OpenID Endpoint Configuration Link
-
In the browser window for the OpenID Endpoint Configuration link, review the settings. You may find it helpful to use a JSON formatting browser extension to make the data easier to read. The data you need from this configuration info is:
-
Issuer (a.k.a. Authority)
-
Authorization Endpoint
-
Token Endpoint
-
User Info Endpoint
-
jwks_uri (a.k.a. JSONWebKeySetUri)
Make note of these URLs, without the quotation marks. You will need them during the Keyfactor Command configuration.
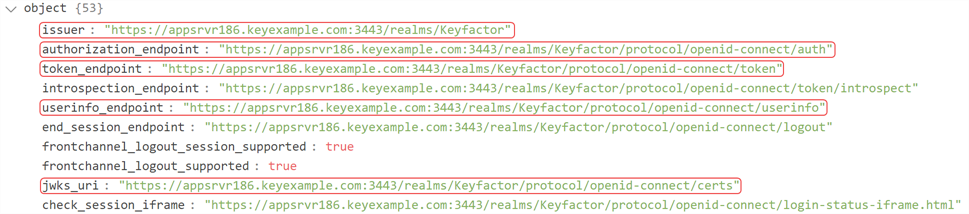
Figure 511: OpenID Endpoint Configuration Settings
-
-
In the Keycloak Administration Console, browse to Realm settings and select the Sessions tab.
On the Sessions tab, locate the SSO Session Max value. This value should match the Session Expiration parameter
A parameter or argument is a value that is passed into a function in an application. value configured in the Keyfactor Command configuration wizard on the Authentication tab. The Locate the SSO Session Idle value and set it to a value that is appropriate to your environment. This value determines the length of time an idle browser session in the Keyfactor Command Management Portal will remain logged in before automatically logging out the user if no input from the user is received.
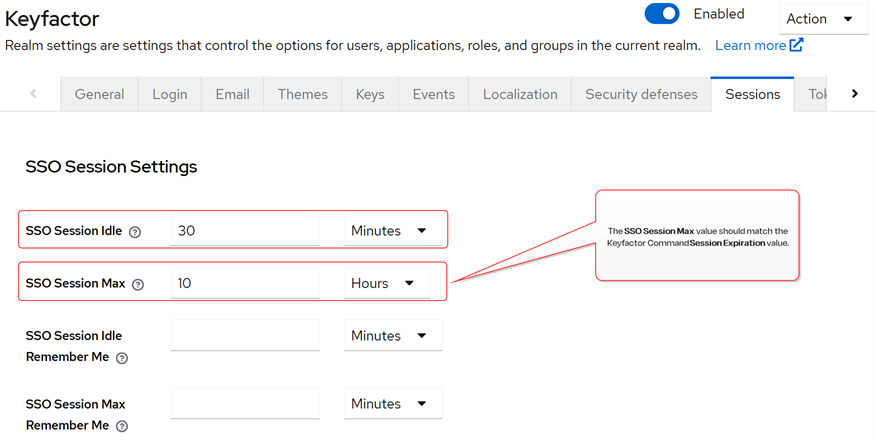
Figure 512: SSO Session Values
-
In the Keycloak Administration Console, browse to Realm settings and select the Tokens tab. On the Tokens tab, locate the Access Token Lifespan value. This value should be greater than or equal to the Cookie Expiration parameter value configured in the Keyfactor Command configuration wizard on the Authentication tab
The
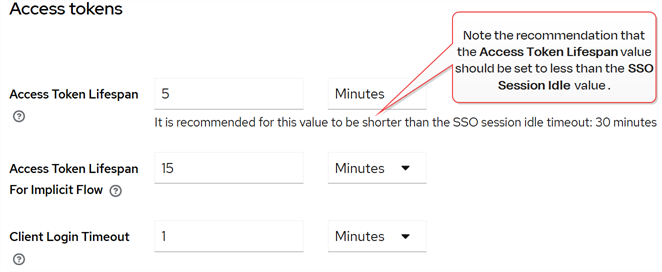
Figure 513: Access Token Lifespan
-
In the Keycloak Administration Console, browse to Users. Click Create new user to add at least one new user to be granted administrative permissions in Keyfactor Command during the Keyfactor Command installation.
Note: The admin user(s) created during or after the Keycloak installation for ongoing management of Keycloak can’t be used for Keyfactor Command authentication because these are in the master realm, not the Keyfactor realm.Tip: Once the Keyfactor Command installation is complete, additional users and groups that you have added into Keycloak can be added through the Keyfactor Command Management Portal and granted varying roles; only one user is required initially so a user can open the Management Portal at the conclusion of the installation.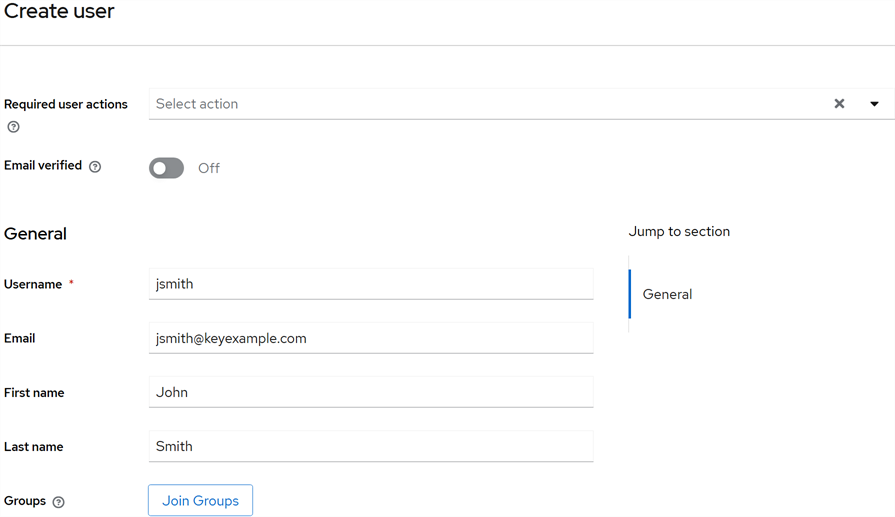
Figure 514: Add a Keycloak User
-
Once the user account creation is complete, on the user details locate the ID for the user and make a copy of the GUID. This GUID is used to reference the user account when you configure the user as an administrator in the Keyfactor Command configuration wizard.
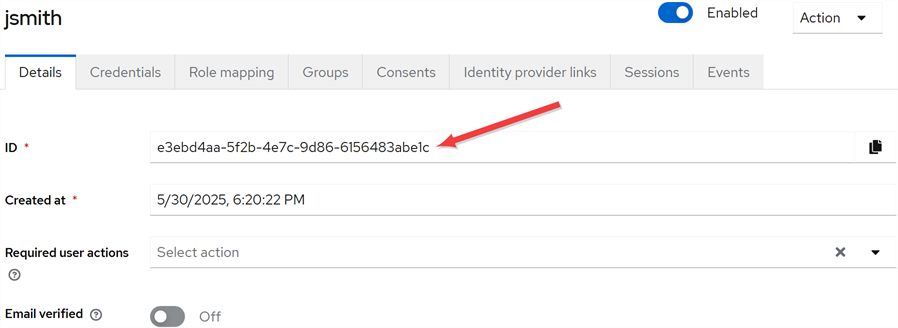
Figure 515: Locate the Keycloak User’s ID
-
In the user details on the Credentials tab, click Set password and set a password for the new user.
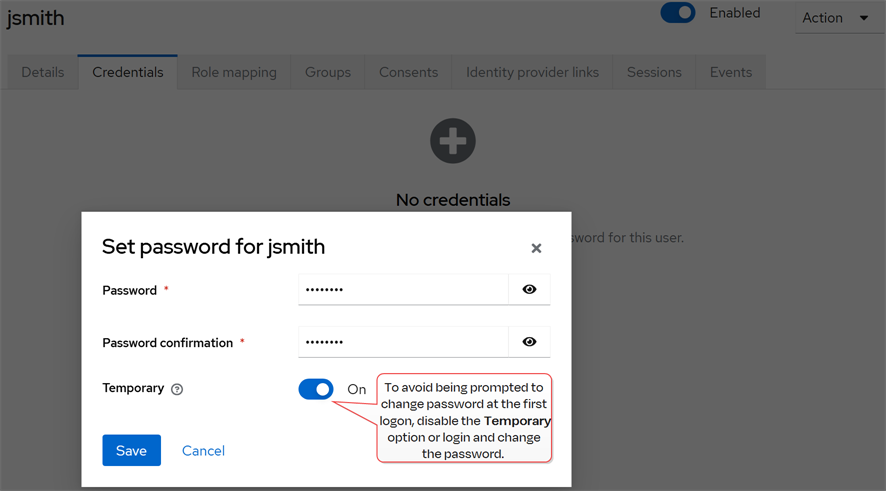
Figure 516: Set a Password for the Keycloak User
From here you can create more administrative users, standard users, and groups (see Using Keycloak).
Was this page helpful? Provide Feedback