
From the Report Manager you can run reports on demand, edit reports (modify how a report displays, change the parameter![]() A parameter or argument is a value that is passed into a function in an application. definitions and add or change the schedule(s) used to run the report), or delete reports. From the top grid menu you can also quickly change the Favorite setting for a report.
A parameter or argument is a value that is passed into a function in an application. definitions and add or change the schedule(s) used to run the report), or delete reports. From the top grid menu you can also quickly change the Favorite setting for a report.
 Run a Report
You can run a report on demand from the Report Manager page.
- In the Management Portal, browse to Reports > Report Manager.
- On the Report Manager page, highlight the report you wish to run in the grid and click Run Report from the top grid menu or the right click menu.
- Populate the parameters as desired (see Parameters Tab for more information on parameters).
- Click Generate. The report will display immediately in the open window. The report can be exported to Excel, PDF or CSV, as available for that report, via the Export button at the end of the report.
Editing a Report and Scheduling a Report for Delivery
You can modify how a report displays, change the parameter definitions for running a report and add or change the schedule(s) used to deliver the report.
To edit an existing report:
- In the Management Portal, browse to Reports > Report Manager.
- On the Report Manager page, highlight the report you wish to modify in the grid and click Edit from the grid menu or the right click menu.
- In the Report Manager dialog, edit the available options as needed.
- Click OK to save the new or changed report details.
The most common edit to make on an existing report would be to check or uncheck the Show in Navigator box to add or remove the report from display on the Reports top menu, or to check or uncheck the Favorites box on the Details tab. The Ignore Renewed Certificates box will be available for reports that use collections to enable de-duplication (see the tip below). The Uses Collection box is for information only. It will be grayed out and checked for reports that use collections.
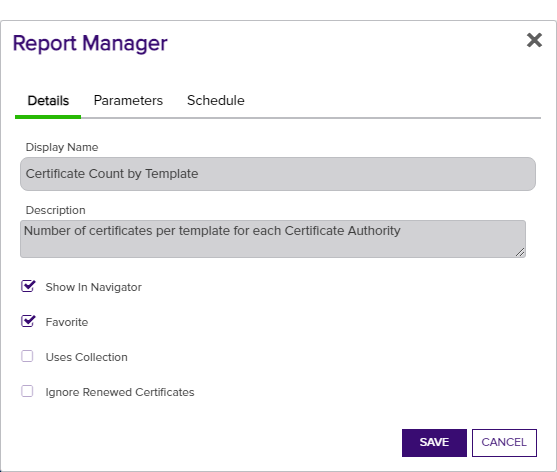
Figure 85: Edit a Report in Report Manager Details Tab
De-duping is configured on a certificate collection![]() The certificate search function allows you to query the Keyfactor Command database for certificates from any available source based on any criteria of the certificates and save the results as a collection that will be availble in other places in the Management Portal (e.g. expiration alerts and certain reports). by setting the Ignore renewed certificate results by option when saving a certificate collection (see Saving Search Criteria as a Collection). Certificate collections may be configured to be de-duplicated based on the certificate common name
The certificate search function allows you to query the Keyfactor Command database for certificates from any available source based on any criteria of the certificates and save the results as a collection that will be availble in other places in the Management Portal (e.g. expiration alerts and certain reports). by setting the Ignore renewed certificate results by option when saving a certificate collection (see Saving Search Criteria as a Collection). Certificate collections may be configured to be de-duplicated based on the certificate common name![]() A common name (CN) is the component of a distinguished name (DN) that represents the primary name of the object. The value varies depending on the type of object. For a user object, this would be the user's name (e.g. CN=John Smith). For SSL certificates, the CN is typically the fully qualified domain name (FQDN) of the host where the SSL certificate will reside (e.g. servername.keyexample.com or www.keyexample.com)., distinguished name, or principal name (or not at all). Only certificates that share all the EKUs (e.g. Client Authentication and Server Authentication) as well as the same CN
A common name (CN) is the component of a distinguished name (DN) that represents the primary name of the object. The value varies depending on the type of object. For a user object, this would be the user's name (e.g. CN=John Smith). For SSL certificates, the CN is typically the fully qualified domain name (FQDN) of the host where the SSL certificate will reside (e.g. servername.keyexample.com or www.keyexample.com)., distinguished name, or principal name (or not at all). Only certificates that share all the EKUs (e.g. Client Authentication and Server Authentication) as well as the same CN![]() A common name (CN) is the component of a distinguished name (DN) that represents the primary name of the object. The value varies depending on the type of object. For a user object, this would be the user's name (e.g. CN=John Smith). For SSL certificates, the CN is typically the fully qualified domain name (FQDN) of the host where the SSL certificate will reside (e.g. servername.keyexample.com or www.keyexample.com)., DN
A common name (CN) is the component of a distinguished name (DN) that represents the primary name of the object. The value varies depending on the type of object. For a user object, this would be the user's name (e.g. CN=John Smith). For SSL certificates, the CN is typically the fully qualified domain name (FQDN) of the host where the SSL certificate will reside (e.g. servername.keyexample.com or www.keyexample.com)., DN![]() A distinguished name (DN) is the name that uniquely identifies an object in a directory. In the context of Keyfactor Command, this directory is generally Active Directory. A DN is made up of attribute=value pairs, separated by commas. Any of the attributes defined in the directory schema can be used to make up a DN. or UPN will be eliminated as duplicates. If a certificate has more than one EKU and at least one EKU does not match an otherwise similar certificate with matching CN, DN or UPN, it will not be eliminated.
A distinguished name (DN) is the name that uniquely identifies an object in a directory. In the context of Keyfactor Command, this directory is generally Active Directory. A DN is made up of attribute=value pairs, separated by commas. Any of the attributes defined in the directory schema can be used to make up a DN. or UPN will be eliminated as duplicates. If a certificate has more than one EKU and at least one EKU does not match an otherwise similar certificate with matching CN, DN or UPN, it will not be eliminated.
For example, if the de-duplication logic was set to DN and the report would include these two certificates:
Certificate one:
- DN: CN=appsrvr14.keyexample.com,OU=IT,O=Key Example, Inc.,L=Chicago,ST=IL,C=US
EKUs: Server Authentication
Issued Date: December 1, 2022
Expiration Date: January 1, 2024
Certificate two:
DN: CN=appsrvr14.keyexample.com,OU=IT,O=Key Example, Inc.,L=Chicago,ST=IL,C=US
EKUs: Server Authentication
Issued Date: December 15, 2022
Expiration Date: December 14, 2023
The de-duplication logic would be triggered because the DNs and EKUs match. The report would include certificate two and leave out certificate one. Notice that certificate two is retained even through certificate one expires after certificate two. This is because certificate two was issued after certificate one.
Now imagine that the de-duplication logic is set to CN and the report would include these two certificates:
Certificate one:
DN: CN=appsrvr14.keyexample.com,OU=IT,O=Key Example, Inc.,L=Chicago,ST=IL,C=US
EKUs: Server Authentication
Issued Date: December 1, 2022
Expiration Date: January 1, 2024
Certificate two:
DN: CN=appsrvr14.keyexample.com,OU=HR,O=Key Example, Inc.,L=Chicago,ST=IL,C=US
EKUs: Server Authentication, Client Authentication
Issued Date: December 15, 2022
Expiration Date: December 14, 2023
Although the DNs for these certificates do not match, the CNs still do, so this matches the de-duplication logic of CN. However, the EKUs for these two certificates do not match, since only one of them includes Client Authentication. In this case, both certificates would appear on the report.
The Parameters tab will display all of the parameters for that specific report and allow you to configure default values to be used when the report is run from the Report Manager Run Report action button and what values default when adding a new schedule. You may also change the display name and description of the parameter.
To edit a parameter, select the Parameters tab, highlight the desired parameter in the parameters grid and click Edit, or double click the row. The Parameters dialog will open. Only those fields which can be edited will be enabled on the parameters details page. A change of the Display Name will change the name of parameter on the Parameters tab . A change of the Description will change the name of the description field on the Schedule tab. A change to the Default Value will define the value to use when the report is run from the Report Manager Run Report action button and what values default when adding a new schedule.
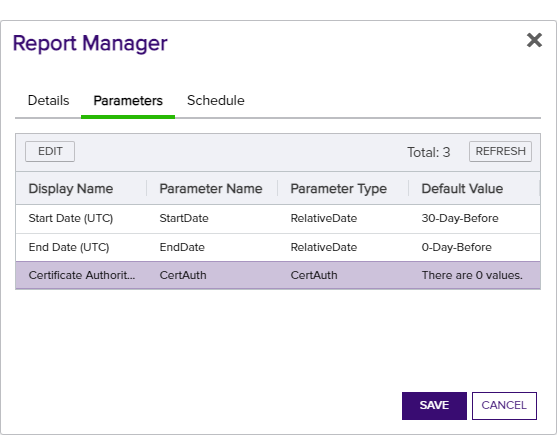
Figure 86: Edit a Report in Report Manager Parameters Tab
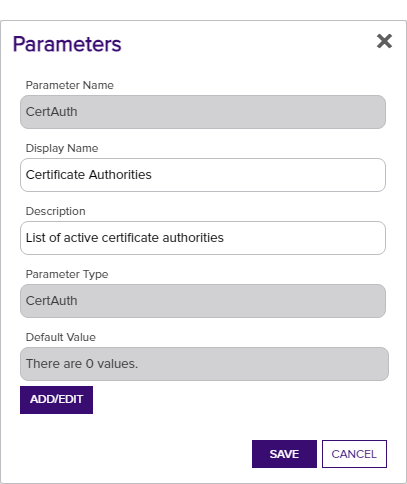
Figure 87: Report Manager Parameters Tab: Parameter Details
To add, edit, or delete a report delivery schedule, select the Schedule tab and choose the desired action. Any scheduled reports will appear on the schedule tab page. You can create multiple schedules with different parameters and recipients for the same report.
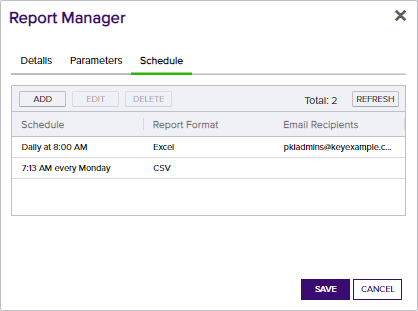
Figure 88: Edit a Report in Report Manager Schedule Tab
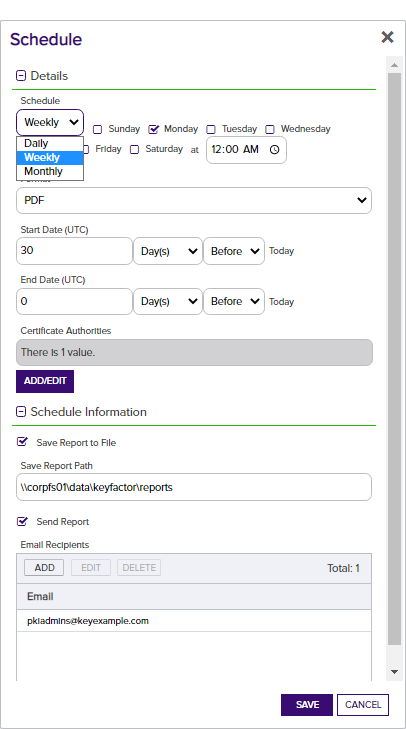
Figure 89: Edit a Report in Report Manager Schedule Tab - Add/Edit page
- Schedule: Choose the schedule by selecting Daily, Weekly or Monthly from the dropdown, then choosing the day or date, and the time to run the report.
-
Report Format: The available report formats are PDF, Excel and CSV*.
Note: *The CSV format is only available on reports that contain all the data within a single section (such as the Certificates in Collection report) rather than broken out into multiple sections (such as the Expiration Report).Note: *CSV format is not available for custom reports with multiple tables. - Dynamic Parameters:
Depending on the parameters specific to the report, you will use either a entry field, a dropdown or click the Add/Edit to open the selection window for the report parameters for the specific schedule you are working on.
- Some reports are based on a certificate collection, so one must be selected.
- Some reports allow you to set an evaluation date for the report other than the current date so that you can, for example, run an Expiration Report time shifted to 1 month in the future to see what the expiration picture will look like in a month's time or compare last year to this year.
- Some reports allow you to include custom metadata Metadata provides information about a piece of data. It is used to summarize basic information about data, which can make working with the data easier. In the context of Keyfactor Command, the certificate metadata feature allows you to create custom metadata fields that allow you to tag certificates with tracking information about certificates. (see Certificate Metadata) in the report output.
- Some reports allow you to select specific templates or CAs for reporting.
-
Save Report to File: You can choose to save your report to file by ticking the Save Report to File box, in which case you must provide a network path to which the file will be written in the Save Report Path (relative to the server) field. You will be given a warning message if the network path cannot be resolved. Although the record can still be saved with a path that doesn't resolve correctly, the report may fail to run if the path still does not resolve at the time the report runs.
Note: The path for saved reports must be provided in UNC format (\\servername\sharename\path) and must be accessible from the Keyfactor Command administration server. In addition:- Do not use a trailing "\" in the report path.
- Ensure that the service account for the Keyfactor Command Service has permission to write to the location where you want the outputted report to be saved.
- When scheduling a report, schedule it for at least 10 minutes in advance of the current time if you wish it to run soon. If you want to run it faster than that, the Keyfactor Command Service will need to be restarted.
- Send Report: You can choose to deliver your report via email by ticking the Send Report box, in which case you must provide at least one recipient in the Recipients field at the bottom of the dialog.
Deleting a Report
To delete a report
- In the Management Portal, browse to Reports > Report Manager.
- On the Report Manager page, highlight the report you wish to delete in the grid and click Delete from the right-click menu.