Security Identity Operations
From the Securities Identities tab of the Security Role and Identities page in Keyfactor Command you can create the individual identities that will be associated with one or more security roles to define the user access to Keyfactor Command. Prior to adding new security identities, it is recommended that you create all of the security roles you require (see Security Role Operations) so they can be assigned to the new security identities. You can also get a complete view of permissions for an identity (see View Permissions of Security Identities).
- In the Management Portal, browse to System Settings Icon
 > Security Roles and Identities.
 - Select the Security Identity tab of the page. Click Add to add a new security identity.
-
The Add Security Identities dialog will open. Enter an AD user or security group name using DOMAIN\group name format and click Save to save the new identity. If the user or group cannot be resolved, you will receive an error.
Important: The built-in Active Directory groups Domain Admins and Enterprise Admins cannot be used directly to grant access to the Management Portal due to how these groups function within Windows. You can create a custom Active Directory group, reference that group in the Management Portal, and add the built-in Domain Admins or Enterprise Admins group to that custom group, if desired.
-
In the Management Portal, browse to System Settings Icon
 > Security Roles and Identities.Important: The built-in Active Directory groups Domain Admins and Enterprise Admins cannot be used directly to grant access to the Management Portal due to how these groups function within Windows. You can create a custom Active Directory group, reference that group in the Management Portal, and add the built-in Domain Admins or Enterprise Admins group to that custom group, if desired.
 - Select the Security Identity tab of the page. Highlight the identity in the grid and choose Edit Roles from the right-click menu, or click Edit Roles at the top of the identity grid.
-
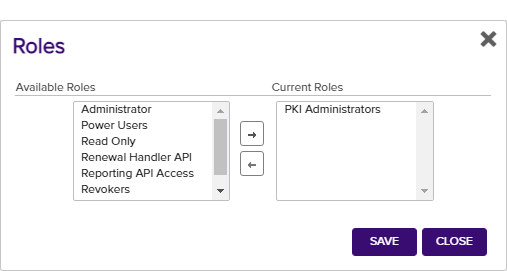
In the Roles dialog, select the appropriate role in the Available Roles list and use the right arrow to move the role to the Current Roles list. Repeat for all desired roles. Click Save to assign the role(s) to the identity.

Figure 360: Grant Roles to a Security Identity
-
In the Management Portal, browse to System Settings Icon
 > Security Roles and Identities.
 - Select the Security Identity tab of the page. Highlight the identity you want to delete and click Delete at the top of the grid. Or right-click the row in the grid and choose Delete from the right-click menu.