
From the Revocation Monitoring page on the Keyfactor Command Management Portal you can view and edit existing location endpoints, add new locations, delete an endpoint![]() An endpoint is a URL that enables the API to gain access to resources on a server., test revocation monitoring location alert email notifications, and monitor location endpoint responsiveness.
An endpoint is a URL that enables the API to gain access to resources on a server., test revocation monitoring location alert email notifications, and monitor location endpoint responsiveness.
Alerts → Revocation Monitoring
When the alerts are run using workflow, there are two Keyfactor Command service jobs that perform this function. The first, running as scheduled for the alerts (see the Monitoring Execution Schedule for each alert), gathers any expiring or unreachable revocation monitoring endpoints that meet the alert criteria. The second, running every 10 minutes, takes the collected revocation monitoring endpoints and generates workflow instances for each.
 Adding or Modifying a Revocation Monitoring Location
-
On the Revocation Monitoring page, click Add from the top menu to create a new alert, or Edit from either the toolbar or right click menu, to modify an existing one.
-
In the Revocation Endpoint Settings dialog, type a Display Name. This name appears on the Revocation Monitoring grid and on the Management Portal dashboard.
-
In the Endpoint Type dropdown, choose either CRL or OCSP.
-
For a CRL location:
-
In the Location field, type a URL for the CRL
A Certificate Revocation List (CRL) is a list of digital certificates that have been revoked by the issuing Certificate Authority (CA) before their scheduled expiration date and should no longer be trusted. location. This can be either an HTTP location or an LDAP location. Be sure to monitor the CRL locations that are in use by applications in your environment—if you're monitoring LDAP locations but applications are using an HTTP location, you're not going to receive any warning if a CRL fails to publish to the HTTP location.Important: CRL URLs that contain a plus sign (+) require careful handling. Because a plus sign in a URL can be interpreted as either a space or a literal plus sign, ensure that the CRL URL you configure is entered exactly as it would be used in a web browser or in PowerShell.- If the CRL is hosted on Microsoft IIS, enable Allow Double Escaping so that plus signs in the URL are processed correctly.
If the CRL is obtained from an EJBCA download link, use the URL exactly as generated, including any encoding.
- In the Show on Dashboard section, turn on the Warn option if desired, and set the number of weeks, days or hours ahead of expiration for warning flags to begin appearing on the Management Portal legacy dashboard (see Dashboard: Revocation Monitoring).
-
-
For an OCSP location:
-
Configure OCSP endpoint information.
In the CA Info field, choose how to retrieve certificate authority
A certificate authority (CA) is an entity that issues digital certificates. Within Keyfactor Command, a CA may be a Microsoft CA or a Keyfactor gateway to a cloud-based or remote CA. information for the OCSP endpoint.-
CMS: Retrieve OCSP information directly from a certificate authority defined in Keyfactor Command.
Use this option to retrieve OCSP information directly from a certificate authority configured in Keyfactor Command. This option is available only for:
-
Microsoft CAs in the same forest
An Active Directory forest (AD forest) is the top most logical container in an Active Directory configuration that contains domains, and objects such as users and computers. where Keyfactor Command is installed -
EJBCA CAs that are accessible on the same network as the Keyfactor Command server
When you use this option, Keyfactor Command sends a request to the CA
A certificate authority (CA) is an entity that issues digital certificates. Within Keyfactor Command, a CA may be a Microsoft CA or a Keyfactor gateway to a cloud-based or remote CA.:-
For Microsoft CAs, Keyfactor Command uses a DCOM request.
-
For EJBCA CAs, Keyfactor Command uses a REST request.
To configure this option, select CMS, choose the desired CA from the CA dropdown, and click Resolve.
-
-
File: Import OCSP information from a certificate issued by the certificate authority.
Use this option to import OCSP information from a certificate issued by the CA you want to monitor. The certificate can be any certificate issued by the CA, as long as it contains OCSP information. The certificate must be provided as a Base64-encoded PEM
A PEM format certificate file is a base64-encoded certificate. Since it's presented in ASCII, you can open it in any text editor. PEM certificates always begin and end with entries like ---- BEGIN CERTIFICATE---- and ----END CERTIFICATE----. PEM certificates can contain a single certificate or a full certifiate chain and may contain a private key. In general, extensions of .cer and .crt are certificate files with no private key, .key is a separate private key file, and .pem is both a certificate and private key. file (.cer or .crt).To configure this option, select OCSP, click Upload, browse to the certificate file, and open it.
Using either method, the CA name, authority key ID, and serial number are populated below the CA dropdown.
-
- In the Location section, enter the full URL to the OCSP responder servicing this certificate authority's CRL.
- In the Show on Dashboard section, click the toggle to enable the option to include this OCSP location on the Management Portal legacy dashboard (see Dashboard: Revocation Monitoring).
-
-
-
In the Monitoring Execution Schedule section, configure a monitoring execution schedule. This defines the frequency with which locations are checked and alerts sent. You can choose to schedule the alert for this location either for daily delivery at a specified time or at intervals of anywhere from every 1 minute to every 12 hours. A daily schedule is the most common configuration. Schedules are configured separately for each endpoint.
Tip: Users with only the Schedule or Schedule > Revocation permissions for alert monitoring and not Modify permissions will only be able to edit the Monitoring Execution Schedule and not other fields on the settings dialog. -
Choose how alerts are delivered. Set Use Workflows to On or Off, depending on how you want alerts delivered.
-
If Use Workflows is set to On (workflow-based alerting):
-
Select an option in the Workflow Definitions dropdown. You can either choose an existing workflow or select Add New Workflow.
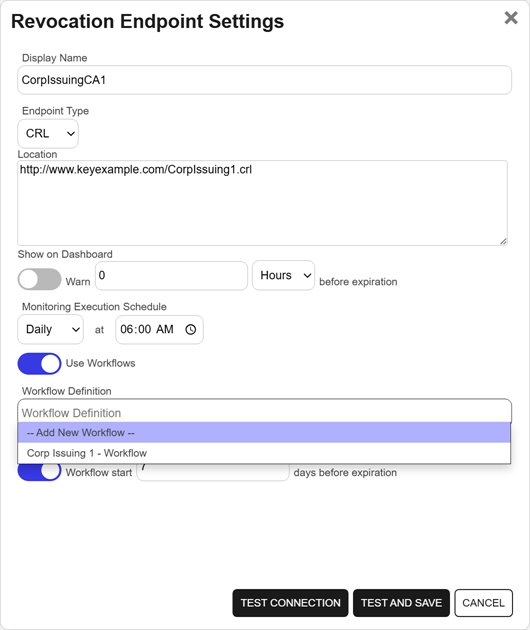
Figure 176: Create a Revocation Monitoring Alert with Workflow Option
-
For a CRL location, in the Workflow Schedule (CRL only) section, configure the timeframe when workflow will begin executing for the alert. Turn on the Workflow start option and set the number of days ahead of expiration that workflow for this alert should run.
-
Save the alert.
If you select Add New Workflow, saving the alert creates a new workflow with the same name as the expiration alert. The workflow workspace opens automatically so you can add steps.
-
Add one or more workflow steps, such as:
-
Send Email to notify recipients of the expiration event (see Workflow Step Configuration).
-
Optional steps for additional functionality, such as Write to Windows Event Log for event logging (see the example 47 Day Certificate Renewal and Email Notification).
-
-
-
If Use Workflows is set to Off (legacy alerting):
Continue with the following steps to configure legacy alert settings.
- For a CRL location, in the Email Reminder (CRL only) section, configure the timeframe when the alert will begin executing. Turn on the Warn option and set the number of days ahead of expiration that email reminders should begin to be sent.
-
In the Recipients grid, click Add to create a new recipient entry. Enter the email addresses of users or groups who should receive notifications when OCSP or CRL endpoints are approaching expiration or are unreachable. Recipient lists are configured separately for each endpoint.
You can also edit or delete a recipient by selecting a row in the Recipients grid and using the action buttons on the toolbar.
Tip: Keyfactor Command sends SMS (text) messages by leveraging the email to text gateways that many major mobile carriers provide. Check with your carrier for specific instructions. Keyfactor has tested that AT&T can be addressed using 10-digit-number@txt.att.net (e.g., 4155551212@txt.att.net) and Verizon can be addressed using 10-digit-number@vtext.com (e.g., 2125551212@vtext.com). T-Mobile can be addressed using 10-digit-number@tmomail.net (e.g., 2065551212@tmomail.net), but functionality can be spotty. Reliability of alerting via this method depends on the reliability of the carrier’s gateways.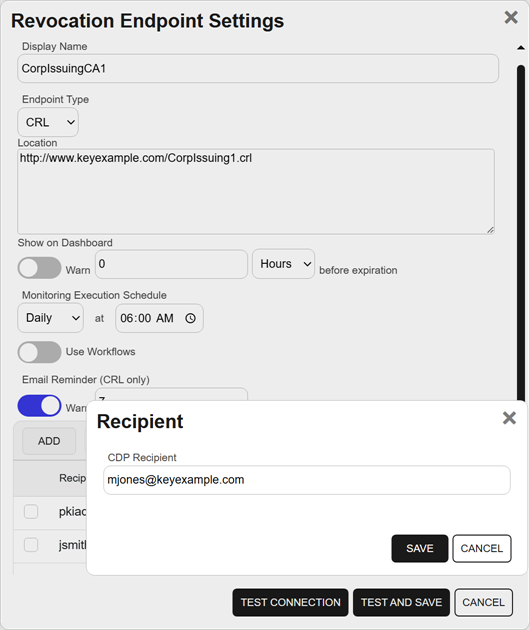
Figure 177: Revocation Monitoring Alert Recipients
-
-
To test the value entered in the Location field to determine if the referenced CRL or OCSP URL can be reached without saving the alert, click Test Connection. To save the alert and test the value in the Location field at the same time, click Test and Save. Records can be saved even if the test fails. Click Cancel to cancel.
Note: The test steps available as part of adding or editing a revocation monitoring alert record do not test whether the CRL or OCSP endpoint is valid. They only test whether a CRL or OCSP endpoint exists at the specified location.
Configuring a Workflow for a Revocation Monitoring Location
For alerts that use workflow, you can open the associated workflow for the alert using the Configure Workflow option.
- On the Revocation Monitoring page, highlight a row in the alerts grid, and click Configure Workflow from the toolbar or right-click menu.
- You will be redirected to the workflow workspace for the workflow associated with the selected alert. If a workflow does not exist for the selected alert, one will be created and pre-populated with the Name, Type, and Revocation Monitoring Alert (key) of the selected alert. Edit the workflow as needed (see Add, Copy, or Modify a Workflow Definition).
Deleting a Revocation Monitoring Location
- On the Revocation Monitoring page, highlight the row in the grid, and click Delete from the toolbar or right-click menu.
- On the Confirm Operation alert, click OK to confirm or Cancel to cancel the operation.
Testing Revocation Alerts
- On the Revocation Monitoring page, select a location from the grid, and click Test from the toolbar or the right-click menu.
- In the Revocation Monitoring Test dialog, select a Start Date for the alert test. For a CRL endpoint, this would be the date to compare against the configured warning period for email reminders and expiration date for the CRL. You can use this option to simulate running the alerts a month from now, for example, to be sure you pick up some expiring CRLs for testing purposes. The date for OCSP endpoints is not significant since these are testing only for the accessibility and validity of the endpoint. For alerts that do not use workflow, enable the Send Emails option if you would like to deliver email messages as part of the test. Alerts that do use workflow will generate a workflow instance for the selected alert.
- Click the Start Tests button to generate the test alert.
-
In the Revocation Monitoring Test: Results dialog, you can review the generated alert to confirm that the alert and the recipients are as expected. Scroll the First, Previous, Next and Last buttons at the bottom of the dialog. The number of alerts generated will display between the navigation buttons.
Note: The display results will vary depending on whether the alert uses workflow to deliver the alerts or the legacy alerting system.
For specific Windows event ID information, see Keyfactor Windows Event IDs.

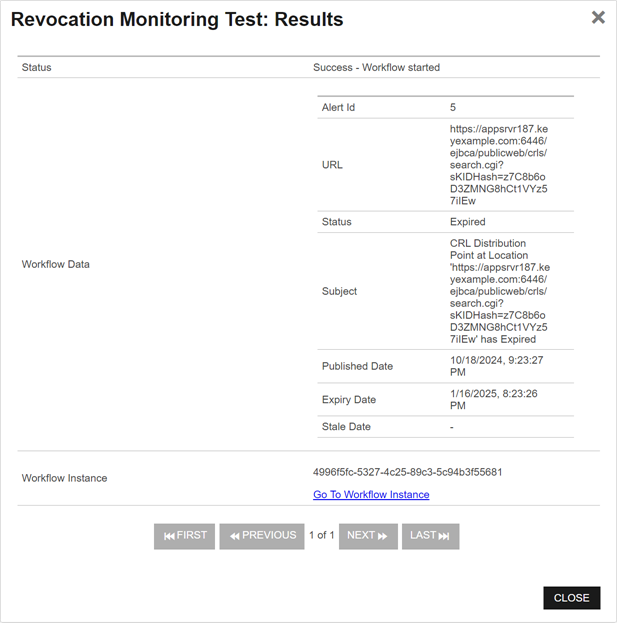
Figure 178: Revocation Monitoring Test Results With and Without Workflow
Was this page helpful? Provide Feedback