
Once you've completed all the preparation steps, you can follow the below instructions to install the gateway and connect to the gateway receiver in the managed environment.
For example, if you had a non-clustered implementation of the gateway and you're changing the implementation to a clustered implementation or you're moving the implementation from one server to another, this will change the dNSHostName attribute on the enrollment service object. In this scenario, the enrollment services object will need to be deleted.
If you do not delete the enrollment services object, you may receive an error of AD Registration Failed when trying to save the gateway configuration. If this occurs, you will need to close the configuration wizard, delete the enrollment services object, and start the configuration wizard again.
For more information, see Identify the Installation User.
To begin the Keyfactor Cloud Gateway installation, execute the WindowsCAGateway.msi file from the installation media and install as follows:
-
On the first installation page, click Next to begin the setup wizard.
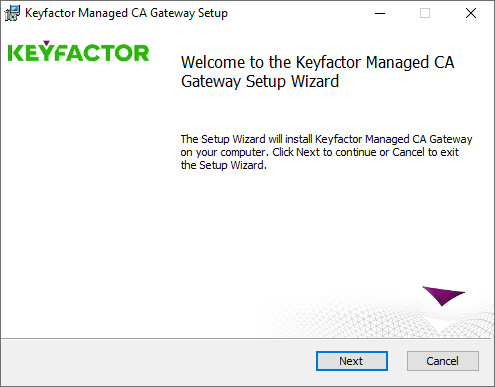
Figure 718: Install Keyfactor Cloud Gateway
- On the End-User License Agreement page, read and accept the license agreement and click Next.
-
On the Custom Setup page, select the features to install. The available features are:
-
Keyfactor Managed CA Gateway
The main gateway service that receives and processes enrollment requests and other CA-related functions.
-
Keyfactor Managed CA Sync Service
The service that synchronizes Active Directory groups and certificate templates from the local forest to the managed environment (see Create or Identify Accounts for Synchronization (Optional) and Create or Identify Templates).
In most environments, both services will be installed on the same machine, but you have the option to split the services and install the gateway service on one or more machines and the sync service on one or more separate machines.
-
-
On the Destination Folder page, select the destination folder for the install. The default installation location is:
C:\Program Files\Keyfactor\Keyfactor Managed CA Gateway - On the next screen, click Install.
-
On the final installation wizard page, leave the “Launch the Configuration Wizard on exit” box selected and click Finish. The configuration wizard should open automatically. This can take several seconds.
Important: If you are using the gateway with the clustering option, stop at this point and create your role in the Microsoft Failover Clustering tool (see Configure the Gateway with Clustering (Optional)) and then continue with the configuration steps. -
In the gateway configuration wizard, you can choose to upload a configuration file to populate the fields. You may have a file saved from a previous run of the configuration wizard or you may be provided one by Keyfactor. To upload a file, in the configuration wizard, click File at the top of the wizard and choose Open Config File. Browse to locate the configuration file. Configuration files have an extension of .cmscfg. The file may be protected with a password. If it is, you will need to provide this password to open the file. Continue with the remainder of the steps, reviewing the tabs to assure that the data is complete and correct.
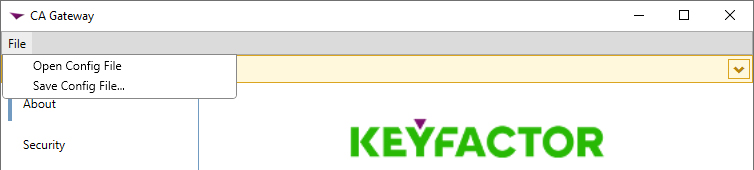
Figure 719: Upload Existing Configuration File
-
In the gateway configuration wizard on the Security tab, click the Edit Security button and in the Edit Security popup, grant appropriate permissions to users, groups and service accounts in the local environment:
-
Users who will enroll for certificates from the managed environment CA need Read and Request permissions.
-
If you would like to allow computers in the local forest to enroll for certificates using the Microsoft MMC rather than Keyfactor Command, add the Domain Computers group, or similarly reference the computer machine accounts, and grant it Request permissions.
-
Users who will revoke certificates or approve or deny pending certificates outside of Keyfactor Command need Read and Issue and Manage Certificate (Manage Certs) permissions.
-
If you’re using Keyfactor Command in the local environment, the service account under which the application pool on the Keyfactor Command Management Portal server is running needs Read permission and the service account under which the timer service is running needs Read permission. Read permission is needed for the application pool account to allow the Keyfactor Command Management Portal to display the status of the gateway as Online on the Keyfactor Command Management Portal dashboard.
-
If you’re using Keyfactor Command and plan to use the renewal event handler in expiration alerts, the service account under which the timer service is running needs Request permission and the service account under which the application pool on the Keyfactor Command Management Portal server is running needs Request permissions if you want to test alerts.
-
If you’re using Keyfactor Command and you are not planning to use Kerberos delegation for the gateway, the service account under which the application pool on the Keyfactor Command Management Portal server is running needs Read and Issue and Manage Certificate (Manage Certs) permissions.
-
If you’re using Keyfactor Command and you are planning to use Kerberos delegation for the gateway, the users who will perform revocation and workflow
 A workflow is a series of steps necessary to complete a process. In Keyfactor Command, it refers to the workflow builder, which allows you to automate event-driven tasks such as when a certificate is requested, revoked or found in a certificate store. (approve/deny pending certificates) through the Keyfactor Command Management Portal need Read and Issue and Manage Certificate (Manage Certs) permissions.
Note: If you've opted to separate the roles for the gateway and sync services onto separate machines, you will need to configure these security settings appropriately for each installation. Most of these settings apply to the gateway service implementation. The sync service implementation will need permissions for at least one administrator (Manage CA).Tip: Manage CA permissions are granted by default to the local Administrators group (BUILTIN\Administrators) on the server on which the gateway is being installed. This is done because local administrator permissions are needed to complete the initial configuration of the gateway. The user performing the install needs to be a member of this local Administrators group either explicitly or via group membership. You may remove the local Administrators group if desired, but at least one user must continue to have the Manage CA permission going forward. Only users with the Manage CA permission can open the gateway configuration tool to make changes to the configuration in the future.When the gateway is first installed, it is registered in Active Directory as a certificate authority
A certificate authority (CA) is an entity that issues digital certificates. Within Keyfactor Command, a CA may be a Microsoft CA or a Keyfactor gateway to a cloud-based or remote CA.. In order to accomplish this step, the user performing the install needs Write and Create Child Object permissions on the following Active Directory container (where DC=keyexample, DC=com are valid for your Active Directory environment):CN=Enrollment Services, CN=Public Key Services, CN=Services, CN=Configuration, DC=keyexample, DC=comBy default, these permissions are granted to members of the Active Directory Domain Admins and Enterprise Admins groups, and the Active Directory Domain Admins group is by default a member of the local Administrators group on domain-joined machines. If this is not the case in your environment, you will need to grant the user installing the gateway these permissions. If changes are made to permissions or to the user's account (e.g., group membership) in the middle of configuration, the user will need to close the configuration wizard and open it again to pick up the changes. Depending on the type of changes made, the user may need to log out of Windows and back in again.
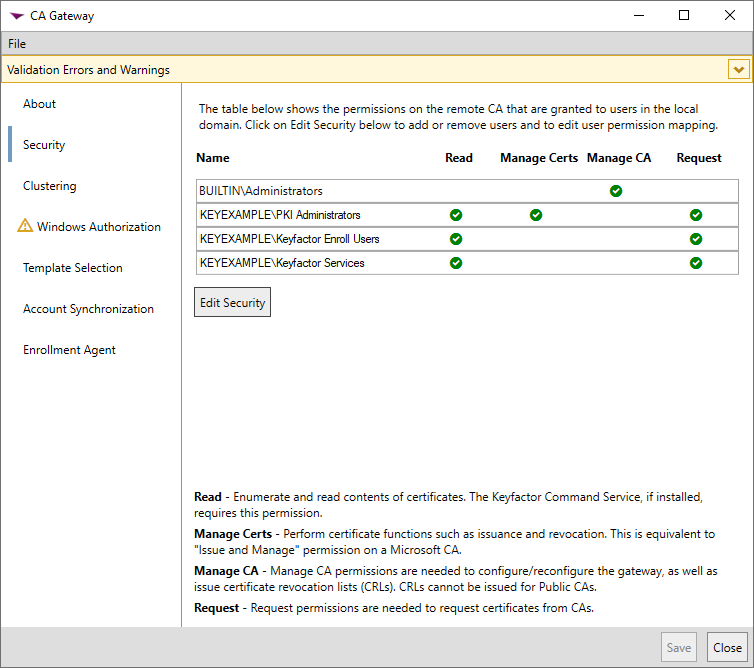
Figure 720: Configure Security
-
-
In the gateway configuration wizard on the Clustering tab, if you have opted to configure clustering, check the Enable Windows Failover Cluster Support box. Click the Select Encryption Certificate button and browse to locate the encryption certificate you created (see Configure the Gateway with Clustering (Optional)). In the Clustered Role Host Name field, enter the FQDN (e.g., CloudGateway.yourlocaldomain.com) of the role you created for the gateway in the Microsoft Failover Cluster Manager (see Configure the Gateway with Clustering (Optional)) and click Look Up Clustered Role. This should cause the Nodes field to populate with the hostnames of all the gateway servers that belong to the cluster role.
Important: You must create a failover cluster role before running the gateway configuration wizard in order to configure clustering (see Configure the Gateway with Clustering (Optional)).Note: If you've opted to separate the roles for the gateway and sync services onto separate machines, typically clustering would only be configured for the gateway, not the sync service, but it is available as an option for both.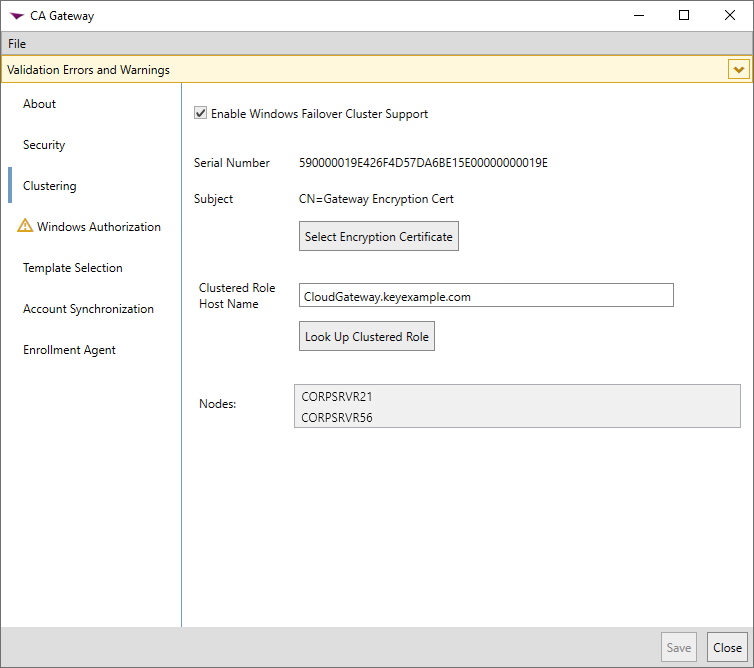
Figure 721: Configure Clustering
-
In the gateway configuration wizard on the Windows Authorization tab, enter the Username and Password of the service account in the managed forest provided to you by Keyfactor. In the Web Proxy URL field, enter the URL of the managed forest gateway service, as provided to you by Keyfactor. For example:
https://exm101keyfactor.keyfactor.com/keyfactorgatewayClick the Validate Connection button to confirm that connectivity to the managed forest is functioning successfully with the provided username, password and URL.
In the CA Logical Name field, enter the name of the issuing CA in the managed forest environment. This name is used to register the gateway as a CA in your local Active Directory and is the name that appears in the Keyfactor Command Management Portal if the gateway is used in conjunction with Keyfactor Command. The name cannot easily be changed once it has been configured.
Important: The CA name entered here must exactly match the CA name in the managed forest environment, including case and spacing, for correct gateway functionality.Click the Select Logical CA Certificate button and choose the CA certificate you acquired and installed as per Acquire and Install a Chain Certificate.
Note: If you've opted to separate the roles for the gateway and sync services onto separate machines, the CA Logical Name section of the page will not appear for the sync service. This configuration information is for the gateway service only.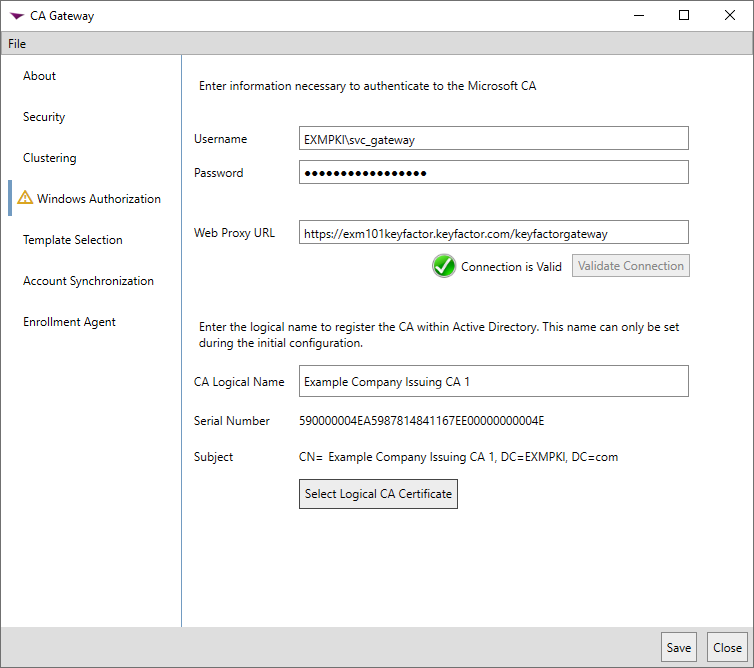
Figure 722: Configure Authorization
- At the bottom of the dialog, click Save to save the configuration done to this point.
-
In the gateway configuration wizard on the Template
A certificate template defines the policies and rules that a CA uses when a request for a certificate is received. Selection tab, check the box in the Issue column next to each template in the local forest that you would like to synchronize to the managed forest and use for enrollment through the Keyfactor Cloud Gateway; this automatically causes the box in the Sync column to be checked (since the template will be synced and available for issuing via the gateway). Check just the box in the Sync column next to each template in the local forest that you would like to synchronize to the managed forest for use only in the managed forest and not use for enrollment through the Keyfactor Cloud Gateway. You can use the Issue All, Sync All and Clear All buttons below the list to select and deselect all the templates.
Tip: If the expected templates do not appear on this tab, confirm that you followed the instructions for identifying templates for use with the gateway (see Create or Identify Templates). Make sure that the user running the gateway installation has read permissions on all the templates you want to configure in the gateway.Note: If you've opted to separate the roles for the gateway and sync services onto separate machines, this tab will appear for both implementations. On the sync service machine, you should configure all the templates that should synchronize to the managed forest. On the gateway service machine, you should configure the templates that should be available for enrollment through the gateway. These may or may not be the same set of templates depending on whether some templates are reserved for enrollment within the managed forest.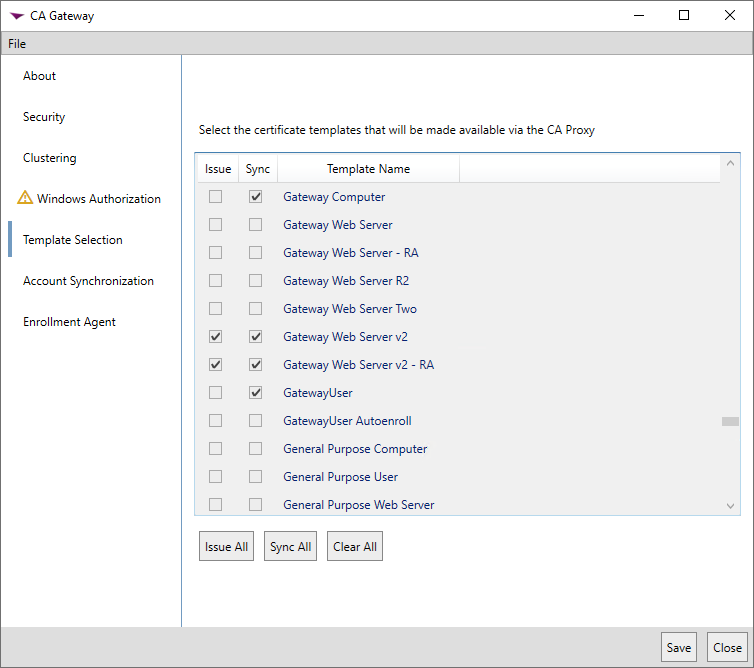
Figure 723: Configure Template Mapping
-
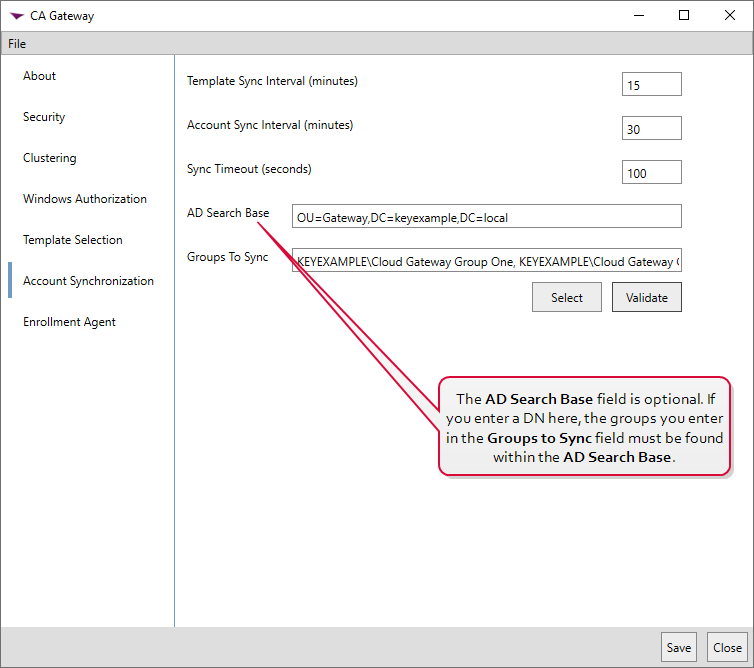
In the gateway configuration wizard on the Account Synchronization tab, change the default Template Sync Interval (minutes) of 15 minutes, if desired. If you wish to synchronize Active Directory users and groups from the local forest to the managed forest, enter a value in the Account Sync Inverval (minutes) field. If you don't wish to synchronize templates or users and groups, set the associated sync value to zero. The Sync Timeout (seconds) defaults to 100. This value will be appropriate in most environments. If you encounter timeout errors when the synchronization service attempts to send data to the cloud-based receiver, you may need to extend this timeout value.
If desired, enter a value in the AD Search Base field to limit the user and group synchronization to just a selected portion of your AD tree (a single OU and any OUs under it, for example). The value should be entered in DN
A distinguished name (DN) uniquely identifies an entry in an LDAP/X.500 directory by specifying a sequence of relative distinguished names (attribute=value pairs) from the entry up to the directory root. It’s written as a comma-separated string—for example: cn=Alice,ou=People,dc=keyexample,dc=com—with the specific attributes defined by the directory’s schema. syntax (e.g., ou=Groups,dc=keyexample,dc=com).Tip: Although the AD Search Base option limits the search to groups found within the specified location, all users in these groups, regardless of their location in Active Directory, will be synchronized.Enter groups in the local forest containing users that should be synchronized to the managed forest in the Groups To Sync field. You may click Select to browse for groups. Click the Validate button to confirm that groups typed into the field have been entered correctly and exist in the specified AD Search Base, if applicable.
Synchronization of users and groups from the local forest is optional. Use of the AD Search Base field is optional.
Important: The account synchronization function requires installation of the Active Directory module for Windows PowerShell, one of the options within the Remote Server Administration Tools Windows feature (see System Requirements), unless you opt to replace the built-in PowerShell scripts that run on Select and Validate with custom scripts that bypass these tools. If you're using clustering, this must be installed on each node in the cluster.Note: If you've opted to separate the roles for the gateway and sync services onto separate machines, the Account Synchronization tab will not appear for the gateway service. This configuration information is for the sync service only. -
In the gateway configuration wizard on the Enrollment Agent tab, check the Use Enrollment Agent Certificate box if you have opted to configure an enrollment agent certificate for CSR validation (see Configure the Enrollment Agent Certificate (Optional)). Click the Select Certificate button and select your enrollment agent certificate.
If you plan to use an enrollment agent certificate to enable enroll on behalf of functionality, do not select this option. Enroll on behalf of configuration is done as a post-install step (see Configure a Certificate for Enroll on Behalf of (Optional)).
Tip: If the expected certificate does not appear, confirm that you imported your enrollment agent certificate as per Import the Enrollment Agent Certificate.Note: If you've opted to separate the roles for the gateway and sync services onto separate machines, the Enrollment Agent tab will not appear for the sync service. This configuration information is for the gateway service only.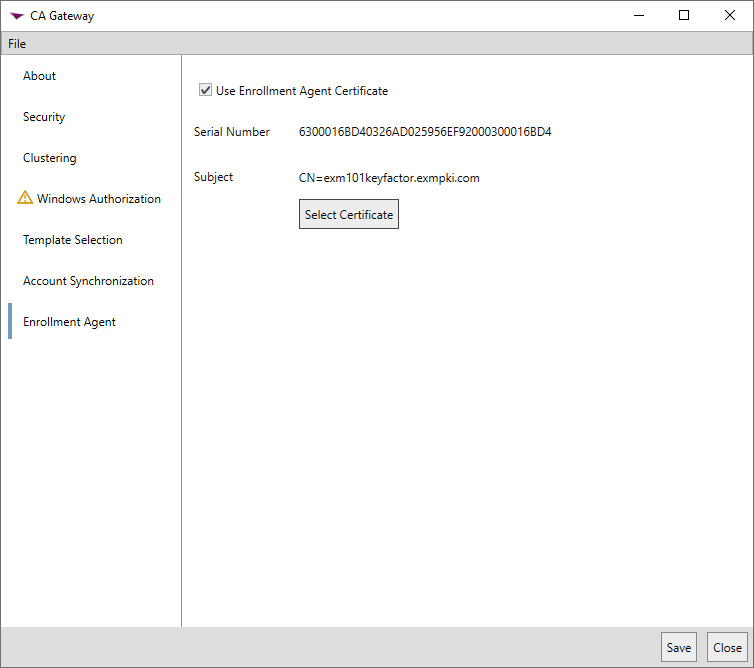
Figure 725: Configure Enrollment Agent for CSR Validation
-
Before completing the configuration wizard, you may choose to save a copy of the configuration as a file for future use. To download the configuration as a file, in the configuration wizard, click File at the top of the wizard and choose Save Config File… . Browse to a location where you want to save the configuration file, enter a file name and click Save. You will be prompted to enter a password to encrypt the data in the file. You may choose to protect the file with a password or not. If you use a password at this time, you will need to provide this password to open the file. Keyfactor strongly recommends using a password to protect production files. If you do not wish to use a password to protect a production file, you may edit the file to remove the sensitive information (the password for the service account entered in the configuration wizard). Once you enter a password or uncheck the encryption box, click OK to save the file.
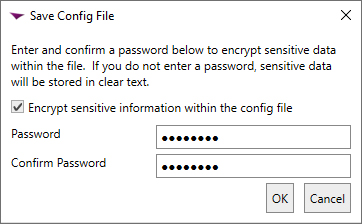
Figure 726: Save Configuration File
- At the bottom of the dialog, click Save and close the dialog.
Was this page helpful? Provide Feedback