
Use the following procedures to add, modify, copy, or delete security roles and claims in Keyfactor Command.
System Settings → Security Roles and Claims → Security Roles Tab
 Adding or Modifying Claims to the Administrator Role
Editing the built-in Administrator role is different than editing any other role. Instead of the full security dialog opening, only the claims tab will open when you click Edit from the Security Roles and Claims page.
To add a new claim to the built-in Administrator security role or update an existing claim:
-
On the Security Role tab, highlight the Administrator row and click Edit from the top of the grid or from the right click menu.
-
Click Add to add a new claim. You can associate existing security claims or add new security claims and associate them in one step. Claim to role associations can also be removed from this tab, but claims cannot be deleted from here. See Claims Tab for more information.
To remove the association of a claim to the role, on the Claims tab, highlight one or more rows and click Remove from the top of the grid or select a single row and choose Remove from the right click menu.
-
Click Save to save changes.
Adding or Modifying a Security Role
To add a new security role or update an existing role:
-
On the Security Role tab, click Add from the menu at the top of the grid to add a new security role; or highlight a row and click Edit from the top of the grid or from the right click menu to modify an existing role.
Note: The built-in Administrator role cannot be edited or deleted (except to add user claims to the role)—it is shown as immutable in the grid. -
The page will change to either the Add Security Role or Role information For <role> dialog. Fill in each tab of the dialog with the information desired for the selected security role as described below.
Details Tab
On the details tab, give the role a Name and Description. Commas are not allowed in the name field. Both fields are required. If desired, add an Email Address for the role. This address can be used from workflows to direct email messages to the owner of certificates for uses such as certificate expiration alerts (assuming the certificate owner for the certificates, a security role, has been populated).
In the Permission Set dropdown, select a permission set to apply to the role. For more information about permission sets, see Permission Sets .
Note: Selecting a permission set limits the permissions available for selection in the dialog to those supported by the permission set. If you select a permission set other than the Global permission set, some permissions may not appear in the dialogs. This includes the Collection The certificate search function allows you to query the Keyfactor Command database for certificates from any available source based on any criteria of the certificates and save the results as a collection that will be availble in other places in the Management Portal (e.g. expiration alerts and certain reports). Permissions, Application Permissions and PAM PAM (Privileged Access Management): Controls privileged access by vaulting credentials, enforcing least-privilege/just-in-time access, rotating secrets, and auditing sessions. Across Keyfactor products, PAM protects diverse sensitive operations and secrets—for example certificate stores and CA credentials—via built-in or third-party providers; external integrations are delivered as custom PAM extensions (several published on Keyfactor’s public GitHub). Provider Permissions tabs, which only appear if the permissions for these are included in the selected permission set.If you change the permission set for a role after permissions have already been granted for the role, any permissions not contained in the new permission set will be removed from the role upon save.
Global Permissions Tab
On the Global Permissions tab, check the boxes for the permissions that are appropriate for the new role (see Security Role Permissions).
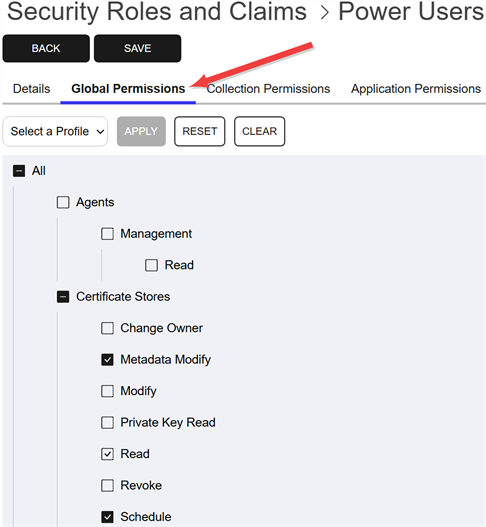
Figure 426: Grant Global Permissions to a Security Role
Tip: If desired, use the dropdown at the top to enable all the Read boxes (Read Only) or All the boxes (Select All). Click Apply to apply the selection in the dropdown across all permissions. Click Reset to return the dialog to the state it was in when last saved and remove any changes made since opening the permissions for editing. Click Clear to uncheck all the boxes.Note: For the most part, when you grant Modify role permissions to an area in the Management Portal, you must also grant Read role permissions to that same area for that security role to receive full functionality. Granting Modify without Read to a user or a group can result in unexpected behavior. See also Certificate Collection Permissions.Note: Security roles for SSH The SSH (secure shell) protocol provides for secure connections between computers. It provides several options for authentication, including public key, and protects the communications with strong encryption. key management are structured somewhat differently than those for most of the rest of the product set, as they don't use the standard Read and Modify convention. For more information, see SSH Permissions.Collection Permissions Tab
Optionally, on the Collection Permissions tab, highlight each certificate collection you would like to set permissions for and click the toggle button for each desired permission (see Certificate Collection Permissions). If you do not opt to set permissions on any collections, the permissions set on the Global Permissions tab will apply to all collections.
Along the top of the Collection Permissions tab, you can see the system-wide certificate collection permissions that have been configured. This is useful for reference. The system-wide settings may also be edited from this tab, if desired.
Any permissions that have been enabled at the system-wide level will not be available for configuration at the collection-level. Toggles for these will be grayed out.
Tip: The search bar at the top of Collection Name column on the collections tab can make it easier to find collections if you have a large number of them.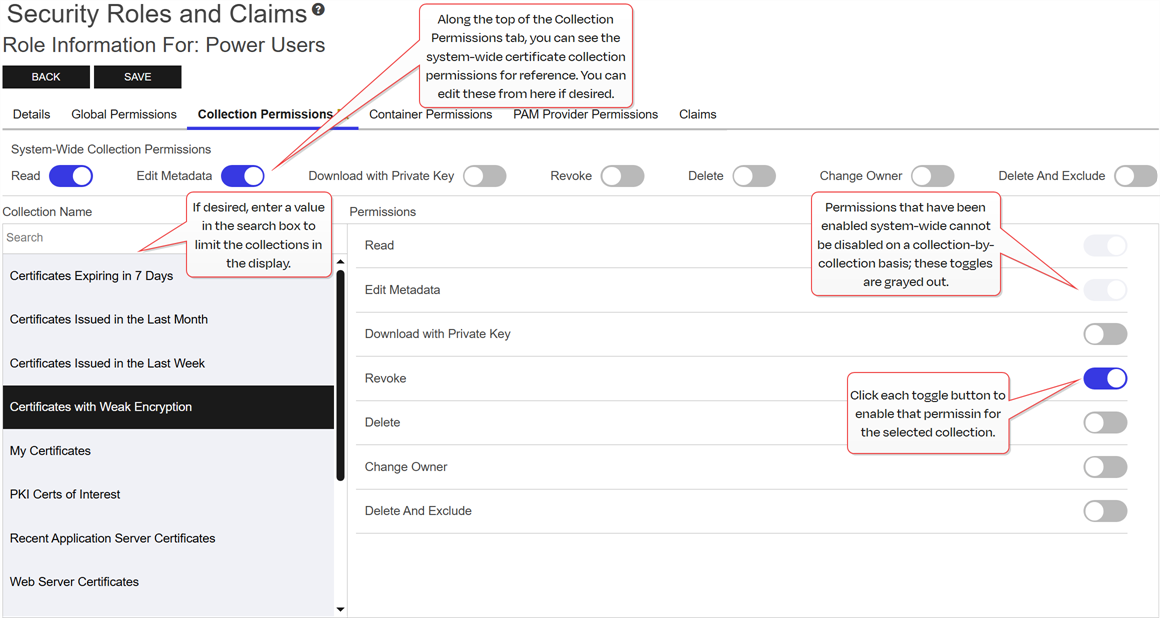
Figure 427: Grant Collection Permissions to a Security Role
Application Permissions Tab
Optionally, on the Application Permissions tab, highlight each certificate store application you would like to set permissions for and click the toggle button for each desired permission (see Application Permissions). If you do not opt to set permissions on any certificate store applications, the permissions set on the Global Permissions tab will apply to all certificate store applications.
Note: Unlike PAM and certificate collection permissions, application permissions are not explicitly listed under global permissions. Instead, they are entirely embedded within certificate store permissions and are not separately highlighted in the certificate store permissions section.Tip: The search bar at the top of Application Name column on the applications tab can make it easier to find certificate store applications if you have a large number of them.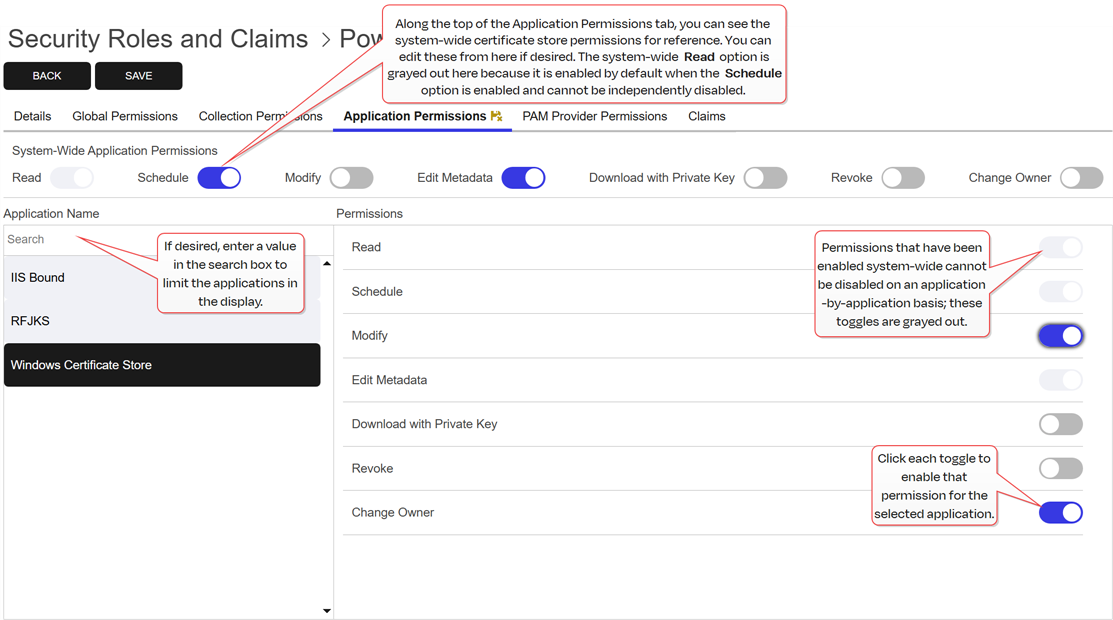
Figure 428: Grant Application Permissions to a Security Role
PAM Provider Permissions Tab
Optionally, on the PAM Provider Permissions tab, highlight each PAM provider you would like to set permissions for and click the toggle button for each desired permission (see PAM Permissions). If you do not opt to set permissions on any PAM providers, the permissions set on the Global Permissions tab will apply to all PAM providers.
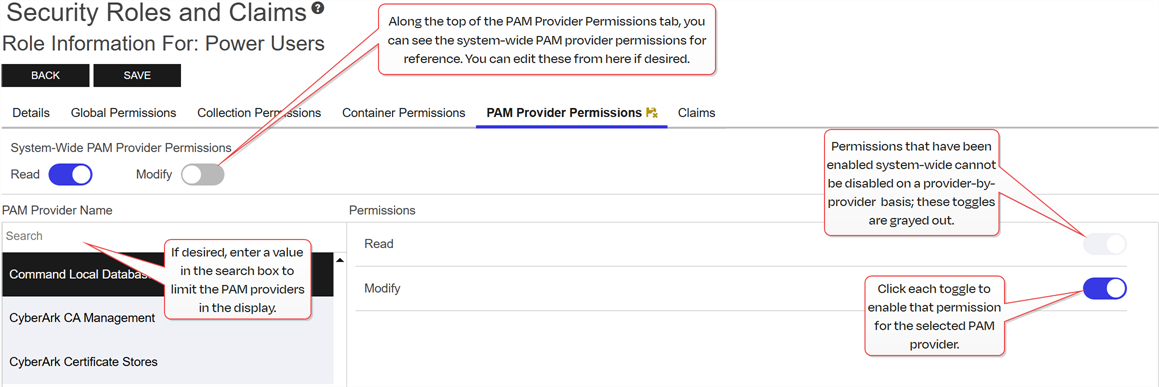
Figure 429: Grant PAM Provider Permissions to a Security Role
Tip: The search bar at the top of PAM Provider Name column on the PAM Provider Permissions tab can make it easier to find PAM providers if you have a large number of them.Claims Tab
On the Claims tab, you associate security claims with the security role to grant the permissions associated with the role to claim owners. You can associate existing security claims or add new security claims and associate them in one step. Claim-to-role associations can also be removed from this tab, but claims cannot be deleted from here.
To add a new claim and associate it with the role:
- On the Claims tab, click Add from the menu at the top of the grid to associate a new or existing security claim with the role.
- On the Select Existing Claims dialog, click Add New at the top of the grid to add a new security claim.
-
In the Add Claim dialog, select a Claim Type in the dropdown. Supported claim types are:
-
Active Directory User: An Active Directory user account.
-
Active Directory Group: An Active Directory group.
-
Active Directory Computer: An Active Directory machine account.
-
OAuth Client Id: An open authorization 2.0 client application claim.
-
OAuth Object Id: An open authorization 2.0 claim of a type not covered by client, role or subject.
-
OAuth Role: An open authorization 2.0 group claim.
-
OAuth Subject: An open authorization 2.0 user claim.
-
-
In the Claim Value field, enter the identifying information for the entity specified in the claim. For Active Directory users and groups, this will be in the form DOMAIN\user or group name (e.g., KEYEXAMPLE\PKI
A public key infrastructure (PKI) is a set of roles, policies, and procedures needed to create, manage, distribute, use, store and revoke digital certificates and manage public-key encryption. Administrators). For Active Directory computers, this will be in the form of a machine account (e.g., KEYEXAMPLE\MyServer$). For an identity provider other than Active Directory, this will vary.Important: The built-in Active Directory groups Domain Admins and Enterprise Admins cannot be used directly to grant access to the Management Portal due to how these groups function within Windows. You can create a custom Active Directory group, reference that group in the Management Portal, and add the built-in Domain Admins or Enterprise Admins group to that custom group, if desired. -
In the Provider dropdown, select the correct identity provider for the claim—either Active Directory or the identity provider name you configured using the configuration wizard.
Note: The identity provider(s) that appear in this dropdown are determined by the permissions of the user accessing the Management Portal and the permission set on the identity provider(s). The user must be assigned a security role that has been granted the Identity Providers > Read permission and that security role must have the same permission set applied to it as has been applied to the identity provider. For more information about permission sets, see Permission Sets. -
In the Description field, enter a description for the security claim. For example, the user’s full name or the group owner. This field is required.
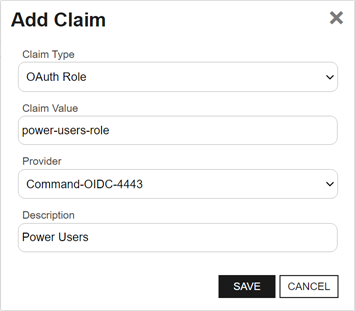
Figure 430: Add a Security Claim for an OAuth Identity Provider Role
- Click Save to save the new claim.
- The new claim will appear in the Select Existing Claims grid. Check the box next to the new claim, and any other desired claim, and click Include or Include and Close to associate the claim(s) with this role. You may use the search at the top of the dialog to limit the claims shown in the dialog grid (see Using the Security Claim Search Feature).
To associate an existing claim with the role:
- On the Claims tab, click Add from the top of the grid to associate an existing claim.
-
On the Select Existing Claims dialog, check the box next to each desired claim and click Include or Include and Close to associate the claim(s) with this role. You may use the search at the top of the dialog to limit the claims shown in the dialog grid (see Using the Security Claim Search Feature).
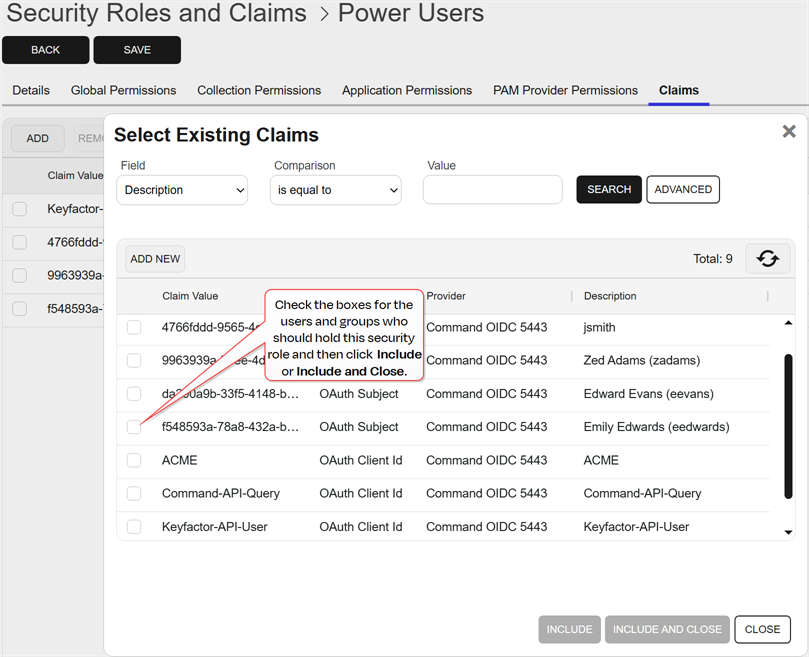
Figure 431: Associate Existing Claims with a Security Role
To remove the association of a claim to the role, on the Claims tab, highlight one or more rows and click Remove from the top of the grid.
- Click Save to save the role.
Copying a Security Role
To copy a security role:
- On the Security Role tab, highlight a row and click Copy from the top of the grid or from the right click menu to copy an existing role.
-
Give the new role a Name and Description.
Note: Copying a security role will also assign the new role to all the same security claims as the original role. - Click Save to save the new role.
Deleting a Security Role
To delete a security role:
- On the Security Role tab, highlight a row, and click Delete from the top of the grid or from the right click menu to delete an existing role.
- Click OK to the Confirm Operation message.
Was this page helpful? Provide Feedback