Installing the Keyfactor SCEP Server
To begin the Keyfactor SCEP installation, execute the SCEPInstaller.msi file from the installation media and install as follows.
-
On the first installation page, click Next to begin the setup wizard.
- On the next page, read and accept the license agreement and click Next.
-
On the next page, select the destination folder for the install. The default installation location is:
C:\Program Files\Keyfactor\Keyfactor SCEP Server - On the next screen, click Install.
- On the final installation wizard page, click Finish. The configuration tool should start automatically. This can take several seconds.
- Microsoft SQL: If you've opted to store Keyfactor SCEP challenges in a Microsoft SQL database, pause at this step and configure the SQL database (see Using a SQL Database (Optional)) and then continue with the configuration steps.
-
Custom Templates: If you opted to create custom templates to generate SCEP encryption and signing certificates with keys greater than 1024 bits and have manually created certificates per Create the Keyfactor SCEP Certificates, close the configuration tool and make the following registry updates before continuing. On the Keyfactor SCEP server:
-
Use the Registry Editor (regedit) to open the following configuration area:
HKEY_LOCAL_MACHINE\SOFTWARE\Certified Security Solutions\SCEP Server\Configuration -
In the Configuration key, create a String Value field and name it EncryptionSerial.
-
Double-click to edit the EncryptionSerial configuration setting and paste in the serial number for the Keyfactor SCEP Server Encryption certificate that you made note of in Create the Keyfactor SCEP Certificates. Click OK to save.
-
In the Configuration key, create a String Value field and name it SigningSerial.
-
Double-click to edit the SigningSerial configuration setting and paste in the serial number for the Keyfactor SCEP Server Signing certificate that you made note of in Create the Keyfactor SCEP Certificates. Click OK to save.
-
Re-open the Keyfactor SCEP Configuration tool from the Windows menu.
-
-
SCEP Enrollment Section: In the Keyfactor SCEP Configuration tool in the SCEP Enrollment section:
- Enrollment CA: Select the CA from which certificates will be issued via Keyfactor SCEP.
- Enrollment Template: Select the certificate template. Only templates available on the selected CA will be shown in the dropdown.
-
Challenge Type:
- Unique Challenge: Generates a unique challenge password for each enrollment request. This option provides the strongest security and is recommended for most environments.
- Single Challenge: Uses the same challenge password for all enrollment requests. This option reduces security because the shared password must be protected and periodically rotated. Use only if your environment requires a static challenge value.
- No Challenge: Does not require a challenge password. This option provides the least security and should be used only in tightly controlled environments where other safeguards restrict access to the Keyfactor SCEP server.
- Concurrent Challenges: Enter the number of challenge passwords that may be issued and remain valid simultaneously during the configured Challenge Lifetime. This value should reflect your expected enrollment volume.
- Challenge Lifetime (minutes): Enter a number of minutes for which Keyfactor SCEP challenges will be valid.
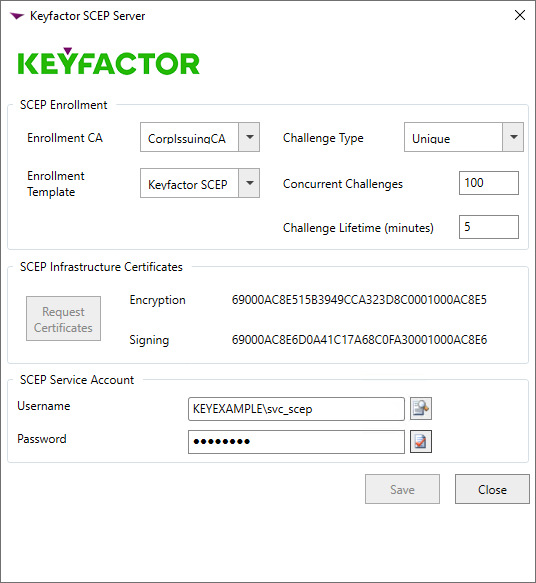
Figure 9: SCEP Configuration Tool
-
SCEP Infrastructure Certificates Section: If you are not using manually acquired encryption and signing certificates using custom templates, click Request Certificates to automatically request certificates for the Keyfactor SCEP server.
The Keyfactor SCEP server requests certificates using the CEP Encryption and Exchange Enrollment Agent (Offline request) templates. It attempts to locate a CA in the environment that is configured to issue certificates based on these templates, starting with the CA selected in the SCEP Enrollment section.
If no CA is available to issue certificates from these templates, the request fails. In that case, you must configure one or more CAs in the environment to allow issuance from the required templates, and then repeat the Request Certificates step.
Note: If you manually configured certificates in the registry, you should see the serial numbers for your certificates in the SCEP Infrastructure Certificates section of the page.Tip: If multiple CAs publish the required SCEP infrastructure certificate templates and you want to control which CA issues the certificates, temporarily select the desired CA in the SCEP enrollment section before requesting the certificates.After the infrastructure certificates have been issued, you can change the selected CA back to your preferred enrollment CA.
- SCEP Service Account Section: Enter the user name (DOMAIN\User format) and password of the Active Directory service account under which the Keyfactor SCEP application pool will run. You may use the people picker button (
 ) to browse for the account. Click the verify button (
 ) to confirm that the username and password entered are valid.
- At the bottom of the configuration tool, click Save and then close the dialog.
Was this page helpful? Provide Feedback