On the Server Groups tab of the Server Manger page you create server groups that allow you to organize SSH![]() The SSH (secure shell) protocol provides for secure connections between computers. It provides several options for authentication, including public key, and protects the communications with strong encryption. servers and set synchronization schedules and management policies on a group level. You must create at least one server group before you can add SSH servers into the Keyfactor Command Management Portal.
The SSH (secure shell) protocol provides for secure connections between computers. It provides several options for authentication, including public key, and protects the communications with strong encryption. servers and set synchronization schedules and management policies on a group level. You must create at least one server group before you can add SSH servers into the Keyfactor Command Management Portal.

Figure 355: SSH Server Groups Grid
 Add or Edit a Server Group
To add or edit a new server group:
- In the Management Portal, browse to SSH > Server Manager.
- On the Server Manager page, select the Server Groups tab (the default when you first visit the page).
-
On the Server Groups tab, click Add or Edit.
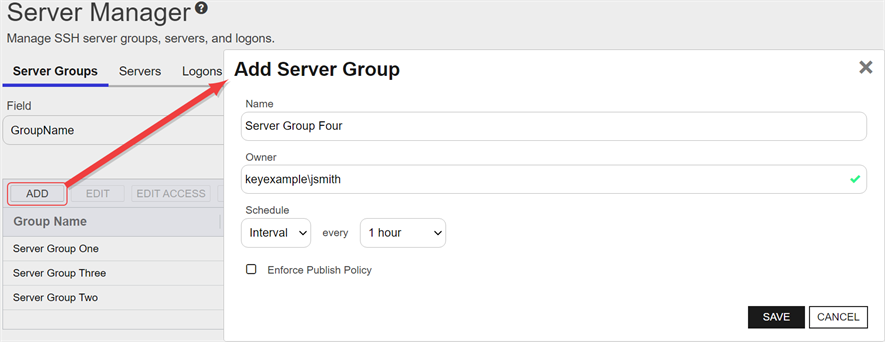
Figure 356: Add a Server Group
- In the Add/Edit Server Group dialog, enter a name for the group in the Name field.
-
In the Owner dropdown, enter or select an Active Directory user with access to the Keyfactor Command Management Portal holding either the SSH Server Admin or SSH Enterprise Admin role (see SSH Permissions). Any users with one of these roles who have previously been made an owner on a server group or enrolled for an SSH key (see My SSH Key Operations) will appear in the Owner dropdown.
Tip: The owner can only be changed by a Keyfactor Command user who holds the SSH Enterprise Admin role (see SSH Permissions). - On an edit, the Server Group Id field will be viewable but cannot be modified. This GUID is useful when installing the Keyfactor Bash Orchestrator
 The Bash Orchestrator, one of Keyfactor's suite of orchestrators, is used to discover and manage SSH keys across an enterprise..
 -
In the Schedule dropdown, select a frequency for the server synchronization job. Possible options are:
-
Interval—Enter an interval from every 1 minute to every 12 hours
-
Daily—Enter selected time
-
Weekly—Enter a selected day or days of the week at a selected time
-
Monthly—Enter a selected day of the month (1st through 27th) at a selected time
Tip: During initial configuration, you may want to set a short timeframe for job frequency and then extend it as the servers settle into a management routine. -
- If desired, check the Enforce Publish Policy box to set the server group to inventory and publish policy mode (see SSH).
- Click Save to save the server group.
 Edit Access to a Server Group
Using the Edit Access function you create mappings between Keyfactor Command user accounts associated with SSH keys and Linux logons in order to publish the SSH public keys to all the Linux servers that belong to the selected server group (see SSH). You can also remove the mappings from here, which causes the SSH public keys to be removed from the Linux servers belonging to the selected server group.
Before adding a logon to user mapping, be sure that you have switched either the server group or all servers in the group to which you will add your mapping to inventory and publish policy mode (see Server Manager) so that the key for the user will be published to the servers in the group. If the servers in the server group are in inventory only mode and you add a mapping for it in Keyfactor Command, the mapping will appear in Keyfactor Command only and the key for the user will not be published out to the servers in the server group. If only some servers in the server group are in inventory and publish policy mode, the key for the user will only be published to those servers.
To edit the access for a server group, create a mapping between a Linux logon and a Keyfactor Command user, and publish the user's key to all the SSH servers belonging to that server group:
- In the Management Portal, browse to SSH > Server Manager.
- On the Server Manager page, select the Server groups tab.
- In the Server groups grid, locate the server group that contains the servers you wish to publish an SSH key to by mapping a Keyfactor Command user to a Linux logon on that server group.
- Right-click the server group and choose Edit Access from the right-click menu or highlight the row in the server groups grid and click Edit Access at the top of the grid.
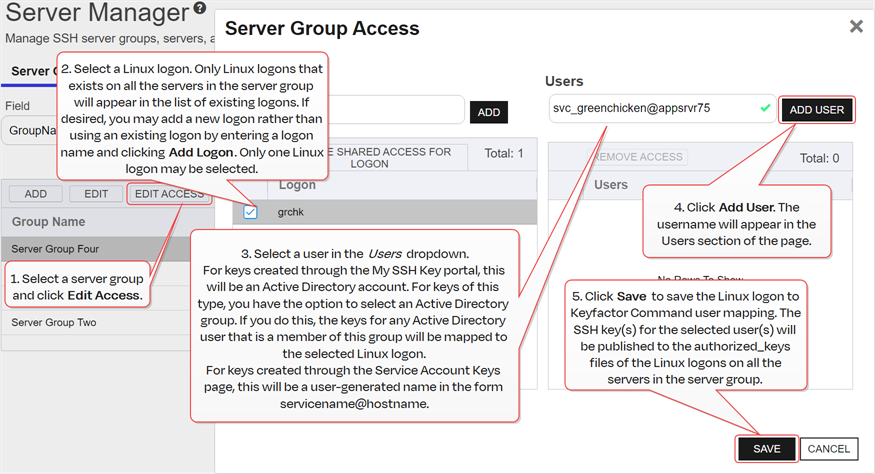
Figure 357: Edit Access for an SSH Server Group
-
On the Access Management page, select an existing Logon on the left side of the page. Logons only appear here if they exist with the same spelling on all servers in the server group. If you wish to add a new logon, enter the new logon name in the Logon field at the top of the left side of the page and click Add Logon. The new logon appears at the bottom of the Logon list. Click the Logon list title to sort the list, if desired. Select the new logon. Only one logon may be selected.
Tip: If you have enabled SSSD support for your Keyfactor Bash Orchestrator Keyfactor orchestrators perform a variety of functions, including managing certificate stores and SSH key stores. and are adding a domain user, specify the user in username@domain format. For example bbrown@keyexample.com (or, depending on SSSD configuration, such as the case-sensitivity setting; BBROWN@keyexample.com). Note that the logon may be modified by the SSSD configuration file in ways in which Keyfactor Command cannot know about. Refer to SSH-SSSD Case Sensitivity Flag for guidance on what to enter based on how the SSSD case sensitivity flag is configured.
 -
In the Users dropdown at the top of the right side of the page, select a user or service account to associate the logon with. Only Keyfactor users that have keys stored in Keyfactor Command, that have been designated as server group owners, or AD users or groups that have been previously entered for association with a logon will appear in the dropdown. If desired, you may enter an Active Directory user or group name in this field. Using an Active Directory group to create Linux logon to Keyfactor user mappings will cause the keys stored in Keyfactor Command for any Active Directory users that are members of this group to be mapped to the selected Linux logon and published to the servers on which the Linux logon exists. Any Active Directory users that are members of this group but who do not have keys stored in Keyfactor Command will not be mapped to the selected Linux logon. Click Add User.
Tip: For keys created through the My SSH Key portal (see My SSH Key Operations), a Keyfactor user is an Active Directory user account. For keys created through the Service Account Keys page (see Service Account Key Operations), a Keyfactor user is a user-generated service account name of the form servicename@hostname The unique identifier that serves as name of a computer. It is sometimes presented as a fully qualified domain name (e.g. servername.keyexample.com) and sometimes just as a short name (e.g. servername)..
 - Repeat step 6 for any other user or service accounts that you wish to map to this logon on the servers in this server group.
- Click Save.
To remove a mapping of a Linux logon to a Keyfactor Command user for all the servers in a server group, remove the public key![]() In asymmetric cryptography, public keys are used together in a key pair with a private key. The private key is retained by the key's creator while the public key is widely distributed to any user or target needing to interact with the holder of the private key. from the Linux logon's authorized_keys files:
In asymmetric cryptography, public keys are used together in a key pair with a private key. The private key is retained by the key's creator while the public key is widely distributed to any user or target needing to interact with the holder of the private key. from the Linux logon's authorized_keys files:
- In the Management Portal, browse to SSH > Server Manager.
- On the Server Manager page, select the Server Groups tab.
- In the Server Groups grid, locate the server group that contains the servers you wish to remove an SSH key from by unmapping a Keyfactor Command user from a Linux logon on that server group.
-
Right-click the server group and choose Edit Access from the right-click menu or highlight the row in the server groups grid and click Edit Access at the top of the grid.
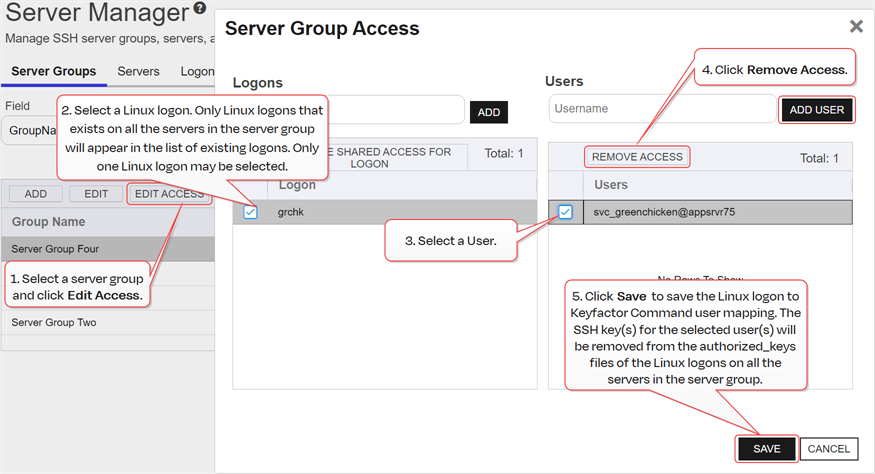
Figure 358: Edit Access for an SSH Server
- On the Access Management page, select a Logon on the left side of the page. Only one logon may be selected.
-
In the Users section on the right side of the page, select a user or service account to unmap from the logon. Click Remove Access under Users. The Linux logon to Keyfactor user mapping for the selected user will be removed and the user's SSH key will be removed from the authorized_keys files of the Linux logons on all the servers in the server group.
Tip: Clicking Remove Shared Access for Logon on the Logons side of the page removes all Linux logon to Keyfactor user mappings for the selected logon with one click without the need to select the users on the Users side of the page.If a logon has user mappings on some servers and not others in the group (see the example, below), these will not appear in the Server Group Edit dialog, and none of these user mappings will be removed. The Remove Shared Access for Logon option only removes user mappings that are visible in the Server Group Access dialog.
This option does not delete the logon from any servers (see Add or Edit Access for an SSH Logon).
- Repeat step 6 for any other user or service accounts that you wish to unmap from this logon on the servers in this server group.
- Click Save.
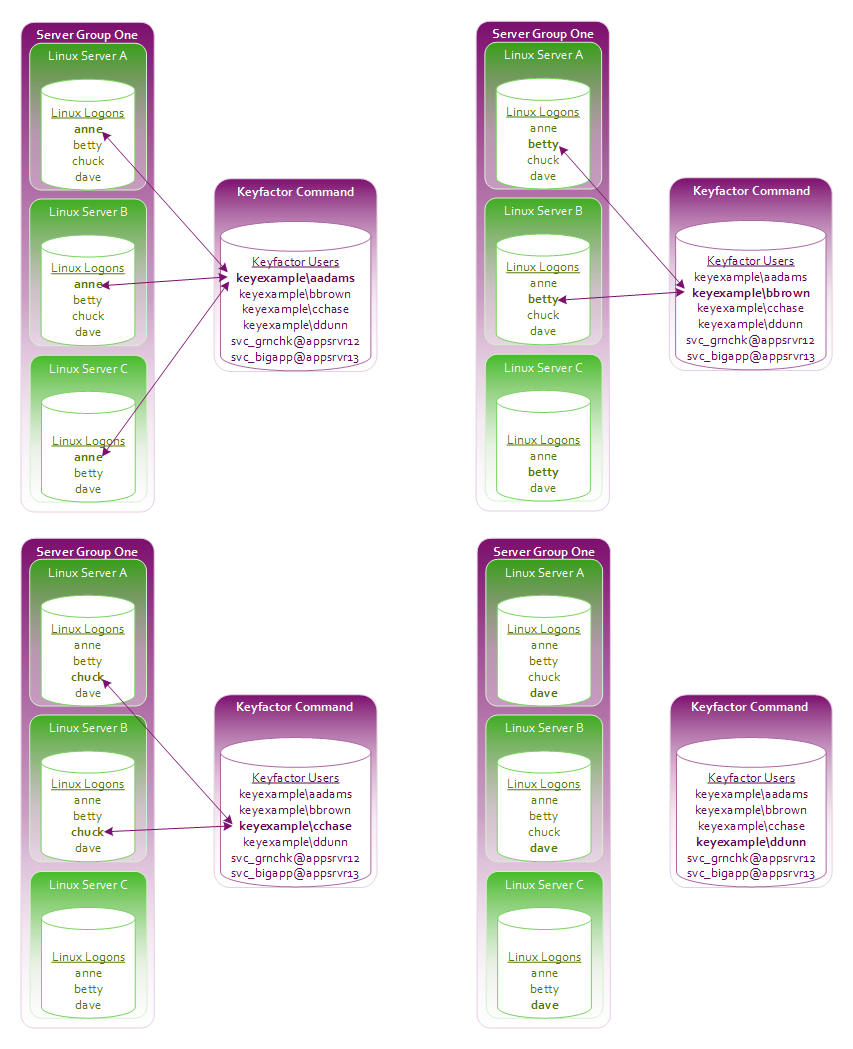
- Anne has acquired an SSH key using My SSH Key (see My SSH Key Operations) and an administrator has mapped it to her Linux logon for all three servers in Server Group One.
- Betty has acquired an SSH key using My SSH Key and an administrator has mapped it to her Linux logon account for servers A and B but not server C.
- Chuck has acquired an SSH key using My SSH Key and an administrator has mapped it to his Linux logon account for servers A and B. No Linux account exists for Chuck on server C and no user mapping has been done for Chuck for this server.
- Dave has acquired an SSH key using My SSH Key but it has not yet been mapped to his Linux logon account for any servers.
You can see these Linux logon to Keyfactor user mappings in Figure 359: Linux Logon to Keyfactor User Mappings for Anne, Betty, Chuck and Dave.
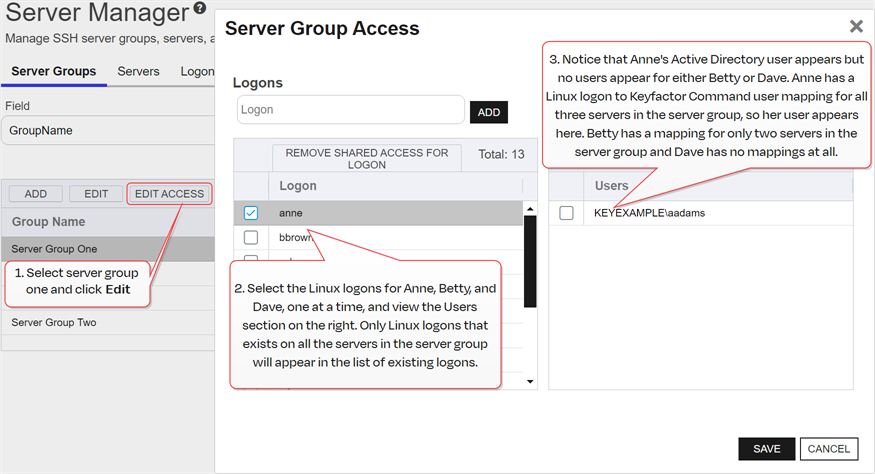
As a result of this logon setup and mapping configuration, when you open the Server Group Access dialog for Server Group One (see Figure 360: Server Group Access Editing Example), in the Logon column you will see anne, betty and dave but not chuck.
- Chuck is missing because he does not have a Linux logon account on server C.
- As you click on each of the users anne, betty and dave in the Logon column, on the right in the Users column, you will see that:
- Anne's mapped user appears, but a mapped user does not appear for either Betty or Dave.
- In Betty's case, this is because her Keyfactor user to Linux logon mapping does not exist for server C. Mapped users only appear if they are consistent across all Linux logons for a user.
- In Dave's case, this is because he does not have a Keyfactor user to Linux logon mapping for any of the servers.
- Other shared Linux logons exist on the servers—such as root—that are not referenced in this example but are shown in Figure 360: Server Group Access Editing Example.
The administrator decides to do the following:
- On the Server Groups tab, she selects Server Group One and clicks Edit Access at the top of the grid.
- In the Server Group Access for Server Group One, she adds a Linux logon for chuck on the left and clicks Save without adding any user mappings on the right.
- Since Chuck already had Linux logon accounts on servers A and B, no changes are made on those servers. A Linux logon account is added on server C for Chuck.
- When the administrator opens the Server Group Access for Server Group One again, she sees Chuck's Linux logon on the left. When she clicks on chuck, no Users are shown on the right because Chuck only has Linux logon to Keyfactor user mappings for servers A and B, not for server C.
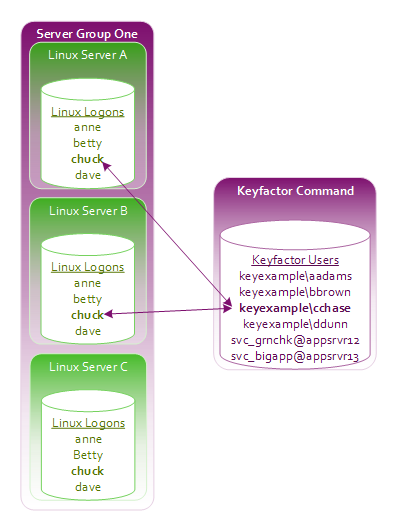
Figure 361: Concept: Add Linux Logon for Chuck on Server C
- In the Server Group Access for Server Group One, she selects chuck on the left and creates a mapping to Chuck's SSH key acquired through My SSH Key. This adds the key to the authorized_keys file for Chuck on any servers in the server group that lack the key—in this case, server C. This then completes the mappings for Linux logon the Keyfactor user for Chuck for the servers in this server group. Chuck's user will then appear in the Server Group Access dialog when Chuck's Logon is selected.
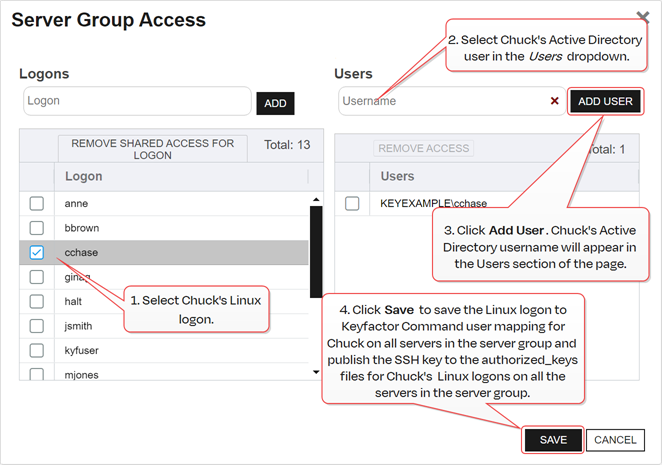
Figure 362: Server Group Access: Add Linux Logon for Chuck on Server C
- In the Server Group Access for Server Group One, she selects betty on the left and creates a mapping to Betty's Active Directory account, which is associated with the SSH key acquired through My SSH Key, and to a service account key for Betty—svc_grnchk@appsrvr12 and clicks Save. Since Betty already had Linux logon to Keyfactor user mappings for servers A and B and her SSH key was already on these servers, no changes are made to these servers. Her key acquired through My SSH Key is published out to server C and added to her authorized_keys file on that server. Betty had no previous mappings for the SSH service key svc_grnchk@appsrvr12, so this key is published out to all three servers in the server group and added to her authorized_keys files on those servers.
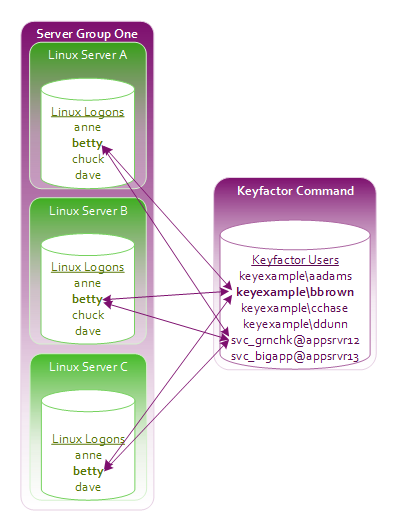
Figure 363: Add Logon to User Mapping for Betty
- At a later date, the administrator decides to remove Betty’s access to the service account key. In the Server Group Access for Server Group One, she selects betty on the left and selects the service account key svc_grnchk@appsrvr12 on the right. She clicks Remove Access and then Save. The SSH key for the svc_grnchk@appsrvr12 service is removed from Betty's authorized_keys file on servers A, B and C. When she opens the Server Group Access dialog again and selects Betty, she sees Betty's Active Directory account, associated with the SSH key acquired through My SSH Key, but not the svc_grnchk@appsrvr12 service account.
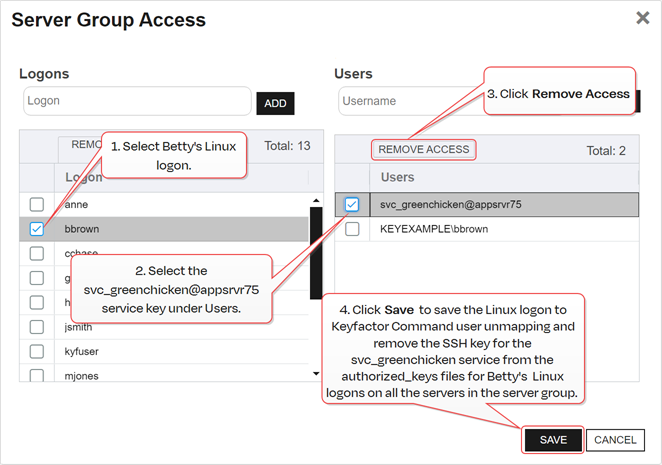
Figure 364: Remove Logon to User Mapping for Betty
- She decides to add Dave’s key to the servers. On the Logons tab, she selects one of Dave's Linux logons on one of the servers in Server Group One and clicks Edit at the top of the grid. In the Edit Logon dialog, she changes to the Access Management tab, selects Dave's Active Directory account in the Users dropdown, and clicks Add User and Save. She repeats these steps for all the servers in Server Group One (servers A, B and C). Dave's SSH key acquired through My SSH Key is published out to all three servers in Server Group One and added to his authorized_keys files on those servers.
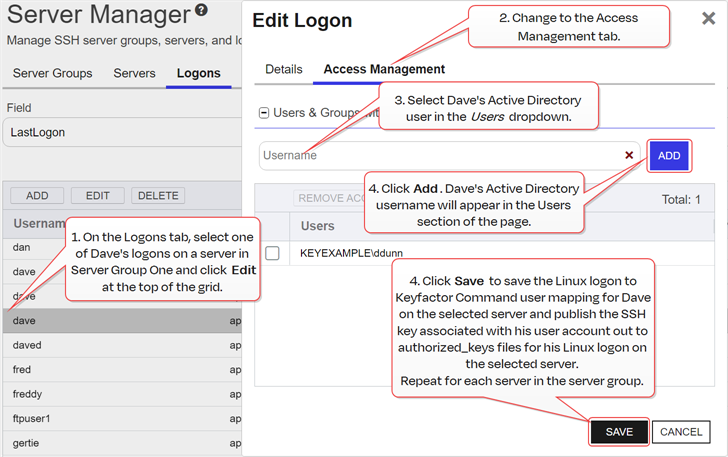
Figure 365: Add Individual Logon to User Mappings for Dave
On the Server Groups tab, she selects Server Group One and clicks Edit Access at the top of the grid. In the Server Group Access for Server Group One, she selects Dave's Linux logon and sees that Dave's Active Directory account appears in the Users section on the right when it did not previously. This is because she created Linux logon to Keyfactor user mappings for Dave individually on the Logons tab for all the servers in Server Group One. If she had only done this for some of the servers in Server Group One, Dave's Active Directory user would not appear on the Server Group Access dialog.
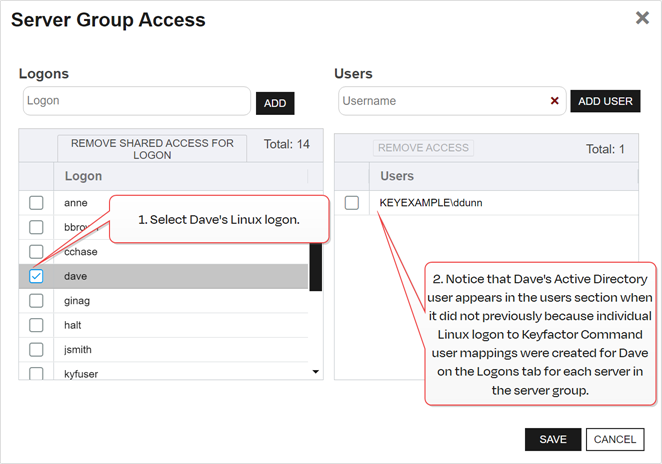
Figure 366: View Server Group Logon to User Mappings for Dave
 Delete a Server Group
To delete a server group, highlight the row in the server groups grid and click Delete at the top of the grid or right-click the group in the grid and choose Delete from the right-click menu.
 View Group Members of a Server Group
To view the servers belonging to a server group, highlight the row in the server groups grid and click View Group Members at the top of the grid or right-click the group in the grid and choose View Group Members from the right-click menu. This will take you to the Servers tab with the advanced search populated by a query for the selected server group name.
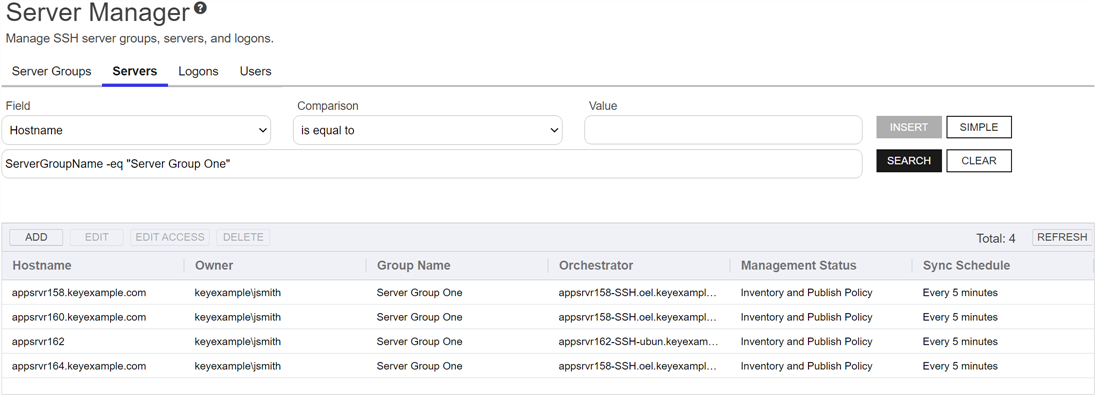
Figure 367: View Members of an SSH Server Group
You can also find the help icon (![]() ) at the top of the page next to the Log Out button. From here you can choose to open either the Keyfactor Software & Documentation Portal at the home page or the Keyfactor API Endpoint Utility.
) at the top of the page next to the Log Out button. From here you can choose to open either the Keyfactor Software & Documentation Portal at the home page or the Keyfactor API Endpoint Utility.
Keyfactor provides two sets of documentation: the On-Premises Documentation Suite and the Managed Services Documentation Suite. Which documentation set is accessed is determined by the Application Settings: On-Prem Documentation setting (see Application Settings: Console Tab).
Was this page helpful? Provide Feedback
