The workflow![]() A workflow is a series of steps necessary to complete a process. In the context of Keyfactor Command, it refers to the workflow builder, which allows you automate event-driven tasks when a certificate is requested or revoked. builder in Keyfactor Command is a powerful feature that allows you to manage certificate enrollments, renewals, and revocations on a per template
A workflow is a series of steps necessary to complete a process. In the context of Keyfactor Command, it refers to the workflow builder, which allows you automate event-driven tasks when a certificate is requested or revoked. builder in Keyfactor Command is a powerful feature that allows you to manage certificate enrollments, renewals, and revocations on a per template![]() A certificate template defines the policies and rules that a CA uses when a request for a certificate is received. basis, end-to-end. It can also monitor certificate collections on a periodic basis for certificates that change membership status based on the query criteria of a specified certificate collection
A certificate template defines the policies and rules that a CA uses when a request for a certificate is received. basis, end-to-end. It can also monitor certificate collections on a periodic basis for certificates that change membership status based on the query criteria of a specified certificate collection![]() The certificate search function allows you to query the Keyfactor Command database for certificates from any available source based on any criteria of the certificates and save the results as a collection that will be availble in other places in the Management Portal (e.g. expiration alerts and certain reports).. Out of the box, there are workflow builder steps such as requiring approvals for actions like certificate enrollment
The certificate search function allows you to query the Keyfactor Command database for certificates from any available source based on any criteria of the certificates and save the results as a collection that will be availble in other places in the Management Portal (e.g. expiration alerts and certain reports).. Out of the box, there are workflow builder steps such as requiring approvals for actions like certificate enrollment![]() Certificate enrollment refers to the process by which a user requests a digital certificate. The user must submit the request to a certificate authority (CA). and revocation requests, sending email notifications, and running PowerShell scripts and API
Certificate enrollment refers to the process by which a user requests a digital certificate. The user must submit the request to a certificate authority (CA). and revocation requests, sending email notifications, and running PowerShell scripts and API![]() A set of functions to allow creation of applications. Keyfactor offers the Keyfactor API, which allows third-party software to integrate with the advanced certificate enrollment and management features of Keyfactor Command. requests as part of the request flow.
A set of functions to allow creation of applications. Keyfactor offers the Keyfactor API, which allows third-party software to integrate with the advanced certificate enrollment and management features of Keyfactor Command. requests as part of the request flow.
 Working with the Keyfactor Command Workflow Builder Workspace
The workflow builder workspace is laid out with the workflow steps running from top to bottom in the middle (initially), the Workflow Definition dialog in a collapsible window on the right, and workspace controls at the bottom left. If you create several steps in a workflow or are working on a smaller browser screen, you may have more workflow steps than will fit in the configuration window. To navigate around the workspace and personalize it:
-
Click and drag the workspace background to move the steps around the workspace. In this way you can reach steps at the top or bottom of the workflow that do not initially appear.
-
Click the open button (
 ) to open the Workflow Definition dialog and the close button (
 ) to close the Workflow Definition dialog.
 -
Click the plus button with a circle around it (
 ) to add a new workflow step at that point in the workflow.
 -
Click the plus button in the lower left of the workspace (
 ) to zoom in on the steps.
 -
Click the minus button in the lower left of the workspace (
 ) to zoom out on the steps.
 -
Click the auto size button in the lower left of the workspace (
 ) to recenter and fit the steps to the window.
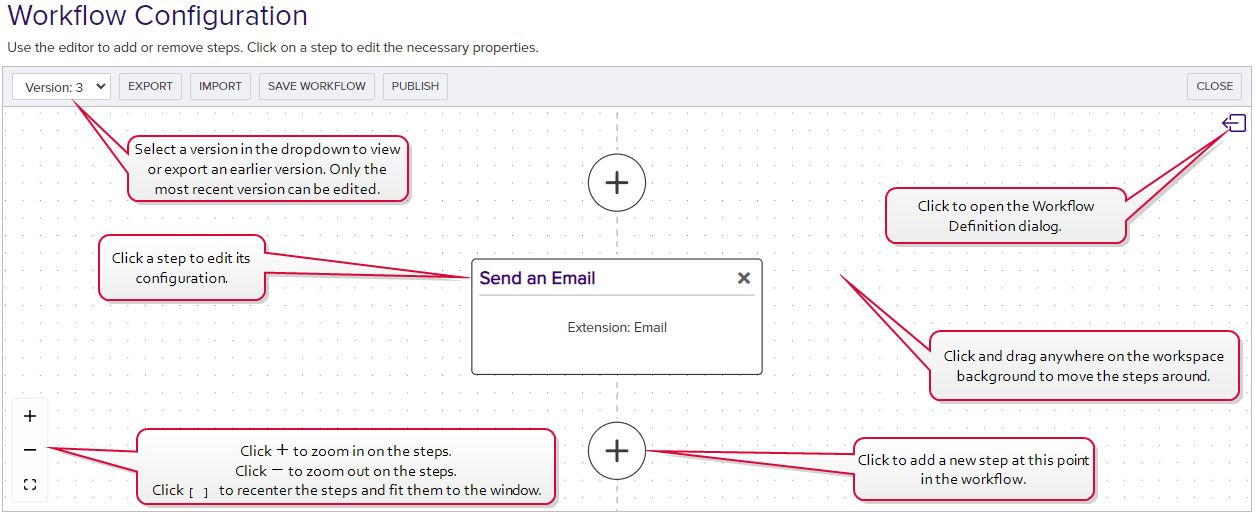
Figure 159: Using the Workflow Workspace
Navigate to the field you want to edit on the workflow definition.
Click
 at the top right above the large text field.
An Edit Content or Edit PowerShell window will open to accept your input. The Edit Content window supports token replacement. The Edit PowerShell window will open with a text editor. Enter your information.
Click
 at the top right to close the edit window and return to the workflow definition, populated with your text.

Figure 160: Edit PowerShell Window

Figure 161: Edit Content Window
 Adding, Copying or Modifying a Workflow Definition
To add a new workflow definition or modify an existing one:
- In the Management Portal, browse to Workflow > Workflow Definitions.
-
On the Workflow Definitions page, click Add from the top menu to create a new blank workflow definition, Copy from either the top or right click menu to copy an existing workflow to create a new one, or Edit from either the top or right click menu, to modify an existing one. This will open the workflow in the workflow builder workspace with the Workflow Definition dialog open on the right.
Note: When you create a new workflow definition by copying an existing one, the word copy will be appended to the end of the definition name and the workflow key (template or certificate collection) will be cleared. Other data from the copied workflow will be retained. -
In the Add/Edit Workflow Definition dialog on the Definition tab, enter a Name for your workflow.
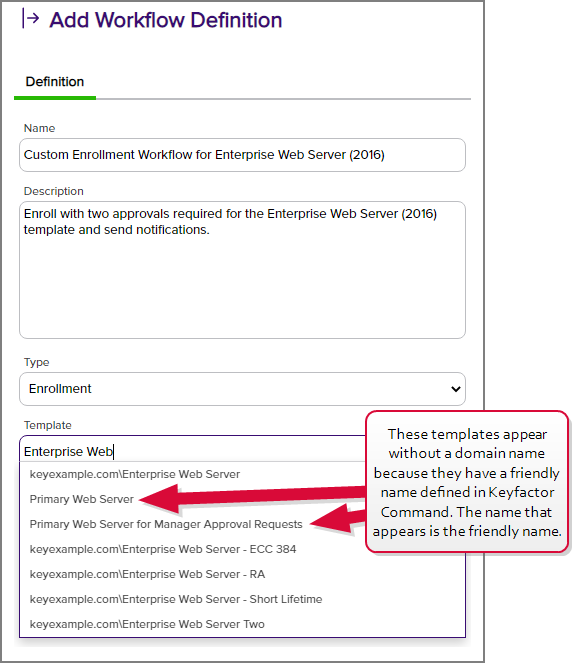
Figure 162: Create a New Workflow Definition
- In the Description field, enter a description for the workflow definition.
- In the Type dropdown, select the type of requests this workflow will handle. See Workflow Types for a description of each workflow type. Note: This field cannot be modified on an edit.
-
Once you have selected a type, a key field will appear.
-
If you selected a type of Enrollment or Revocation, the key field is Template.
-
If you selected a type of Certificate Entered Collection or Certificate Left Collection, the key field is Certificate Collection.
Begin typing in the Template or Certificate Collection field to search for available templates or certificate collections or click in the field and scroll down to locate your desired template or certificate collection. Templates that have been configured with a template friendly name will appear by friendly name.
Note: The key cannot be changed on an edit. -
-
On the Workflow Configuration page, click the plus button in between two workflow steps where you want to add a new step. A new step box will be added below the plus that you clicked.
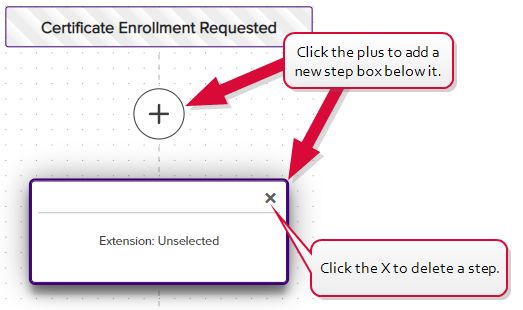
Figure 163: Click Plus to Add a New Workflow Definition Step
Tip: To delete a step, click the X at the top right of the step box and confirm that you want to delete the step. - Click the new step box to load the step in the Add/Edit Workflow Definition dialog. If the dialog is not already open, clicking a step will open it, or you can open a step by clicking the open button (
 ) and then clicking the desired step to load it into the dialog.
-
In the Add/Edit Workflow Definition dialog on the Step tab in the General section, select a Step Type for the step in the dropdown. To narrow the list of step types in the dropdown, begin typing a search string in the Search field. See Workflow Steps for a description of each step type.
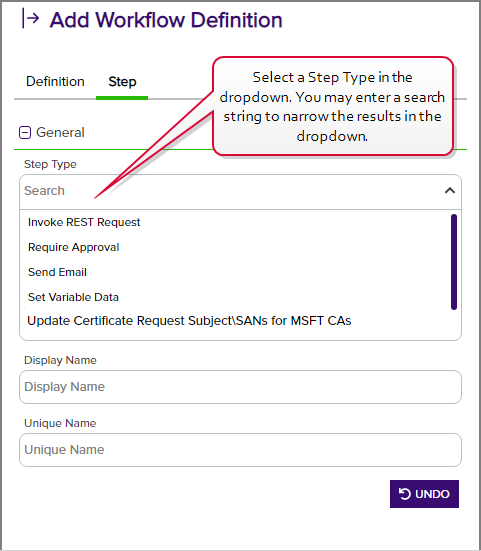
Figure 164: Select a Workflow Definition Step
Note: On an edit, if you change the workflow step type, you must also change the Unique Name. Changing the workflow step type without changing the unique name will result in an error similar to the following:System.Collections.Generic.KeyNotFoundException: The given key was not present in the dictionaryInstead of changing both the workflow step type and unique name, you may be prefer to delete the step and create a new step of the desired type.
In the Add/Edit Workflow Definition dialog on the Step tab in the General section, enter a Display Name for the step. This name appears as the title of the step box on the workflow workspace page.
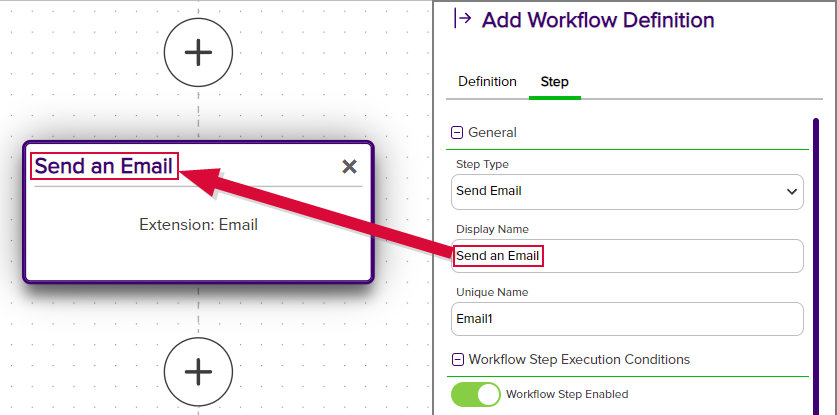
Figure 165: Display Name is Step Name Title
In the Add/Edit Workflow Definition dialog on the Step tab in the General section, either accept the automatically generated Unique Name for the step or modify it. This name must be unique among the steps within the particular workflow. It is intended to be used as a user-friendly reference ID.
- In the Add/Edit Workflow Definition dialog on the Step tab in the Workflow Step Execution Conditions section, click the Workflow Step Enabled toggle to enable or disable the workflow. It is enabled by default.
Workflow Step Execution Conditions
In the Workflow Step Execution Conditions section, click Add in the Optional Workflow Step Conditions for Execution section to create a new condition for the step. Conditions are true/false statements indicating whether the step should run and can be based on tokens. See Workflow Step Execution Conditions for in-depth information and examples of workflow step conditions.
The fields in the Configuration Parameters section will vary depending on the type of step you're configuring. See Workflow Definitions Configuration Parameters for in-depth information and examples of each configuration parameter
 A parameter or argument is a value that is passed into a function in an application. option.
For Require Approval steps or custom steps requiring signals, in the Workflow Step Editor in the Signals section, select one or more security roles (see Security Roles and Claims) in the Approval Status dropdown. To narrow the list of security roles in the dropdown, begin typing a search string in the Search field. Click the erase icon (
 ) to clear your selections.
Users who hold the security role(s) selected here will be able to submit signals (e.g. approve requests) for this workflow.
Tip: Signals represent data used at the point in the workflow step where the workflow needs to continue based on user input. Here, you're configuring which users are allowed to provide that input.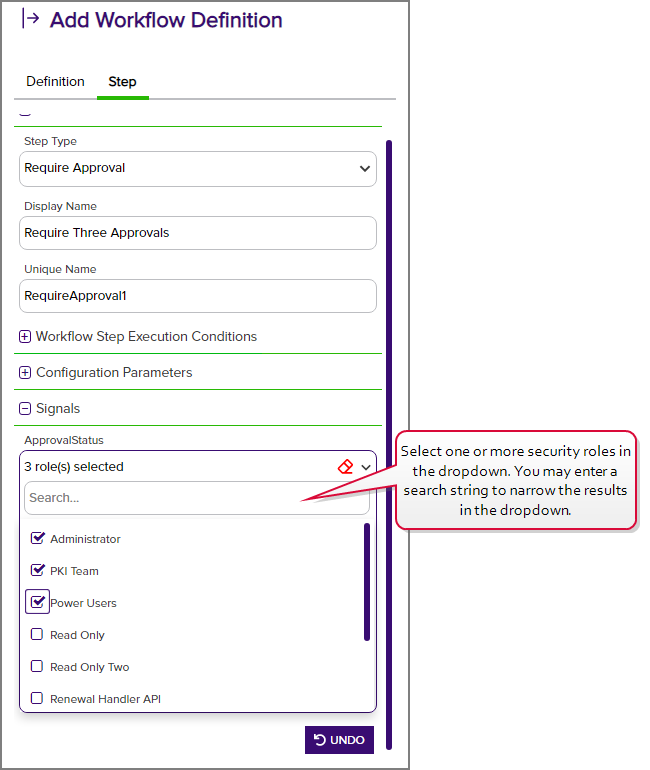
Figure 166: Signals Configuration for a Requires Approval Workflow Definition Step
Important: If all the security roles configured for a workflow step are deleted from Keyfactor Command, no users will be able to submit signals for workflow instances initiated with that workflow definition. To remedy this, update the workflow definition with one or more current security roles, re-publish it, and then restart any outstanding workflow instances.- Click Save Workflow at the top of the workflow workspace to save the workflow step.
- On the Workflow Configuration page, click the plus button in between two workflow steps to add another step in the workflow or click Save Workflow to save the workflow with its current steps.
Before you can use the workflow, it must be published to activate it. Click the Publish button at the top of the workflow workspace to publish it immediately or return to the workflow definitions page and publish it later, if desired (see Publishing a Workflow Definition).
Tip: Clicking Publish automatically saves the workflow.- To close the workflow workspace and return to the workflow definitions page, click the Close button at the top of the workflow workspace.
An audit log entry is created when you add or edit a workflow definition (see Audit Log).
 Deleting a Workflow Definition
To delete a workflow definition:
- In the Management Portal, browse to Workflow > Workflow Definitions.
- On the Workflow Definitions page, select a workflow definition and click Delete from either the top or right-click menu.
- On the Confirm Operation alert, click OK to confirm or Cancel to cancel the operation.
An audit log entry is created when you delete a workflow definition (see Audit Log).
 Publishing a Workflow Definition
Workflow definitions are drafts that cannot be actively used until you take the step to publish them. This allows you to add new workflows or update existing ones without interrupting the flow of current activity. Then, once the workflow definition is complete and ready for use, you can activate it. This can be done on the workflow workspace page while editing the workflow (see Adding, Copying or Modifying a Workflow Definition) or from the workflow definitions page.
To publish a workflow definition from the workflow definitions page:
- In the Management Portal, browse to Workflow > Workflow Definitions.
- On the Workflow Definitions page, select a workflow definition and click Publish from either the top or right-click menu.
- On the Confirm Operation alert, click OK to confirm or Cancel to cancel the operation.
Alternately, publish a workflow definition from the workflow builder workspace:
- In the Management Portal, browse to Workflow > Workflow Definitions.
- On the Workflow Definitions page, select a workflow definition to open the workflow definition you wish to publish.
- Click the Publish button at the top of the workflow workspace to publish it.
 Exporting a Workflow
Workflow definitions can be exported either from the workflow workspace page while viewing or editing the workflow (see Adding, Copying or Modifying a Workflow Definition) or from the workflow definitions page.
-
Export a workflow for backup purposes.
-
Export a workflow that you've fully configured and which you need to replicate and then import under another name to create a duplicate of it.
-
Export a previous version of a workflow and import it as the current version to revert to using the previous version.
To export a workflow definition from the workflow workspace:
- In the Management Portal, browse to Workflow > Workflow Definitions.
- On the Workflow Definitions page, click Edit from either the top or right click menu. This will open the workflow in the workflow workspace with the Workflow Definition dialog open on the right.
- At the top of the workflow workspace, select a different Version of the workflow in the dropdown, if desired (see Workflow Versions).
- At the top of the workflow workspace, click Export.
- Browse to place the exported file on the local computer. The file will have an extension of .json.
To export a workflow definition from the workflow definitions page:
- In the Management Portal, browse to Workflow > Workflow Definitions.
- On the Workflow Definitions page, select a workflow definition and click Export from either the top or right-click menu.
-
In the Export Workflow Definition dialog, select a Version and click Export.
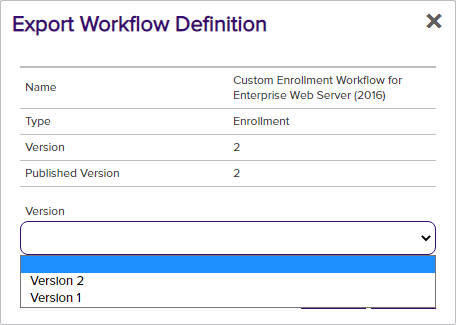
Figure 167: Export Workflow Definition
- Browse to place the exported file on the local computer. The file will have an extension of .json.
- Secrets
Some types of workflow steps include secret values (e.g. passwords). Secret values are not exported. If your workflow includes steps with secret values, these will need to be re-entered if you choose to import the exported file.
- Roles for Signals
Some types of workflow steps make use of signals to allow users to provide input to the workflow midstream (e.g. provide approvals). This requires configuration of security roles that define who is allowed to provide this input. These security role values are not exported. You will need to set appropriate security roles on any workflow steps that use signals if you choose to import the exported file.
 Importing a Workflow
Workflow definitions can be imported either to create a new workflow or to replace an existing workflow (e.g. to revert to a backup). When you import a workflow definition while editing an existing workflow definition, it will overwrite any changes you have made to the existing workflow since the last time it was published. Previously published versions of the workflow—including the most recent—will be retained. This is useful in cases where you want to export a previous version of a workflow and reimport it to make it the currently active version. This can be used to import a new workflow customized for you by the Keyfactor team.
To import a workflow definition:
- In the Management Portal, browse to Workflow > Workflow Definitions.
- On the Workflow Definitions page, click Add from the top menu to create a new workflow definition into which you will import, or Edit from either the top or right click menu, to import into an existing one to revert to a previous version. This will open the workflow in the workflow workspace with the Workflow Definition dialog open on the right.
- At the top of the workflow workspace, click Import.
-
Browse to locate the workflow definition file you wish to import. Only files with an extension of .json will appear.
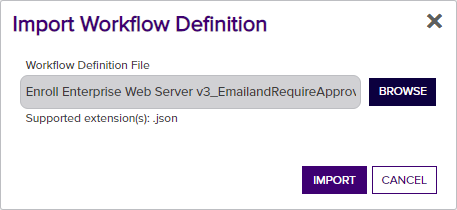
Figure 168: Browse to Locate a Workflow Definition to Import
Tip: In order to be successfully imported, the file must be correctly formatted JSON with at least WorkflowType and Steps properties. The maximum file upload size is 2 MB. - Click Import to import the workflow definition and populate it into the workflow workspace.
- On the Confirm Operation alert, click OK to confirm or Cancel to cancel the operation.
-
In the workflow workspace, edit and save the workflow definition as needed as per Adding, Copying or Modifying a Workflow Definition. The following values will need attention:
-
Key (Template or Certificate Collection)
When the workflow definition is imported into a new workflow definition, the key is cleared. You will need to set an appropriate key (template for enrollment or revocation type workflows, certificate collection for workflows of type certificate entered or left collection) on the imported workflow definition before saving. The key is not cleared for imports into workflows with existing published versions.
This is done both to support export of workflow definitions from one environment and import into another where the key set likely would be different and to support copying of workflow definitions, since you can't have two definitions for the same key.
-
Secrets
Some types of workflow steps include secret values (e.g. passwords). Secret values are not imported. If your workflow includes steps with secret values, these will need to be re-entered. This is true for imports into new workflow definitions and workflow definitions with existing published versions.
-
Roles for Signals
Some types of workflow steps make use of signals to allow users to provide input to the workflow midstream (e.g. provide approvals). This requires configuration of security roles that define who is allowed to provide this input. These security role values are not imported. You will need to set appropriate security roles on any workflow steps that use signals before saving. This is true for imports into new workflow definitions and workflow definitions with existing published versions.
This is done to support export of workflow definitions from one environment and import into another where the security role set likely would be different.
Important: If you're importing a copy of a workflow definition that already exists in Keyfactor Command and you want to save it as a separate copy, be sure to change the Name of the workflow before saving the imported workflow to avoid overwriting the existing version of the workflow. -
 Workflow Versions
When you open a workflow definition for editing, you will see the version of the workflow shown at the upper left of the workflow workspace in a dropdown. By default, the current version will be shown.

Figure 169: Workflow Definition Versions: View Current Version
When you have the current, most recent, version of the workflow loaded, you will see several options in the button bar at the top of the workflow workspace (if you have appropriate permissions) and the Add/Edit Workflow Definition Dialog will be active. If you select an older version in the dropdown, only the Version, Export, and Close options will appear on the workflow workspace button bar and the Add/Edit Workflow Definition Dialog will be read only.
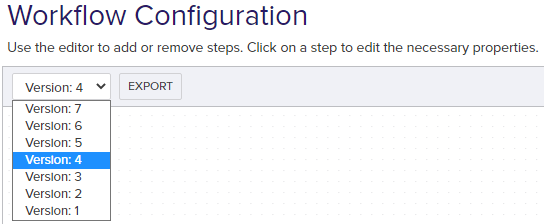
Figure 170: Workflow Definition Versions: View Previous Version
This option is designed to allow you to review previous versions of a workflow or export them as backups or to be re-imported to be used as a base for generating new workflows.