Keyfactor Command can be used with a variety of OAuth 2.0 compliant providers via federation through Keyfactor Identity Provider. Once you have finished configuring Keyfactor Identity Provider, you’re ready to federate to an additional OAuth provider, if desired. You may choose to manage your users and groups in Keyfactor Identity Provider and not add federation to an additional provider. Federation can be added at any time. The examples below show configuring Okta as a federated identity provider. If you’re not using Okta, this may give you sufficient information to configure the identity provider of your choice, since configuration tends to be similar.
The below configuration steps assume that you have already completed the installation of Keyfactor Identity Provider (see Installing Keyfactor Identity Provider) and have created at least one role in Keyfactor Identity Provider that you will use to grant permissions in Keyfactor Command (see Using Keyfactor Identity Provider). Keyfactor Command access control with Keyfactor Identity Provider and federation works by granting permissions in Keyfactor Command to Keyfactor Identity Provider roles, assigning those roles to users in Keyfactor Identity Provider, and importing user records from the federated identity provider automatically on login for any user attempting to access Keyfactor Command (see Figure 471: Federated Identity Provider Login Flow). The user accounts in the federated identity provider need to be assigned roles that mirror the roles in Keyfactor Identity Provider to provide a seamless first-time login experience for users.
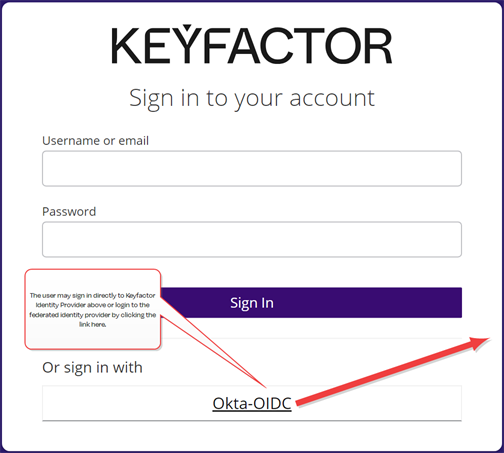
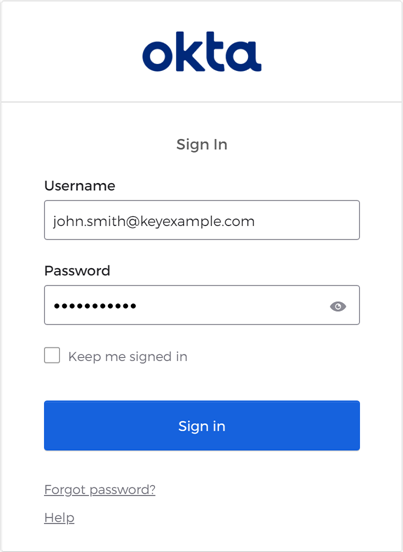
Figure 470: Login Page with Choice of Federated Identity Provider
No changes are needed to the configuration of the OAuth provider in Keyfactor Command when you add federation because all requests are brokered through Keyfactor Identity Provider. At login, the user is presented with a Keyfactor Identity Provider login prompt where he or she can choose to login directly to Keyfactor Identity Provider or click a link that will redirect to the login page of the federated identity provider.
Federating to an Okta OpenID Connect Application
Federating to an Okta OpenID Connect application involves some information gathering and configuration on the Okta side and some configuration in Keyfactor Identity Provider.
To configure the Okta OIDC application and gather information:
-
Login to your Okta management console, browse to Applications > Applications and open the details for the application you will be federating. On the General tab, locate your Client ID and Client Secret and make note of these. You will need these when configuring the federated link from Keyfactor Identity Provider. Confirm that your application is configured to Require PKCE as additional verification. Keyfactor strongly recommends the use of this option for best security practice.

Figure 472: Client ID and Secret in Okta OIDC Application
-
In the Okta OIDC application on the General tab, scroll down to the LOGIN section. Update these values as follows:
-
Sign-in redirect URIs
The URI for the Keyfactor Identity Provider federated identity provider endpoint
 An endpoint is a URL that enables the API to gain access to resources on a server.. For example:https://appsrvr18.keyexample.com:1443/realms/Keyfactor/broker/Okta-OIDC/endpoint
Where appsrvr18.keyexample.com is the fully qualified domain name of the server on which you installed or will install Keyfactor Identity Provider, Keyfactor is the name of the realm in Keyfactor Identity Provider (the default is Keyfactor), and Okta-OIDC is the name you give to the federated identity provider broker you create in Keyfactor Identity Provider to link to your Okta OIDC application.
-
Sign-out redirect URIs
The URI to which users should be redirected on logout. For example:
https://appsrvr18.keyexample.com:1443/realms/Keyfactor/broker/Okta-OIDC/endpoint/logout_responseWhere appsrvr18.keyexample.com is the fully qualified domain name of the server on which you installed or will install Keyfactor Identity Provider, Keyfactor is the name of the realm in Keyfactor Identity Provider (the default is Keyfactor), and Okta-OIDC is the name you give to the federated identity provider broker you create in Keyfactor Identity Provider to link to your Okta OIDC application.
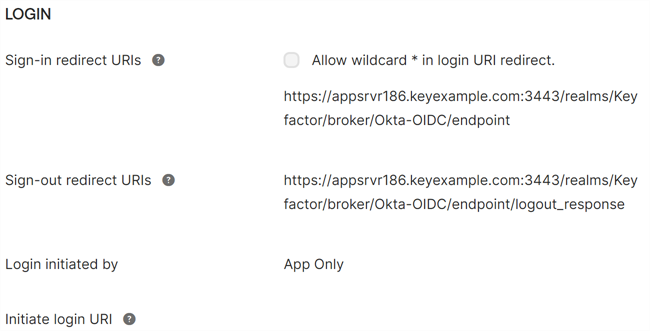
Figure 473: Redirect URIs for the Okta OIDC Application
-
-
In the Okta management console, browse to Security > API, and on the Authorization Servers tab, open the authorization server for your application. In the authorization server details on the Claims tab, click Add Claim to create a new claim to send role information to Keyfactor Identity Provider to allow you to map roles in Okta to roles in Keyfactor Identity Provider and then use the roles to assign permissions in Keyfactor Command.
In the Edit Claim dialog:
-
Give the claim a Name to indicate its purpose. You will need to reference this name when creating maps in your Keyfactor Identity Provider federated identity provider.
-
Set Include in token type to ID Token Always.
-
Select a Value type of Groups.
-
Enter a Filter to control which Okta roles are included with the user information delivered to Keyfactor Identity Provider. To deliver all the groups, you can choose Matches regex and enter a regex of .* or use a Starts with filter, for example, if all the roles you wish to use with Keyfactor Identity Provider start with the same value (e.g. kyf).
-
Set Include in to Any scope.

Figure 474: Create an Authorization Server Role Claim
-
To configure Keyfactor Identity Provider to add a federated identity provider for the Okta OIDC application:
-
Use a browser to open the Keyfactor Identity Provider management interface. For example:
https://appsrvr18.keyexample.com:1443Click the Administration Console link and sign in with an administrative user and password (see Installing Using Docker Compose).
-
In the Keyfactor Identity Provider Administration Console, select Keyfactor in the realm dropdown.

Figure 475: Select a Realm in the Keyfactor Identity Provider Administration Console
-
In the Keyfactor Identity Provider Administration Console, browse to Identity providers and click Add provider. In the top section, accept the default Redirect URI, in the Alias field enter the name you used when constructing your redirect URIs in Okta in the previous step, and enter a compatible Display Name.
Tip: The alias field is used as the identity provider hint during the configuration of Keyfactor Command if you wish to bypass the Keyfactor Identity Provider login and send users directly to the Okta login.
Figure 476: Give the Keyfactor Identity Provider Identity Provider an Alias
-
In the configuration page for the new provider in the OpenId Connect settings section, choose Use discovery endpoint and enter the URL to the discovery endpoint for your application’s authorization server. For example:
https://${yourOktaDomain}/oauth2/${authorizationServerId}/.well-known/oauth-authorization-server
Figure 477: Enter the Okta Discovery Endpoint in the Keyfactor Identity Provider Identity Provider
Click Show metadata to review the data retrieved from the discovery endpoint.
-
Once the information populates, toggle Use discovery endpoint off and click Show metadata to display the additional fields. Toggle the Use PKCE to On and set the PKCE Method to S256 (unless you didn’t enable PKCE in Okta).

Figure 478: Enable PKCE in the Keyfactor Identity Provider Identity Provider
-
In the Client ID field enter the client ID for your Okta application and enter the secret for your Okta application in the Client Secret field.

Figure 479: Add Okta Client ID and Secret in the Keyfactor Identity Provider Identity Provider
- Click Add to create the identity provider.
-
Expand Advanced, and in the Scopes field add openid profile.
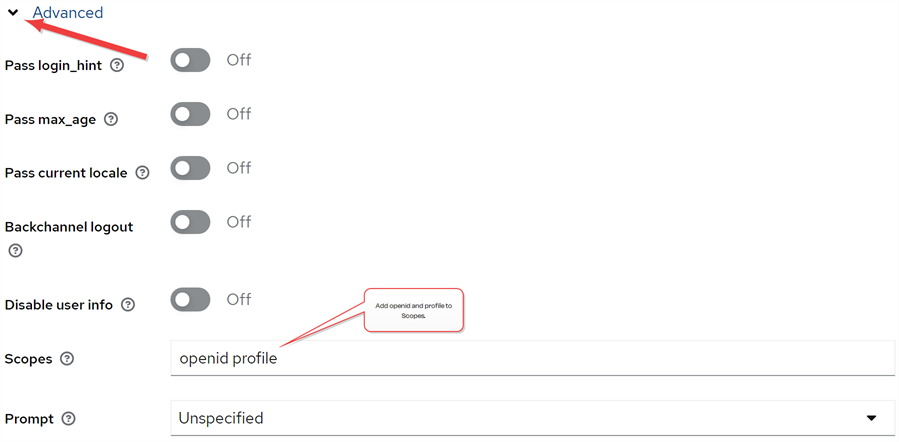
Figure 480: Deliver the Okta openid and profile to the Keyfactor Identity Provider Identity Provider
-
At the top of the identity providers page, switch to the Mappers tab and click Add mapper. Here you’re mapping the usernames from Okta to the Username field in Keyfactor Identity Provider to allow user records for each Okta user to automatically be generated in Keyfactor Identity Provider.
On the Add Identity Provider Mapper dialog:
-
Give the mapper a Name that will help you identify it.
-
Choose a Sync mode override of Import.
-
Choose a Mapper type of Username Template Importer.
-
Set the Template to ${CLAIM.preferred_username}.
Note: This assumes the value in the Okta preferred_username is the one you wish to use as the username for login to Keyfactor Command. -
Choose a Target of LOCAL.
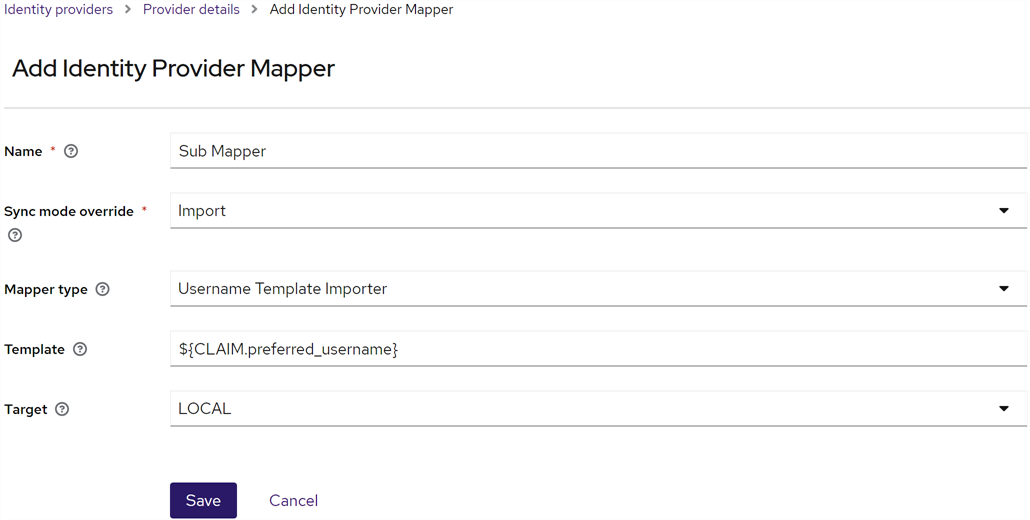
Figure 481: Map the Okta preferred_username to the Keyfactor Identity Provider Identity Provider Username
-
-
Return to the Provider details and click Add mapper again. Here you’re mapping the roles from Okta to the roles in Keyfactor Identity Provider to allow the user records for each Okta user in Keyfactor Identity Provider to automatically be assigned roles in Keyfactor Identity Provider.
On the Add Identity Provider Mapper dialog:
-
Give the mapper a Name that will help you identify it. If you’ll be adding mappings for more than one Okta group, you may find it helpful to use a consistent naming pattern (e.g. Role Mapper: Admins, Role Mapper: Power Users).
-
Choose a Sync mode override of Import.
-
Choose a Mapper type of Claim to Role.
-
Set the Claim to the name of the claim you created in Okta to include roles in the claim passed to Keyfactor Identity Provider (e.g. kyf_role) as per the Okta steps, above.
-
Click Select Role and choose the role in Keyfactor Identity Provider that should be mapped to the incoming Okta role.
Note: This step assumes that you’ve already set up a role in Keyfactor Identity Provider for this purpose (see Using Keyfactor Identity Provider).
Repeat this step for any additional roles from Okta that should be mapped to Keyfactor Identity Provider roles, using the same Claim name for each (all the roles are passed in the same claim). Any roles that come in with the claim that you do not create a mapping for will be ignored.
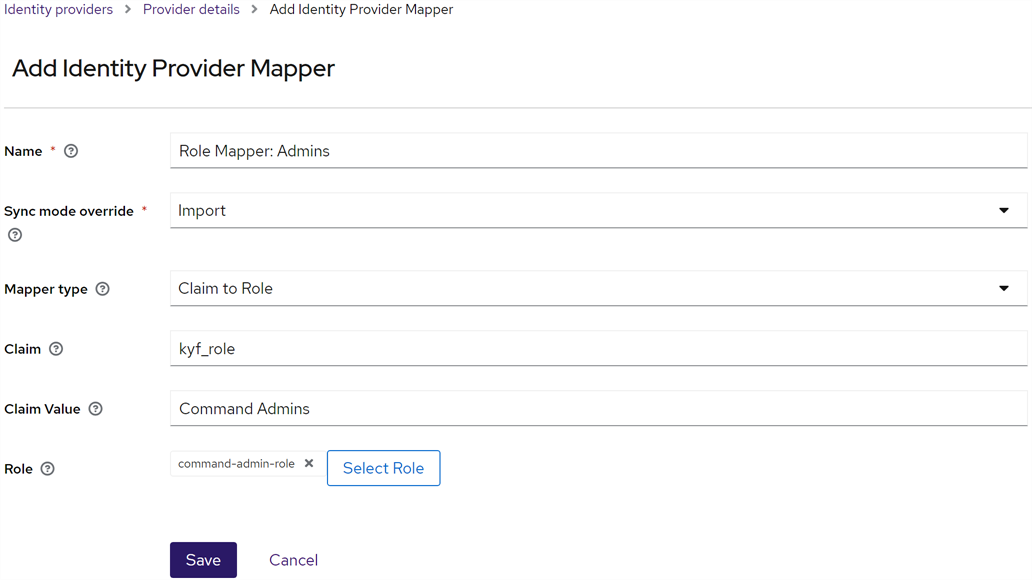
Figure 482: Map the Okta Roles to the Keyfactor Identity Provider Identity Provider Roles
-
Configuration is complete. No changes are needed to the configuration in Keyfactor Command. It’s helpful to restart the web server services (run an iisreset) on the Keyfactor Command server after making the changes to clear any cached data.
