An issued certificate request alert is designed to send an email notification to a certificate requester when a certificate request he or she made using a certificate template![]() A certificate template defines the policies and rules that a CA uses when a request for a certificate is received. that required manager approval is approved.
A certificate template defines the policies and rules that a CA uses when a request for a certificate is received. that required manager approval is approved.
Issued Request Alert operations include: creating, editing or deleting an issued request alerts, configuring an alert schedule, and copying alerts to create similar alerts for different recipients or collections.
The issued alert handler runs immediately when an enrollment![]() Certificate enrollment refers to the process by which a user requests a digital certificate. The user must submit the request to a certificate authority (CA). is approved within the Keyfactor Command platform and also runs via a schedule to pick up any approvals done outside of Keyfactor Command.
Certificate enrollment refers to the process by which a user requests a digital certificate. The user must submit the request to a certificate authority (CA). is approved within the Keyfactor Command platform and also runs via a schedule to pick up any approvals done outside of Keyfactor Command.
- In the Management Portal, browse to Alerts > Issued Request.
- On the Issued Certificate Request Alerts page, click Add from the top menu to create a new alert, or Edit ,from either the top or right click menu, to modify an existing one.
-
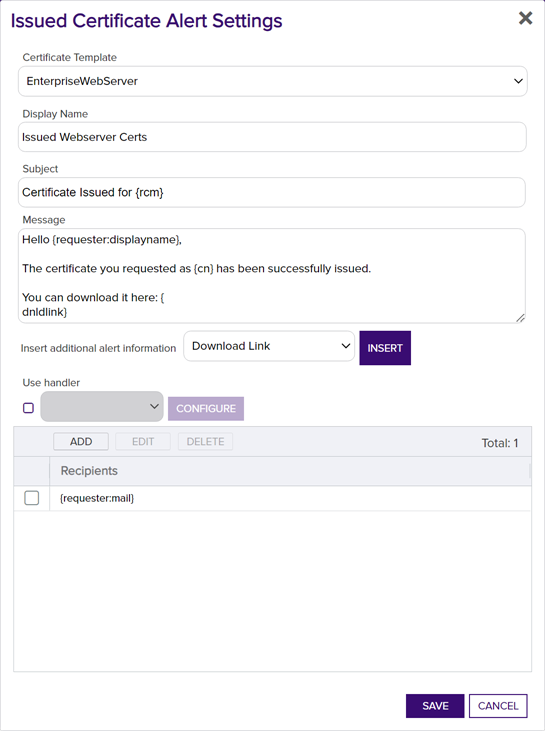
In the Issued Certificate Alert Settings dialog, select your Certificate Template (or select All Templates) in the first dropdown.

Figure 135: Create a New Issued Certificate Alert
- In the Display Name field, enter a name for the alert. This name appears in the list of issued certificate alerts in the Management Portal.
-
In the Subject field, enter a subject line for the email message that will be delivered when the alert is triggered. You can use substitutable special text in the subject line. Substitutable special text uses a variable in the alert definition that is replaced by data from the certificate or certificate metadata
 Metadata provides information about a piece of data. It is used to summarize basic information about data, which can make working with the data easier. In the context of Keyfactor Command, the certificate metadata feature allows you to create custom metadata fields that allow you to tag certificates with tracking information about certificates. at processing time. For example, you can enter {cn
 A common name (CN) is the component of a distinguished name (DN) that represents the primary name of the object. The value varies depending on the type of object. For a user object, this would be the user's name (e.g. CN=John Smith). For SSL certificates, the CN is typically the fully qualified domain name (FQDN) of the host where the SSL certificate will reside (e.g. servername.keyexample.com or www.keyexample.com).} in the alert definition and each alert generated will contain the specific common name
 A common name (CN) is the component of a distinguished name (DN) that represents the primary name of the object. The value varies depending on the type of object. For a user object, this would be the user's name (e.g. CN=John Smith). For SSL certificates, the CN is typically the fully qualified domain name (FQDN) of the host where the SSL certificate will reside (e.g. servername.keyexample.com or www.keyexample.com). of the given certificate instead of the variable {cn}.
To add substitutable special text to the subject line; place your cursor where you would like the text to appear on the subject line, select the appropriate variable from the Insert special text dropdown, and click Insert. Alternately, type the special text variable enclosed in curly braces (e.g. {cn}).
-
In the Message box, enter the body of the email message that will be delivered when the alert is triggered. You can use the Insert special text dropdown below the message window to add substitutable special text to the message. The metadata that appears in the dropdown will depend upon the custom metadata you have defined (see Certificate Metadata). Place your cursor where you would like the text to appear, select the appropriate variable from the dropdown, and click Insert. Alternately, you can type the special text variable enclosed in curly braces directly. In addition to the substitutable special text fields available in the dropdown, you can also build your own substitutable fields for the requester based on string values from the user or computer Active Directory record. See Substitutable Special Text for Issued Certificate Alerts. If desired, you can format the message body using HTML. For example, you could place the certificate detail information into a table by replacing this text:
Serial Number: {serial}Thumbprint: {thumbprint}App Owner: {metadata:AppOwnerFirstName} {metadata:AppOwnerLastName}With this HTML code:
<table><tr><td>Serial Number: </td><td>{serial}</td></tr><tr><td>Thumbprint: </td><td>{thumbprint}</td></tr><tr><td>SANs: </td><td>{san}</td></tr><tr><td>App Owner: </td><td> {metadata:AppOwnerFirstName} {metadata:AppOwnerLastName} </td></tr></table> - The Download Link substitutable special text field is an important one to include in your alert intended for the requester of the certificate or the person responsible for installing the certificate. This provides a link in the email message that the user can click to be taken to the Keyfactor Command Management Portal to download the certificate.
Tip: If the users who will receive the issued alerts do not have global Read permissions for Certificates, they will not be able to use the built-in download link. To resolve this, you can build a custom download link as follows:
- If you do not already have a My Certificates collection
 The certificate search function allows you to query the Keyfactor Command database for certificates from any available source based on any criteria of the certificates and save the results as a collection that will be availble in other places in the Management Portal (e.g. expiration alerts and certain reports)., create one using the %ME% special value with a search string of:
NetBIOSRequester -eq "%ME%"
 - In the Management Portal, browse to the My Certificates collection page and look in the browser's address bar at the end of the URL for the number that has been assigned to the collection. For example, the following URL points to collection 9:
https://keyfactor.keyexample.com/ KeyfactorPortal/ CertificateCollection/ Edit?cid=9
- Grant the users who will receive the issued alerts Read permissions on the My Certificates collection (see Certificate Collection Permissions).
- In the message body of the issued alert, create a link that looks like the following, where keyfactor.keyexample.com is the name of your Keyfactor Command server and ID is the correct collection ID for your My Certificates collection (e.g. 9):<a href="https://keyfactor.keyexample.com/ KeyfactorPortal/ CertificateCollection/ Edit?cid=ID &query= Thumbprint+ -eq+%22 {thumbprint}%22 "> Download Now </a>
- If you do not already have a My Certificates collection
-
Check the Use handler box if you would like the alert to trigger an event handler at processing time, select the appropriate handler in the dropdown, and click the Configure button to configure the event handler. See Event Handler Registration for more information on using event handlers, and Adding PowerShell Handlers to Alerts for more information about using PowerShell Handlers.
-
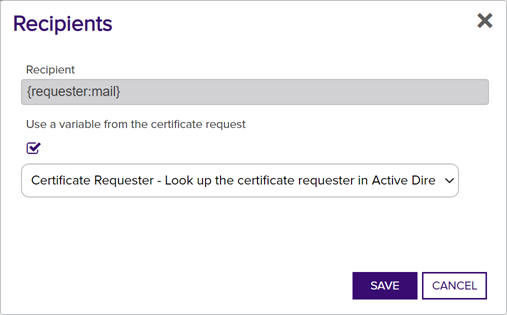
In the Recipients section of the page, click Add to add a recipient to the alert. Each alert can have multiple recipients. Recipients should be added one at a time. You can enter specific email addresses and/or use substitutable special text to replace an email address variable with actual email addresses at processing time. There are three built-in variables that can be selected in the Recipient dialog Use a variable from the certificate request dropdown. In addition, you can type a special text variable enclosed in curly braces in the Email field if you have, for example, a metadata field that contains an email address.
Keyfactor Command sends SMS (text) messages by leveraging the email to text gateways that many major mobile carriers provide. Check with your carrier for specific instructions. Keyfactor has tested that AT&T can be addressed using 10-digit-number@txt.att.net (e.g. 4155551212@txt.att.net) and Verizon can be addressed using 10-digit-number@vtext.com (e.g. 2125551212@vtext.com). T-Mobile can be addressed using 10-digit-number@tmomail.net (e.g. 2065551212@tmomail.net), but functionality can be spotty. Reliability of alerting via this method depends on the reliability of the carrier’s gateways.

Figure 136: Issued Certificate Alerts Recipients
- Click Save to save your issued certificate alert.
You may use the copy operation to create multiple similar alerts—for example, one to the requester of the certificate and another with a different message to the person responsible for installing it.
- In the Management Portal, browse to Alerts > Issued Request.
- On the Issued Certificate Request Alerts page, highlight the row in the alerts grid and click Copy at the top of the grid, or from the right click menu.
- The Issued Certificate Alert Settings dialog will pop-up with the details from the selected alert. The display name field will have - Copy tagged to the end of it to o indicate it is a new alert. You may modify the alert as needed and click Save to add the new alert, or Cancel to cancel the operation.
- In the Management Portal, browse to Alerts > Issued Request.
- On the Issued Certificate Request Alerts page, highlight the row in the alerts grid and click Delete at the top of the grid, or from the right click menu.
- On the Confirm Operation alert, click OK to confirm or Cancel to cancel the operation.
After adding your desired issued alerts, you may configure a schedule to send the alerts.
- In the Management Portal, browse to Alerts > Issued Request.
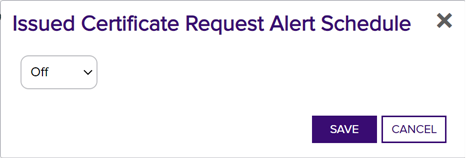
- On the Issued Certificate Request Alerts page, click the Configure button at the top of the Issued Certificate Request Alerts page to configure a monitoring execution schedule. This defines the frequency with which alerts are sent. You can choose to schedule the alerts either for daily delivery at a specified time or at intervals of anywhere from every 1 minute to every 12 hours. A short interval is the most common configuration.

Figure 137: Issued Alert Schedule
Refer to the following table for a complete list of the substitutable special text that can be used to customize alert messages.
Table 8: Substitutable Special Text for Issued Certificate Alerts
|
Variable |
Name |
Description |
|---|---|---|
|
{dnldlink} |
Download Link |
Link pointing to the Certificate Requests page in the Keyfactor Command Management Portal where the certificate requester or the person responsible for installing the certificate can go to download the certificate. The certificate will be available only in a .cer/.crt format (without the private key) unless private key retention has been enabled on the template (see Certificate Templates). |
|
{certemail} |
Email Address in Certificate |
Email address contained in the certificate, if present |
|
{cn} |
Common Name |
Common name contained in the certificate |
|
{dn} |
Distinguished Name |
Distinguished name contained in the certificate |
|
{certnotbefore} |
Issue Date |
Validity date of the certificate |
|
{certnotafter} |
Expiration Date |
Expiration date of the certificate |
|
{issuerDN} |
Issuer DN |
Distinguished name of the certificate’s issuer |
|
{principal:mail} |
Principal’s Email |
Email address retrieved from Active Directory of the user whose UPN is contained in the SAN field of the certificate, if present Note: This substitutable special text token is only supported in environments using Active Directory as an identity provider.
|
|
{principal:givenname} |
Principal’s First Name |
First name retrieved from Active Directory of the user whose UPN is contained in the SAN field of the certificate, if present Note: This substitutable special text token is only supported in environments using Active Directory as an identity provider.
|
|
{principal:sn} |
Principal’s Last Name |
Last name retrieved from Active Directory of the user whose UPN is contained in the SAN field of the certificate, if present Note: This substitutable special text token is only supported in environments using Active Directory as an identity provider.
|
|
{principal:displayname} |
Principal’s Display Name |
Display name retrieved from Active Directory of the user whose UPN is contained in the SAN field of the certificate, if present Note: This substitutable special text token is only supported in environments using Active Directory as an identity provider.
|
|
{requester} |
Requester |
The user account that requested the certificate from the CA, in the form DOMAIN\username |
|
{requester:mail} |
Requester’s Email |
Email address retrieved from Active Directory of the user account that requested the certificate from the CA, if present Note: This substitutable special text token is only supported in environments using Active Directory as an identity provider.
|
|
{requester:givenname} |
Requester’s First Name |
First name retrieved from Active Directory of the user account that requested the certificate from the CA, if present Note: This substitutable special text token is only supported in environments using Active Directory as an identity provider.
|
|
{requester:sn} |
Requester’s Last Name |
Last name retrieved from Active Directory of the user account that requested the certificate from the CA, if present Note: This substitutable special text token is only supported in environments using Active Directory as an identity provider.
|
|
{requester:displayname} |
Requester’s Display Name |
Display name retrieved from Active Directory of the user account that requested the certificate from the CA, if present Note: This substitutable special text token is only supported in environments using Active Directory as an identity provider.
|
|
{careqid} |
Issuing CA / Request ID |
A string containing the Issuing CA name and the certificate’s Request ID from the CA |
|
{serial} |
Serial Number |
The serial number of the certificate |
|
{san} |
Subject Alternative Name |
Subject alternative name(s) contained in the certificate |
|
{template} |
Template Name |
Name of the certificate template used to create the certificate |
|
{templateshortname} |
Template Short Name |
Short name (often the name with no spaces) of the certificate template used to create the certificate request |
|
{thumbprint} |
Thumbprint |
The thumbprint (hash) of the certificate |
|
{upn} |
User Principal Name |
The user principal name (UPN) contained in the subject alternative name (SAN) field of the certificate, if present (e.g. username@keyexample.com) |
|
{metadata:Email-Contact} |
Email-Contact |
Example of a custom metadata field |
|
{principal:field} |
String Value from AD |
Locates the object in Active Directory identified by the UPN in the certificate (if present), and substitutes the contents of the attribute named by field. For example:
Note: This substitutable special text field is partially user defined—you pick the field out of AD to include—and is therefore not available in the Insert special text dropdown; it needs to be typed manually.
Note: This substitutable special text token is only supported in environments using Active Directory as an identity provider.
|
|
{requester:field} |
String Value from AD |
Locates the object in Active Directory identified by the user or computer account that requested the certificate from the CA, and substitutes the contents of the attribute named by field. For example, for users:
For computers:
Note: This substitutable special text field is partially user defined—you pick the field out of AD to include—and is therefore not available in the Insert special text dropdown; it needs to be typed manually.
Note: This substitutable special text token is only supported in environments using Active Directory as an identity provider.
|