Pending certificate request alerts are designed to send an email notification to certificate approvers when a certificate request is received that requires approval based on policy on the CA![]() A certificate authority (CA) is an entity that issues digital certificates. Within Keyfactor Command, a CA may be a Microsoft CA or a Keyfactor gateway to a cloud-based or remote CA.. Pending request alerts can also be sent to the original certificate requesters alerting them that their certificate requests have been sent.
A certificate authority (CA) is an entity that issues digital certificates. Within Keyfactor Command, a CA may be a Microsoft CA or a Keyfactor gateway to a cloud-based or remote CA.. Pending request alerts can also be sent to the original certificate requesters alerting them that their certificate requests have been sent.
Pending Request Alert operations include:
-
Creating, editing or deleting a pending alert
-
Configuring an alert schedule
-
Copying alerts to create similar alerts for different recipients or situations
-
Testing alerts
- In the Management Portal, browse to Alerts > Pending Request.
- On the Pending Certificate Request Alerts page, click Add from the top menu to create a new alert, or Edit from either the top or right click menu, to modify an existing one.
-
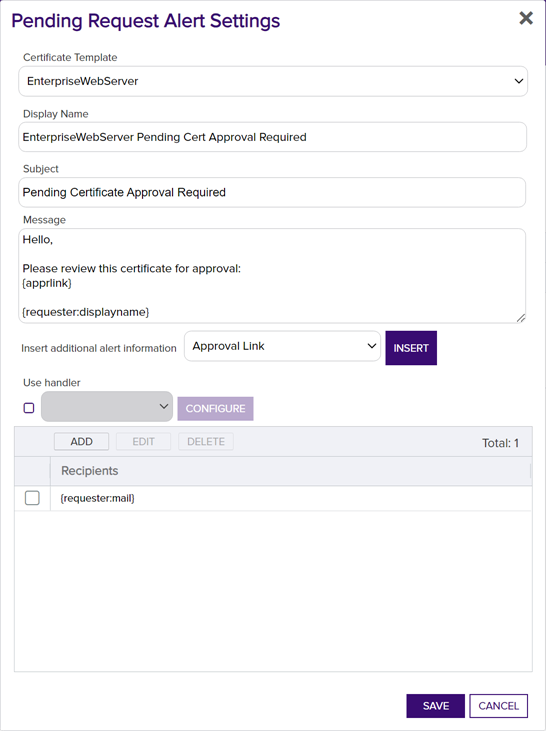
In the Pending Request Alert Settings dialog, select your Certificate Template (or select All Templates) in the first dropdown.

Figure 131: Create a New Pending Request Alert
- In the Display Name field, enter a name for the alert. This name appears in the pending request alerts grid in the Management Portal.
-
In the Subject field, enter a subject line for the email message that will be delivered when the alert is triggered. You can use substitutable special text in the subject line. Substitutable special text uses a variable in the alert definition that is replaced by data from the certificate or certificate metadata
 Metadata provides information about a piece of data. It is used to summarize basic information about data, which can make working with the data easier. In the context of Keyfactor Command, the certificate metadata feature allows you to create custom metadata fields that allow you to tag certificates with tracking information about certificates. at processing time. For example, you can enter {rcn} in the alert definition and each alert generated at processing time will contain the specific requested common name
 A common name (CN) is the component of a distinguished name (DN) that represents the primary name of the object. The value varies depending on the type of object. For a user object, this would be the user's name (e.g. CN=John Smith). For SSL certificates, the CN is typically the fully qualified domain name (FQDN) of the host where the SSL certificate will reside (e.g. servername.keyexample.com or www.keyexample.com). of the given certificate request instead of the variable {rcn}.
To add substitutable special text to the subject line; place your cursor where you would like the text to appear on the subject line, select the appropriate variable from the Insert special text dropdown, and click Insert. Alternately, type the special text variable enclosed in curly braces (e.g. {cn
 A common name (CN) is the component of a distinguished name (DN) that represents the primary name of the object. The value varies depending on the type of object. For a user object, this would be the user's name (e.g. CN=John Smith). For SSL certificates, the CN is typically the fully qualified domain name (FQDN) of the host where the SSL certificate will reside (e.g. servername.keyexample.com or www.keyexample.com).}).
 -
In the Message box, enter the body of the email message that will be delivered when the alert is triggered. You can use the Insert special text dropdown below the message window to add substitutable special text to the message. The metadata that appears in the dropdown will depend upon the custom metadata you have defined (see Certificate Metadata). Place your cursor where you would like the text to appear, select the appropriate variable from the dropdown, and click Insert. Alternately, you can type the special text variable enclosed in curly braces directly. In addition to the substitutable special text fields available in the dropdown, you can also build your own substitutable fields for the requester based on string values from the user or computer Active Directory record. See Table 7: Substitutable Special Text for Pending Request Alerts. If desired, you can format the message body using HTML. For example, you could place the certificate detail information into a table by replacing this text:
CN: {rcn}With this HTML code:
<table><tr><td>CN:</td><td>{rcn}</td></tr><tr><td>DN:</td><td>{rdn}</td></tr><tr><td>SAN:</td><td>{san}</td></tr></table> - The Approval Link substitutable special text field is an important one to include in your alert intended for the administrator responsible for approving or denying the certificate request. This provides a link in the email message that the administrator can click to be taken to an approve/deny page for the certificate in the Management Portal to either approve or deny the request. This certificate-specific approval page cannot be directly accessed within the Management Portal (though you can approve certificate requests in the Management Portal from the Certificate Requests page (see Certificate Requests).
-
Check the Use handler box if you would like the alert to trigger an event handler at processing time, select the appropriate handler in the dropdown, and click the Configure button to configure the event handler. See Event Handler Registration for more information on using event handlers, and Adding PowerShell Handlers to Alerts for more information about using PowerShell Handlers.
-
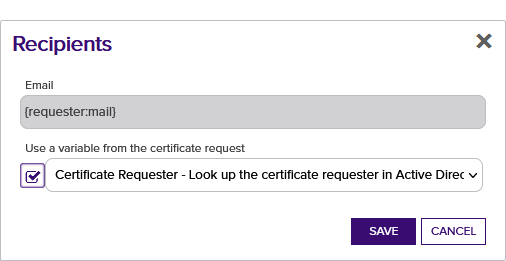
In the Recipients section of the page, click Add to add a recipient to the alert. Each alert can have multiple recipients. Recipients should be added one at a time. You can enter specific email addresses and/or use substitutable special text to replace an email address variable with actual email addresses at processing time. The built-in variable can be selected in the Recipient dialog Use a variable from the certificate request dropdown. In addition, you can type a special text variable enclosed in curly braces in the Email field if you have, for example, a metadata field that contains an email address.
Keyfactor Command sends SMS (text) messages by leveraging the email to text gateways that many major mobile carriers provide. Check with your carrier for specific instructions. Keyfactor has tested that AT&T can be addressed using 10-digit-number@txt.att.net (e.g. 4155551212@txt.att.net) and Verizon can be addressed using 10-digit-number@vtext.com (e.g. 2125551212@vtext.com). T-Mobile can be addressed using 10-digit-number@tmomail.net (e.g. 2065551212@tmomail.net), but functionality can be spotty. Reliability of alerting via this method depends on the reliability of the carrier’s gateways.

Figure 132: Pending Request Alerts Recipients
- Click Save to save your pending request alert.
You may use the copy operation to create multiple similar alerts—for example, one to the requester of the certificate and one to the administrator(s) responsible for approving it.
- In the Management Portal, browse to Alerts > Pending Request.
- On the Pending Certificate Request Alerts page, highlight the row in the alerts grid and click Copy at the top of the grid, or from the right click menu.
- The Pending Request Alert Settings dialog will pop-up with the details from the selected alert. The display name field will have - Copy tagged to the end of it to indicate it is a new alert. You may modify the alert as needed and click Save to add the new alert, or Cancel to cancel the operation.
- In the Management Portal, browse to Alerts > Pending Request.
- On the Pending Certificate Request Alerts page, highlight the row in the alerts grid and click Delete at the top of the grid, or from the right click menu.
- On the Confirm Operation alert, click OK to confirm or Cancel to cancel the operation.
After adding your desired pending request alerts, you may configure a schedule to send the alerts.
- In the Management Portal, browse to Alerts > Pending Request.
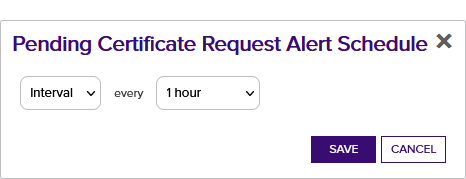
- On the Pending Certificate Request Alerts page, click the Configure button at the top of the Pending Request Alerts page to open the Pending Certificate Request Alert Schedule dialog and configure a monitoring execution schedule. This defines the frequency with which alerts are sent. You can choose to schedule the alerts for:
-
Daily delivery at a specified time
-
An Interval of anywhere from every 1 minute to every 12 hours
-
Turn Off a previously configured schedule

Figure 133: Pending Request Alert Schedule
Once the alerts are configured, you may run a test of all or selected alerts to see if they are configured correctly.
- In the Management Portal, browse to Alerts > Pending Request.
- On the Pending Certificate Request Alerts page, either highlight one row in the pending request alerts grid and click the Test button at the top of the grid or click the Test All button at the top of the grid to test all the alerts.
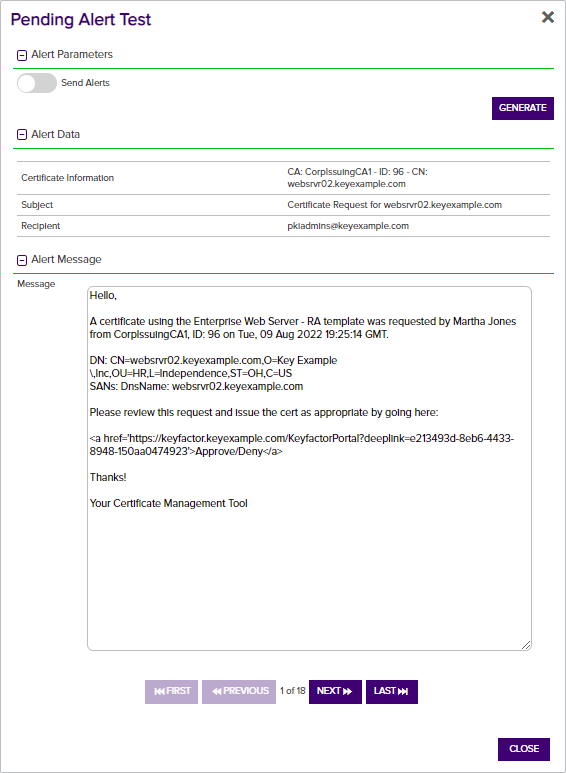
- In the Pending Alert Test dialog in the Alert Parameters section, click the toggle button for Send Alerts , if you would like to deliver email messages as part of the test.
- Click the Generate button to begin generating alerts. Depending on the number of certificate requests to process, this may take a few seconds.
- In the Pending Alert Test dialog in the Alert Data and Alert Message sections, you can review the certificate requests found to confirm that the expected requests are appearing and that the substitutable special text is being replaced as expected. Scroll the First, Previous, Next and Last buttons at the bottom of the dialog. The number of alerts generated will display between the navigation buttons.
By default, a maximum of 100 alerts will be generated during a test. The maximum value is configurable with the Pending Alert Test Result Limit setting in Keyfactor Command application settings (see Application Settings: Console Tab). If more than 100 alerts are generated, no email messages will be sent and you'll have the opportunity to view the first 100 alerts generated.
If you're using an event handler, the event handler is run and the handler actions taken (PowerShell script run, event log message) when the test is run. This is true whether or not you click the Send Alerts toggle.

Figure 134: Pending Alert Test
Refer to the following table for a complete list of the substitutable special text that can be used to customize alert messages.
Table 7: Substitutable Special Text for Pending Request Alerts
|
Variable |
Name |
Description |
|---|---|---|
|
{apprlink} |
Approval Link |
Link pointing to the certificate-specific approval page in the Management Portal where the person responsible for approving the request can go to approve or deny the request |
|
{reqid} |
CMS Request Id |
The request ID for the certificate as stored in the Keyfactor Command database. This is not the same as the request ID issued by the CA. |
|
{rcn} |
Requested Common Name |
Common name contained in the certificate request |
|
{rdn} |
Requested Distinguished Name |
Distinguished name contained in the certificate request |
|
{requester} |
Requester |
The user account that requested the certificate from the CA, in the form DOMAIN\username |
|
{requester:mail} |
Requester’s Email |
Email address retrieved from Active Directory of the user account that requested the certificate from the CA, if present Note: This substitutable special text token is only supported in environments using Active Directory as an identity provider.
|
|
{requester:givenname} |
Requester’s First Name |
First name retrieved from Active Directory of the user account that requested the certificate from the CA, if present Note: This substitutable special text token is only supported in environments using Active Directory as an identity provider.
|
|
{requester:sn} |
Requester’s Last Name |
Last name retrieved from Active Directory of the user account that requested the certificate from the CA, if present Note: This substitutable special text token is only supported in environments using Active Directory as an identity provider.
|
|
{requester:displayname} |
Requester's Display Name |
Display name retrieved from Active Directory of the user account that requested the certificate from the CA, if present Note: This substitutable special text token is only supported in environments using Active Directory as an identity provider.
|
|
{careqid} |
Issuing CA / Request ID |
A string containing the Issuing CA name and the certificate’s Request ID from the CA |
|
{san} |
Subject Alternative Name |
Subject alternative name(s) contained in the certificate request. There are four possible sources for the SANs that appear here:
|
|
{subdate} |
Submission Date |
Date the certificate request was submitted |
|
{template} |
Template Name |
Name of the certificate template used to create the certificate request |
|
{templateshortname} |
Template Short Name |
Short name (often the name with no spaces) of the certificate template used to create the certificate request |
|
{metadata: Email-Contact} |
Email-Contact |
Example of a custom metadata field |
|
{requester:field} |
String Value from AD |
Locates the object in Active Directory identified by the user or computer account that requested the certificate from the CA, and substitutes the contents of the attribute named by field. For example, for users:
For computers:
Note: This substitutable special text field is partially user defined—you pick the field out of AD to include—and is therefore not available in the Insert special text dropdown; it needs to be typed manually.
Note: This substitutable special text token is only supported in environments using Active Directory as an identity provider.
|