By default, Keyfactor Command connects to SQL using an encrypted connection using an SSL![]() TLS (Transport Layer Security) and its predecessor SSL (Secure Sockets Layer) are protocols for establishing authenticated and encrypted links between networked computers. certificate configured on your SQL server.
TLS (Transport Layer Security) and its predecessor SSL (Secure Sockets Layer) are protocols for establishing authenticated and encrypted links between networked computers. certificate configured on your SQL server.
You can check whether your SQL server has been configured with an SSL certificate in one of two ways:
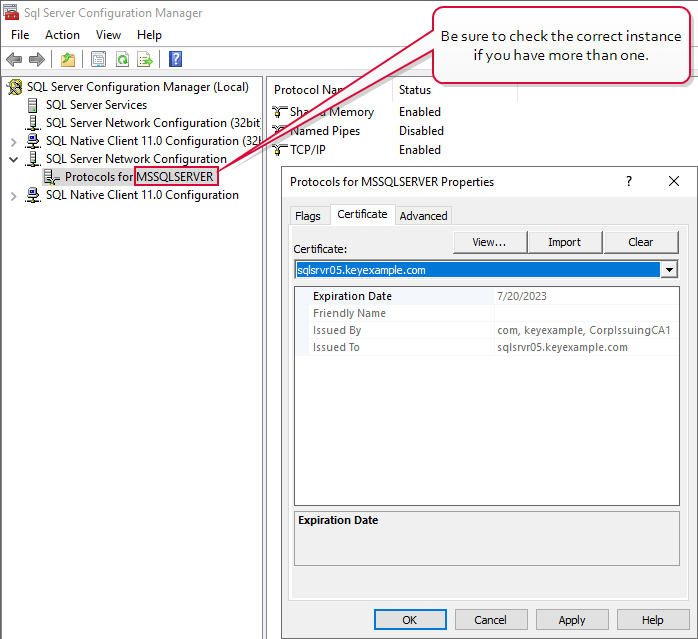
- On the SQL server, open the SQL Server Configuration Manager and drill down under SQL Server Network Configuration to find Protocols for [YOUR INSTANCE NAME].
- Right-click on Protocols for [YOUR INSTANCE NAME] and choose Properties.
- Check the Certificate tab of the Properties dialog to see if a certificate has been configured and is still valid. If your certificate has a friendly name, it will appear here listed in the dropdown by its friendly name.

Figure 486: SQL Server Configuration Manager View Active SSL Certificate
-
On the SQL server, open the registry editor and browse to (where [MSSQL15.MSSQLSERVER] is the correct version of SQL server for your server):
HKEY_LOCAL_MACHINE\SOFTWARE\Microsoft\Microsoft SQL Server\[MSSQL15.MSSQLSERVER]\MSSQLServer\SuperSocketNetLib - In the SuperSocketNetLib registry key, look for a Certificate value.
- Validate that the Certificate value has a thumbprint configured. This should match the thumbprint of an active certificate with a Server Authentication EKU in the Local Machine certificate store.

Figure 487: Registry View Active SSL Certificate
To acquire a new certificate for your SQL server:
- On the SQL server open the Services.msc MMC and scroll down to locate the SQL Server ([YOUR INSTANCE NAME]) service.
-
Check the Log On As column for the name of the service account that the service is running as.
- Identify a template
 A certificate template defines the policies and rules that a CA uses when a request for a certificate is received. with a Server Authentication EKU (a typical web server template).
 -
On the SQL server, do one of following:
-
Using the GUI:
- Open an empty instance of the Microsoft Management Console (MMC).
- Choose File->Add/Remove Snap-in….
- In the Available snap-ins column, highlight Certificates and click Add.
- In the Certificates snap-in popup, choose the radio button for Computer account, click Next, accept the default of Local computer, and click Finish.
- Click OK to close the Add or Remove Snap-ins dialog.
-
Using the command line:
- Open a command prompt using the “Run as administrator” option.
-
Within the command prompt type the following to open the certificates MMC:
certlm.msc
-
-
Enroll for the certificate using your preferred method, being sure to give the certificate a CN (it will not appear in the configuration tool without this) and add subject alternative names (SANs) to it for all the IP addresses, server names, and FQDNs that you might use to reference the SQL server when communicating with it, including DNS
 The Domain Name System is a service that translates names into IP addresses. aliases. Install it, along with its private key
 Private keys are used in cryptography (symmetric and asymmetric) to encrypt or sign content. In asymmetric cryptography, they are used together in a key pair with a public key. The private or secret key is retained by the key's creator, making it highly secure., into the Local Machine certificate store on the SQL server. One way to do this is in the certificates MMC:
- Drill down to the Personal folder under Certificates for the Local Computer, right-click, and choose All Tasks->Request New Certificate….
- Follow the certificate enrollment
 Certificate enrollment refers to the process by which a user requests a digital certificate. The user must submit the request to a certificate authority (CA). wizard, selecting the template you identified for this purpose, and providing appropriate SANs along with any required information.

Figure 489: SQL Server SSL Certificate Details
- Drill down to the Personal folder under Certificates for the Local Computer, locate your certificate, right-click, and choose All Tasks->Manage Private Keys….
-
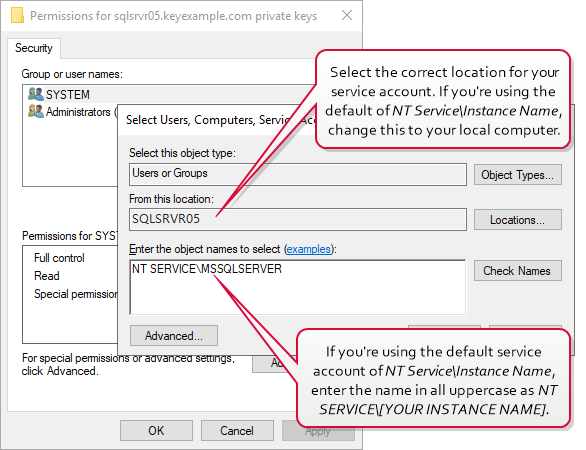
In the Permissions for private keys dialog, click Add, add the SQL service account, and grant that service account Read but not Full control permissions. If the SQL server is running as NT Service\[YOUR INSTANCE NAME] as shown in Figure 488: View SQL Server Services, be sure to change the location to your local machine and enter the object name as “NT SERVICE\[YOUR INSTANCE NAME]” as shown in Figure 490: Grant Private Key Permissions for SQL Server.
- Click OK to save.
- Configure the SSL certificate in SQL using either the SQL Server Configuration Manager or registry as shown above for checking whether there is an existing certificate configured (see SQL Server Configuration Manager).
- After you've acquired a new certificate, made the private key permission changes, and associated it in SQL, you'll need to restart the SQL Server (Instance Name) service (see Figure 488: View SQL Server Services) before these changes will take effect.

