Appendix - Set up the Universal Orchestrator to Use Client Certificate Authentication via a Reverse Proxy: Citrix ADC
The Keyfactor Universal Orchestrator![]() The Keyfactor Universal Orchestrator, one of Keyfactor's suite of orchestrators, is used to interact with Windows servers (a.k.a. IIS certificate stores) and FTP capable devices for certificate management, run SSL discovery and management tasks, and manage synchronization of certificate authorities in remote forests. With the addition of custom extensions, it can run custom jobs to provide certificate management capabilities on a variety of platforms and devices (e.g. F5 devices, NetScaler devices, Amazon Web Services (AWS) resources) and execute tasks outside the standard list of certificate management functions. It runs on either Windows or Linux. can be configured to support TLS
The Keyfactor Universal Orchestrator, one of Keyfactor's suite of orchestrators, is used to interact with Windows servers (a.k.a. IIS certificate stores) and FTP capable devices for certificate management, run SSL discovery and management tasks, and manage synchronization of certificate authorities in remote forests. With the addition of custom extensions, it can run custom jobs to provide certificate management capabilities on a variety of platforms and devices (e.g. F5 devices, NetScaler devices, Amazon Web Services (AWS) resources) and execute tasks outside the standard list of certificate management functions. It runs on either Windows or Linux. can be configured to support TLS![]() TLS (Transport Layer Security) and its predecessor SSL (Secure Sockets Layer) are protocols for establishing authenticated and encrypted links between networked computers. termination at a reverse proxy or network edge device such as a Citrix ADC (a.k.a. NetScaler) or F5. The orchestrator
TLS (Transport Layer Security) and its predecessor SSL (Secure Sockets Layer) are protocols for establishing authenticated and encrypted links between networked computers. termination at a reverse proxy or network edge device such as a Citrix ADC (a.k.a. NetScaler) or F5. The orchestrator![]() Keyfactor orchestrators perform a variety of functions, including managing certificate stores and SSH key stores. supports using either basic authentication or client certificate authentication between the orchestrator and the Keyfactor Command orchestrator endpoint
Keyfactor orchestrators perform a variety of functions, including managing certificate stores and SSH key stores. supports using either basic authentication or client certificate authentication between the orchestrator and the Keyfactor Command orchestrator endpoint![]() An endpoint is a URL that enables the API to gain access to resources on a server.. When a client certificate is used for the segment between the orchestrator and the reverse proxy, the reverse proxy authenticates the orchestrator with the provided client certificate and then sends the certificate on to Keyfactor Command as an added request header to authenticate the orchestrator to Keyfactor Command with the original certificate. The orchestrator is authenticated and authorized to make the connection to Keyfactor Command in one of two ways:
An endpoint is a URL that enables the API to gain access to resources on a server.. When a client certificate is used for the segment between the orchestrator and the reverse proxy, the reverse proxy authenticates the orchestrator with the provided client certificate and then sends the certificate on to Keyfactor Command as an added request header to authenticate the orchestrator to Keyfactor Command with the original certificate. The orchestrator is authenticated and authorized to make the connection to Keyfactor Command in one of two ways:
- A username and password with appropriate permissions within Keyfactor Command are stored on the reverse proxy and presented to Keyfactor Command as part of the request. Basic authentication is used to authenticate the reverse proxy to IIS on the Keyfactor Command server. The same credentials provide authorization for the orchestrator in Keyfactor Command. The original certificate from the orchestrator, provided in a request header, authenticates the orchestrator to the Keyfactor Command orchestrator endpoint.
- A username and password with appropriate permissions within Keyfactor Command are stored in IIS on the Keyfactor Command. In this scenario, a second client certificate residing on the reverse proxy is used to authenticate the reverse proxy to IIS on the Keyfactor Command server. The basic authentication credentials provide authorization for the orchestrator in Keyfactor Command and the original client certificate from the request header provides authentication. The basic authentication credentials are stored locally and do not need to travel over the network. The original certificate from the orchestrator, provided in a request header, authenticates the orchestrator to the Keyfactor Command orchestrator endpoint.
The following instructions cover one method of configuring a Citrix ADC device to support these.
Complete the following steps and then configure the orchestrator to enable client certificate authentication as per the installation instructions (see --client-auth-certificate or Install the Universal Orchestrator on Windows).
Create the following two rewrite actions.
Capture the client certificate from the orchestrator:
- In the Citrix ADC GUI, browse to AppExpert > Rewrite > Actions.
- On the Rewrite Actions page, click Add.
- On the Create Rewrite Action page, enter a Name for the action that will take the certificate received from the orchestrator and convert it to PEM
 A PEM format certificate file is a base64-encoded certificate. Since it's presented in ASCII, you can open it in any text editor. PEM certificates always begin and end with entries like ---- BEGIN CERTIFICATE---- and ----END CERTIFICATE----. PEM certificates can contain a single certificate or a full certifiate chain and may contain a private key. Usually, extensions of .cer and .crt are certificate files with no private key, .key is a separate private key file, and .pem is both a certificate and private key. format (e.g. CaptureClientCert).
 - Give the action a Type of INSERT_HTTP_HEADER.
- Give the action a Header Name (e.g. NS-ClientCert). Be sure to make a note of this header name. You will need it later when you configure certificate authentication for the orchestrator.
- Enter an Expression to convert the client authentication certificate to PEM format:CLIENT.SSL.CLIENT_CERT.TO_PEM
- Enter Comments if desired and click OK to save the action.
Store basic authentication credentials to authenticate the proxy to IIS on the Keyfactor Command server and provide authorization information:
- Click Add to add another action.
- On the Create Rewrite Action page, enter a Name for the action that will send the basic authentication credentials for the orchestrator to Keyfactor Command (e.g. SendServiceCreds).
- Give the action a Type of INSERT_HTTP_HEADER.
- Give the action a Header Name of Authorization.
- Enter an Expression to send Base64-encoded basic authentication credentials to the Keyfactor Command server (where service@keyexample.com and MySecurePassword are the correct service name and password for your environment):"Basic "+("service@keyexample.com"+":"+"MySecurePassword").B64ENCODEM
- Enter Comments if desired and click OK to save the action.
Create the following two rewrite policies.
Put the client certificate from the orchestrator in the header:
- In the Citrix ADC GUI, browse to AppExpert > Rewrite > Policies.
- On the Rewrite Policies page, click Add.
- On the Create Rewrite Policy page, enter a Name for the policy that will confirm that a certificate has been received from the orchestrator and run the action to convert it to PEM format (e.g. NS-GetCert).
- Give the policy the Action you created in the previous section to capture the client authentication certificate (e.g. CaptureClientCert).
- Define a Log Action if desired.
- Set the Undefined-Result Action to -Global-undefined-result-action-.
- Enter an Expression to validate that the client authentication certificate has been received from the orchestrator:CLIENT.SSL.CLIENT_CERT.EXISTS
- Enter Comments if desired and click OK to save the policy.
Send the basic authentication credentials to the Keyfactor Command server:
- Click Add to add another policy.
- On the Create Rewrite Policy page, enter a Name for the policy that will send the basic authentication credentials for the orchestrator to the Keyfactor Command server (e.g. NS-SendCreds).
- Give the policy the Action you created in the previous section to send the basic authentication credentials (e.g. SendServiceCreds).
- Define a Log Action if desired.
- Set the Undefined-Result Action to -Global-undefined-result-action-.
- Enter an Expression to confirm that the authorization header does not already exist in the request header:HTTP.REQ.HEADER("Authorization").EXISTS.NOT
- Enter Comments if desired and click OK to save the policy.
Create the following responder policy.
Validate that the client certificate presented by the orchestrator was issued by the specified issuing CA![]() A certificate authority (CA) is an entity that issues digital certificates. Within Keyfactor Command, a CA may be a Microsoft CA or a Keyfactor gateway to a cloud-based or remote CA.:
A certificate authority (CA) is an entity that issues digital certificates. Within Keyfactor Command, a CA may be a Microsoft CA or a Keyfactor gateway to a cloud-based or remote CA.:
- In the Citrix ADC GUI, browse to AppExpert > Responder > Policies.
- On the Responder Policies page, click Add.
- On the Create Responder Policy page, enter a Name for the policy that will validate that the certificate received from the orchestrator was issued by the correct CA (e.g. NS-ValidateIssuer).
- Select an Action of Reset.
- Define a Log Action if desired.
- Do not configure an AppFlow Action.
- Set the Undefined-Result Action to -Global-undefined-result-action-.
- Enter an Expression to confirm that the certificate received from the orchestrator was issued from the correct issuing CA (where CorpIssuingCA is the logical name
 The logical name of a CA is the common name given to the CA at the time it is created. For Microsoft CAs, this name can be seen at the top of the Certificate Authority MMC snap-in. It is part of the FQDN\Logical Name string that is used to refer to CAs when using command-line tools and in some Keyfactor Command configuration settings (e.g. ca2.keyexample.com\Corp Issuing CA Two). of your CA):CLIENT.SSL.CLIENT_CERT.ISSUER.CONTAINS("CorpIssuingCA").NOTTip: Connections from the orchestrator will fail if the client authentication certificate was issued by any CA other than the one configured here. You can use AND logic to add more than one CA. For example:CLIENT.SSL.CLIENT_CERT.ISSUER.CONTAINS("CorpIssuingCA1").NOT && CLIENT.SSL.CLIENT_CERT.ISSUER.CONTAINS("CorpIssuingCA2").NOT
With this expression, certificates issued from either one of these CAs would be accepted.
- Enter Comments if desired and click OK to save the policy.
Modify the configuration for your load balancing virtual server that is used for Keyfactor Command KeyfactorAgent requests as follows.
Configure the Citrix device to authenticate the orchestrator using its client certificate:
- In the Citrix ADC GUI, browse to Traffic Management > Load Balancing > Virtual Servers.
- On the Virtual Servers page, select your virtual server and click Edit.
- In the SSL
 TLS (Transport Layer Security) and its predecessor SSL (Secure Sockets Layer) are protocols for establishing authenticated and encrypted links between networked computers. Parameters section, click to edit, check the Client Authentication box, and set the Client Certificate dropdown to Mandatory.
Associate the two rewrite policies.
- On the Virtual Servers page, under Advanced Settings expand Policies.
- In the Policies section, click the plus to add a new policy.
- On the Choose Type page, select Choose PolicyRewrite and Choose TypeRequest and click Continue.
- On the Choose Type page, click Add Binding.
- On the Policy Binding page, click the Select Policy field and on the Rewrite Policies page select the radio button for the rewrite policy you created to capture the client authentication certificate (e.g. NS-GetCert). Click Select to save the selection.
- On the Policy Binding page, set a Priority of 110.
- Set Goto Expression to Next.
- Set Invoke LabelType to None.
- Click Bind to save the binding.
- On the Choose Type page for Rewrite Request, click Add Binding.
- On the Policy Binding page, click the Select Policy field and on the Rewrite Policies page select the radio button for the rewrite policy you created to send the service account credentials to the Keyfactor Command server (e.g. NS-SendCreds). Click Select to save the selection.
- On the Policy Binding page, set a Priority of 120.
- Set Goto Expression to Next.
- Set Invoke LabelType to None.
- Click Bind to save the binding.
- Click Close to return to the virtual server settings page.
Associate the responder policy:
- On the Virtual Servers page, in the Policies section, click the plus to add a new policy.
- On the Choose Type page, select Choose Policy Responder and Choose Type Request and click Continue.
- On the Choose Type page, click Add Binding.
- On the Policy Binding page, click the Select Policy field and on the Responder Policies page select the radio button for the responder policy you created to validate the issuer of the client authentication certificate (e.g. NS-ValidateIssuer). Click Select to save the selection.
- On the Policy Binding page, set a Priority of 100.
- Set Goto Expression to END.
- Set Invoke LabelType to None.
- Click Bind to save the binding.
- Click Close to return to the virtual server settings page.
Once you have all the components configured on Citrix, you're ready to configure Keyfactor Command to enable client certificate authentication for the orchestrators. Once you do this, all orchestrators connecting to this instance of Keyfactor Command will be required to provide a certificate to authenticate. If you have some orchestrators deployed that do not support certificate authentication (e.g. Java agents), you will need to design a solution with multiple Keyfactor Command servers to support multiple authentication types. Contact your Keyfactor representative for assistance with this.
To configure Keyfactor Command to require client certificate authentication for orchestrators:
- On the Keyfactor Command server, open the Keyfactor Configuration Wizard.
- In the Certificate Authentication section of the Orchestrators tab, check the Enabled box.
- In the Certificate Authentication HTTP Header field, enter the Header Name you gave to the rewrite action you created to capture the certificate from the orchestrator (e.g. NS-ClientCert). Keyfactor Command uses the certificate supplied in this header to identify the orchestrator attempting to authenticate.
- In the Certificate Authentication Username and Certificate Authentication Password fields, enter the credentials for an Active Directory service account for the orchestrator(s).Tip: The service account entered here does not need to match the service account entered on the Citrix device to authenticate the orchestrator.
- Click Verify Configuration and Apply Configuration.
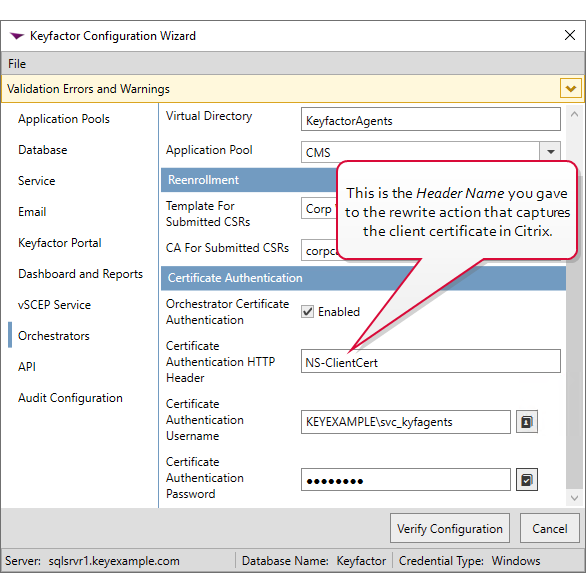
Figure 557: Configure Keyfactor Command for Client Certificate Authentication
If you have opted to configure the Citrix ADC device to use a client certificate to authenticate from the device to the Keyfactor Command server instead of submitting basic authentication credentials from the device, you will need to configure IIS on the Keyfactor Command server to recognize the client certificate for authentication and then use basic authentication credentials on the Keyfactor Command server to provide authorization to Keyfactor Command. In addition, you will need to configure Keyfactor Command to force it to use the client certificate from the orchestrator stored in the header to authenticate the orchestrator, not the client certificate presented by the proxy in the second hop of the transaction.
On your Keyfactor Command server, install the following additional module:
-
IIS Client Certificate Mapping Authentication (rather than Client Certificate Mapping Authentication)
Tip: It's fine to install both IIS Client Certificate Mapping Authentication and Client Certificate Mapping Authentication, but the former is what's needed for this solution.
If you have more than one Keyfactor Command server with separated roles, this only needs to be installed on the server accepting traffic to the /KeyfactorAgents web application.
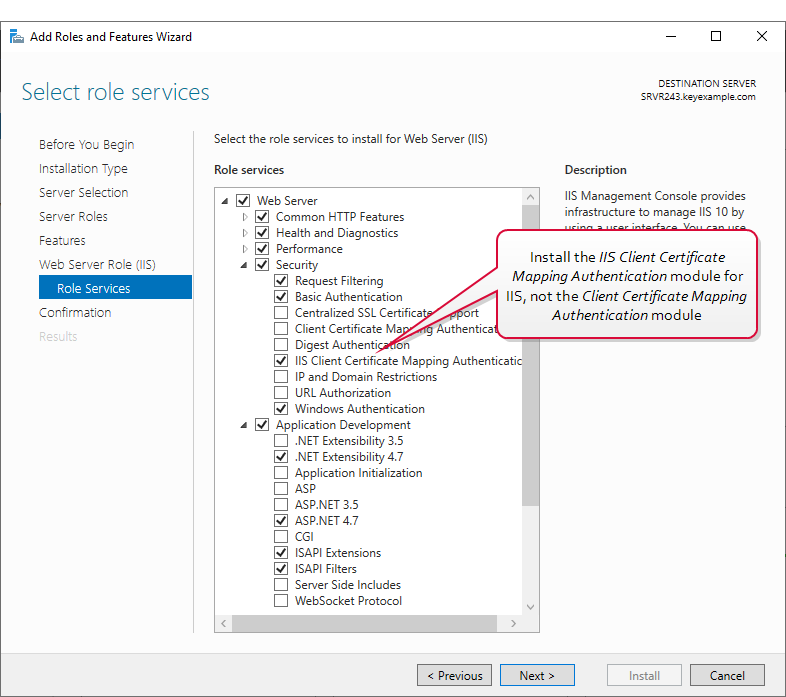
Figure 558: IIS Module for Client Certificate Authentication
The PowerShell command to install the appropriate module is :
Make the following changes in the IIS Management console on the Keyfactor Command server:
-
In the IIS Management console, highlight the server name on the left and open Authentication. Make sure Anonymous Authentication is the only enabled method.
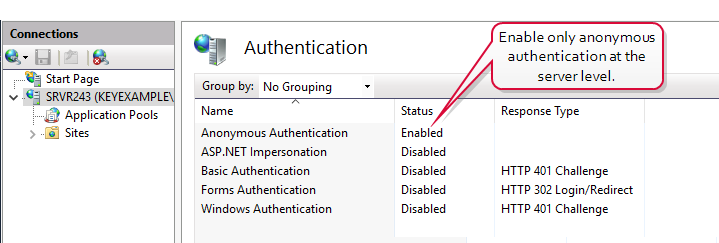
Figure 559: Configure only Anonymous Authentication at the Server Level in IIS
-
In the IIS Management console, drill down into sites and into the Default Web Site (or other web site if your Keyfactor Command instance has been installed in an alternate web site). Under the Default Web Site, locate the KeyfactorAgents application and open Authentication for this. Disable all the authentication methods shown here.
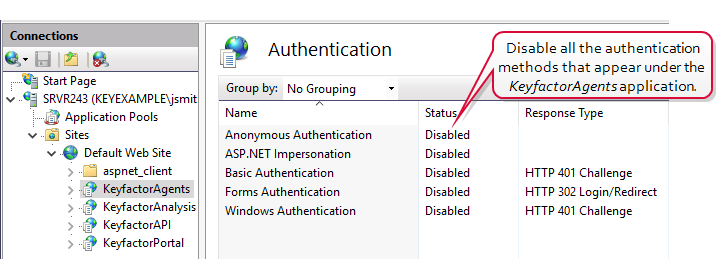
Figure 560: Disable Authentication Methods at the Application Level in IIS
Tip: If your KeyfactorAgents endpoint is running on a standalone server with no other Keyfactor roles, you should also disable all authentication methods at the Default Web Site level as in step two. If your server holds other Keyfactor roles, leave this in the default configuration with Anonymous being the only authentication method enabled as in step one. -
In the IIS Management console, open SSL Settings for the KeyfactorAgents application. Check the Require SSL box and select either Require or Accept for Client certificates.
Important: Only selected Require if your are only using orchestrators that support client certificate authentication and plan to configure all of them for certificate authentication.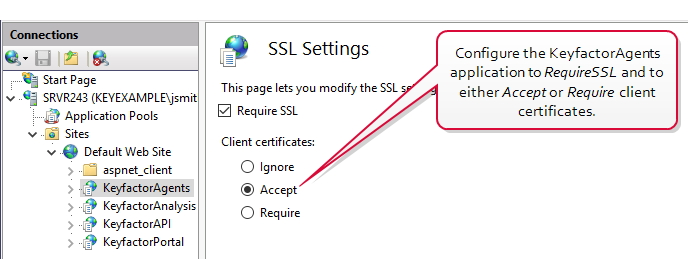
Figure 561: Configure SSL Settings in IIS for Client Certificate Authentication
Tip: If your KeyfactorAgents endpoint is running on a standalone server with no other Keyfactor roles, you may also configure your server to Require or Accept for Client certificates at the Default Web Site level. It is good security practice to check the Require SSL box. If your KeyfactorAgents endpoint is running on a server with other Keyfactor roles, you do not need to accept client certificates at this level and should not require them at this level.
Make the following changes in the IIS Management console on the Keyfactor Command server:
- In the IIS Management console, drill down to the Default Web Site (or other web site if your Keyfactor Command instance has been installed in an alternate web site). In the Default Web Site, open the Configuration Editor tool.
-
In the Configuration Editor tool at the Default Web Site level, browse to:
system.webServer/security/authentication/iisClientCertificateMappingAuthenticationImportant: Don't be tempted to configure this setting only at the application level (KeyfactorAgents) rather than at the Default Web Site level. It will only work if configured at the Default Web Site level and then enabled at the application level. -
In the configurations for IIS Client Certificate Mapping Authentication, set the defaultLogonDomain to your forest
 An Active Directory forest (AD forest) is the top most logical container in an Active Directory configuration that contains domains, and objects such as users and computers. root. Set the manyToOneCertificateMappingsEnabled option to True and the oneToOneCertificateMappingEnabled option to False. Click the dots to the right of the manyToOneMappings setting to open details for this setting.
Figure 562: Configure IIS Client Certificate Mapping Authentication for the Default Web Site
-
In the Collection
 The certificate search function allows you to query the Keyfactor Command database for certificates from any available source based on any criteria of the certificates and save the results as a collection that will be availble in other places in the Management Portal (e.g. expiration alerts and certain reports). Editor for the manytoOneMappings, click Add and enter appropriate values for the properties. The service account entered here will be used as the identity in Keyfactor Command of all orchestrators that authenticate via client certificate.
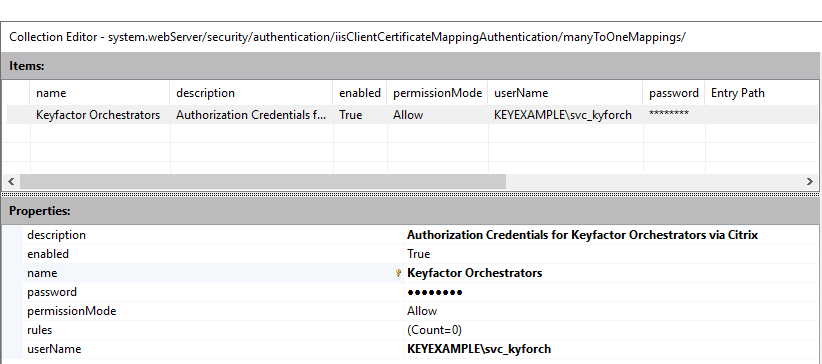
Figure 563: Configure Authorization Credentials for Keyfactor Orchestrators
- In the IIS Management console,drill down into sites and into the Default Web Site (or other web site if your Keyfactor Command instance has been installed in an alternate web site). Under the Default Web Site, locate the KeyfactorAgents application and open the Configuration Editor tool for it.
-
In the Configuration Editor tool at the KeyfactorAgents application level, browse to:
system.webServer/security/authentication/iisClientCertificateMappingAuthenticationEnable the mapping authentication option at this level. The configuration should have replicated down from the Default Web Site level.
When the orchestrator is configured to use a client certificate to authenticate to a proxy and then the proxy is configured to use a separate client certificate to authenticate to the Keyfactor Command server, authentication to the Keyfactor Command application should be done using the original certificate from the orchestrator, not the certificate inserted in the process at the proxy level. This is done by including the original certificate from the orchestrator in the request header to Keyfactor Command. To assure that Keyfactor Command gives priority to this certificate and not the certificate the proxy uses to authenticate, set the Keyfactor Command authentication application setting Always Use Certificate from Header to True.
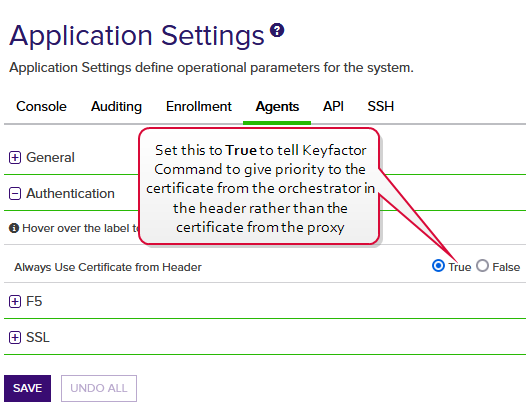
Figure 564: Configure Application Setting in Keyfactor Command to use the Header Certificate
- On the Keyfactor Command server, open a command prompt using the “Run as administrator” option.
Execute the following command to output the current configuration for SSL certificate bindings:
netsh http show sslcertOutput from this command will look something like this (you may see multiple sections if you have multiple web sites on the server):
SSL Certificate bindings:
-------------------------
IP:port                      : 0.0.0.0:443
Certificate Hash             : 649dfa6df693583f609af499fe4237f2c1d64224
Application ID               : {4dc3e181-e14b-4a21-b022-59fc669b0914}
Certificate Store Name       : My
Verify Client Certificate Revocation : Enabled
Verify Revocation Using Cached Client Certificate Only : Disabled
Usage Check                  : Enabled
Revocation Freshness Time    : 0
URL Retrieval Timeout        : 0
Ctl Identifier               : (null)
Ctl Store Name               : (null)
DS Mapper Usage              : Enabled
Negotiate Client Certificate : Disabled
Reject Connections           : Disabled
Disable HTTP2                : Not Set
Disable QUIC                 : Not Set
Disable TLS1.2               : Not Set
Disable TLS1.3               : Not Set
Disable OCSP Stapling        : Not Set
Disable Legacy TLS Versions  : Not Set
- Look at the value for the Negotiate Client Certificate setting for the web site on which Keyfactor Command is installed. If the value is Disabled, retrieve from the output the values for the IP:port, Certificate Hash, and Application ID.
Execute the following commands to remove and re-add the IP:port with Negotiate Client Certificate enabled (referencing the correct values for ipport, certhash, and appid):
netsh http delete sslcert ipport=0.0.0.0:443
netsh http add sslcert ipport=0.0.0.0:443 certhash=649dfa6df693583f609af499fe4237f2c1d64224 appid={4dc3e181-e14b-4a21-b022-59fc669b0914} clientcertnegotiation=enable- Execute the show command again to confirm that the setting is now shown as enabled.
- Restart the IIS services (iisreset) and try the certificate authentication again.