Revocation Monitoring Location Operations
From the Revocation Monitoring page on the Keyfactor Command Management Portal you can view and edit existing location endpoints, add new locations, delete an endpoint![]() An endpoint is a URL that enables the API to gain access to resources on a server., test revocation monitoring location alert email notifications, and monitor location endpoint responsiveness.
An endpoint is a URL that enables the API to gain access to resources on a server., test revocation monitoring location alert email notifications, and monitor location endpoint responsiveness.
-
In the Management Portal, browse to Alerts > Revocation Monitoring.

Figure 135: Revocation Monitoring Grid
- On the Revocation Monitoring page, click Add to create a new monitoring location, or Edit to modify an existing one, and then populate the Revocation Endpoint Settings dialog appropriately for the type of revocation endpoint using the information below:
 For a CRL location:
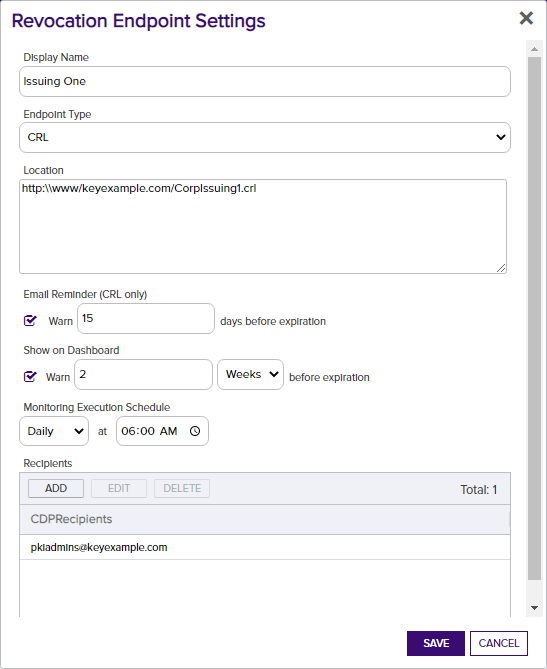
- In the Revocation Endpoint Settings dialog, type a Display Name for the CRL
 A Certificate Revocation List (CRL) is a list of digital certificates that have been revoked by the issuing Certificate Authority (CA) before their scheduled expiration date and should no longer be trusted. location. This name appears on the Revocation Monitoring grid and on the Management Portal dashboard.
 - Select CRL in the Endpoint Type dropdown.
In the Location field, type a URL for the CRL location. This can be either an HTTP location or an LDAP location. Be sure to monitor the CRL locations that are in use by applications in your environment—if you're monitoring LDAP locations but applications are using an HTTP location, you're not going to receive any warning if a CRL fails to publish to the HTTP location.
Important: Because a “+” (plus sign) in a URL can represent either a space or a “+” Keyfactor Command has chosen to read “+” as a space. For CRL URLs that require a “+” (plus sign), rather than a space, replace plus signs in your CRL's URL with “%2B”. Only replace the plus signs you don't wish to be treated as a space.- In the Email Reminder section of the page, check the Warn box and set the number of days ahead of expiration that email reminders should begin to be sent.
- In the Show on Dashboard section of the page, check the Warn box and set the number of weeks, days or hours ahead of expiration for warning flags to begin appearing on the Management Portal dashboard (see Dashboard: Revocation Monitoring).
- In the Monitoring Execution Schedule section of the page, configure a monitoring execution schedule. This defines the frequency with which locations are checked and alerts sent. You can choose to schedule the alert for this location either for daily delivery at a specified time or at intervals of anywhere from every 1 minute to every 12 hours. A daily schedule is the most common configuration. Schedules are configured separately for each endpoint.
In the Recipients section of the page, add email addresses of the users and/or groups who should receive email notifications when CRLs are approaching expiration or are unreachable. Recipient lists are configured separately for each endpoint.
Keyfactor Command sends SMS (text) messages by leveraging the email to text gateways that many major mobile carriers provide. Check with your carrier for specific instructions. Keyfactor has tested that AT&T can be addressed using 10-digit-number@txt.att.net (e.g. 4155551212@txt.att.net) and Verizon can be addressed using 10-digit-number@vtext.com (e.g. 2125551212@vtext.com). T-Mobile can be addressed using 10-digit-number@tmomail.net (e.g. 2065551212@tmomail.net), but functionality can be spotty. Reliability of alerting via this method depends on the reliability of the carrier's gateways.

Figure 136: CRL Monitoring Details
 For an OCSP location:
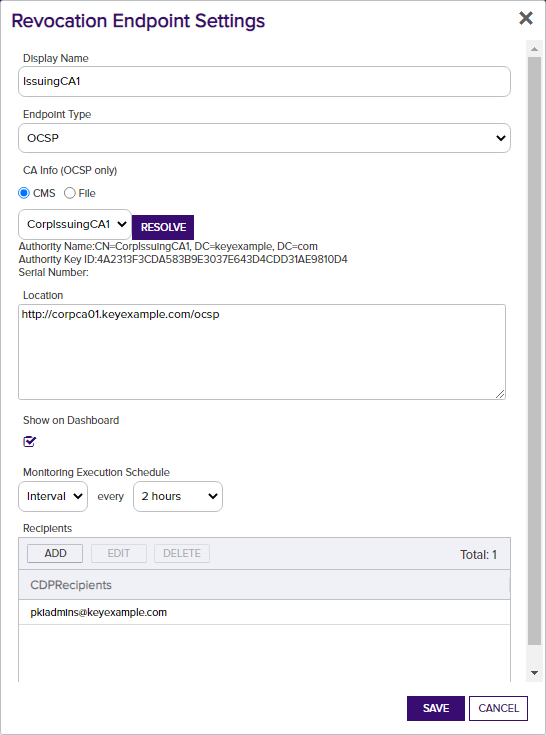
- In the Revocation Endpoint Settings dialog, type a Display Name for the OCSP location. This name appears on the Revocation Monitoring grid and on the Management Portal dashboard.
- Select OCSP in the Endpoint Type dropdown.
Keyfactor Command offers two options to retrieve endpoint information for OCSP:
- Resolve it based on a certificate authority
 A certificate authority (CA) is an entity that issues digital certificates. Within Keyfactor Command, a CA may be a Microsoft CA or a Keyfactor gateway to a cloud-based or remote CA. defined in Keyfactor Command (see Adding or Modifying a CA Record). This option is only available for Microsoft CAs in the forest
 An Active Directory forest (AD forest) is the top most logical container in an Active Directory configuration that contains domains, and objects such as users and computers. in which Keyfactor Command is installed or EJBCA CAs installed on the same network as the Keyfactor Command server. When you use this option, a request is sent for information from the Keyfactor Command server to the CA. For Microsoft CAs, this a DCOM request. For EJBCA CAs, this is a REST request.
 - Import it from a certificate issued by the certificate authority to be monitored. This can be any certificate issued by the CA and containing the OCSP information. The certificate needs to be a base-64 encoded PEM
 A PEM format certificate file is a base64-encoded certificate. Since it's presented in ASCII, you can open it in any text editor. PEM certificates always begin and end with entries like ---- BEGIN CERTIFICATE---- and ----END CERTIFICATE----. PEM certificates can contain a single certificate or a full certifiate chain and may contain a private key. Usually, extensions of .cer and .crt are certificate files with no private key, .key is a separate private key file, and .pem is both a certificate and private key. file (.cer/.crt).
In the CA Info field, select the CMS radio button to automatically retrieve the CA certificate information from Keyfactor Command or select the File radio button to upload a file with the CA certificate information.
- If you select CMS, pick the desired CA from the CA dropdown and then click the Resolve button to retrieve the certificate authority information.
If you select File, click the Upload button, browse to locate the file containing a certificate issued by the desired CA and open it.
With either method of retrieving the information, you should see the full certificate authority name and authority key ID populate below the CA dropdown. The serial number field will populate for uploaded files.
- Resolve it based on a certificate authority
- In the Location section of the page, enter the full URL to the OCSP responder servicing this certificate authority's CRL.
- In the Show on Dashboard section of the page, check the box to include this OCSP location on the Management Portal dashboard (see Dashboard: Revocation Monitoring).
- In the Monitoring Execution Schedule section of the page, configure a monitoring execution schedule. This defines the frequency with which locations are checked and alerts sent. You can choose to schedule the alert for this location either for daily delivery at a specified time or at intervals of anywhere from every 1 minute to every 12 hours. A daily schedule is the most common configuration. Schedules are configured separately for each endpoint.
In the Recipients section of the page, add email addresses of the users and/or groups who should receive email notifications when OCSP endpoints are unreachable. Recipient lists are configured separately for each endpoint.
Keyfactor Command sends SMS (text) messages by leveraging the email to text gateways that many major mobile carriers provide. Check with your carrier for specific instructions. Keyfactor has tested that AT&T can be addressed using 10-digit-number@txt.att.net (e.g. 4155551212@txt.att.net) and Verizon can be addressed using 10-digit-number@vtext.com (e.g. 2125551212@vtext.com). T-Mobile can be addressed using 10-digit-number@tmomail.net (e.g. 2065551212@tmomail.net), but functionality can be spotty. Reliability of alerting via this method depends on the reliability of the carrier's gateways.

Figure 137: OCSP Monitoring Details
- In the Revocation Endpoint Settings dialog, type a Display Name for the CRL
- Click Save to save the endpoint location, or the changes. Click Cancel to cancel.
- In the Management Portal, browse to Alerts > Revocation Monitoring.
- On the Revocation Monitoring page, highlight the row in the grid and click Delete at the top of the grid, or from the right click menu.
- On the Confirm Operation alert, click OK to confirm or Cancel to cancel the operation.
- In the Management Portal, browse to Alerts > Revocation Monitoring.
- On the Revocation Monitoring page, click the Test All button at the top of the grid, or select a specific location from the grid and click Test from the top of the grid or the right click menu.
- In the Revocation Monitoring Test dialog in the Alert Parameters section, select an End Date for testing. You can use this option to simulate running the alerts a month from now instead of today, for example, or put in a date far in the future to be sure you pick up some expiring CRLs for testing purposes.
- In the Revocation Monitoring Test dialog in the Alert Parameters section, click the toggle button for Send Alerts if you would like to deliver email messages as part of the test.
- Click the Generate button to begin generating alerts. Depending on the number of endpoints to process, this may take a few seconds.
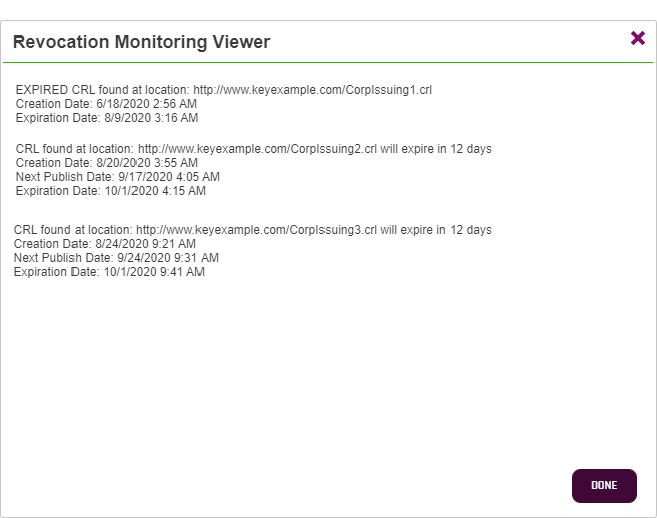
- In the Revocation Monitoring Test dialog in the Alert Data and Alert Message sections, you can review the alerts to confirm that the expected CRLs and OCSP endpoints are appearing. Scroll through the alerts using the First, Previous, Next and Last buttons at the bottom of the dialog. The number of alerts generated will display between the navigation buttons.
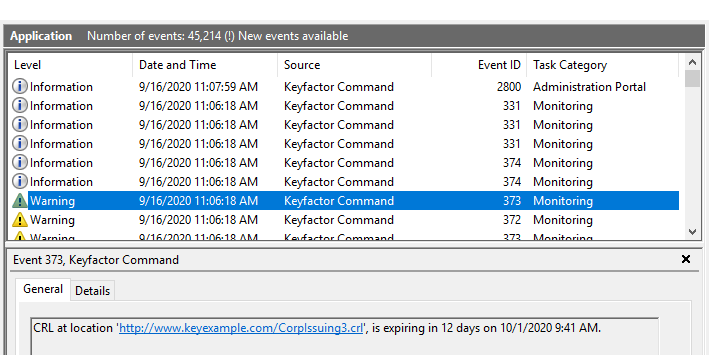
When alerts are tested or sent on a schedule, corresponding message are also written to the system event log on the server where the Keyfactor Command service runs. For testing, this is true whether or not you click the Send Alerts toggle. Information is logged to the event log for both locations that are in a good state (e.g. CRL resolves and is not in a warning or expired state or response from OCSP) and locations that are in an error state (e.g. CRL resolves but is in the warning period or expired, CRL is expired, CRL or OCSP location does not resolve).
For specific Windows event ID information, see Keyfactor Command Windows Event IDs.

Figure 138: Test Revocation Monitoring

Figure 139: Revocation Monitoring Event Log Messages