Preparing CyberArk to Work with Keyfactor Command
Configuring the CyberArk Credential Provider to interoperate with Keyfactor Command and store Keyfactor Command credentials in the CyberArk vault involves these preparatory steps before configuration in Keyfactor Command can begin:
- Install required software on the Keyfactor Command server.
- Create a safe for the Keyfactor Command credentials in the CyberArk PrivateArk (or identify an existing safe).
- Create passwords in your CyberArk safe for use with your Keyfactor Command certificate stores.
- Create an application user for Keyfactor Command use in the CyberArk PrivateArk.
- Grant the application user and Keyfactor Command provider account in CyberArk appropriate permissions in PrivateArk to the safe.
- Create a credential file on the Keyfactor Command server for use with CyberArk.
- Register the CyberArk software assembly file with Keyfactor Command.
CyberArk has the following software requirements for interoperability with Keyfactor Command:
- Microsoft Visual C++ 2013 (x64)
- Microsoft Visual C++ 2013 (x86)
- CyberArk Credential Provider
Both versions of Microsoft Visual C++ must be installed on the Keyfactor Command server along with the CyberArk Credential Provider software before you proceed to creating a credential file on the Keyfactor Command server or registration of the CyberArk software on the Keyfactor Command server.
Keyfactor Command uses an application user account within CyberArk to retrieve credentials.
To create an application user in CyberArk:
- Open the CyberArk Password Vault web portal.
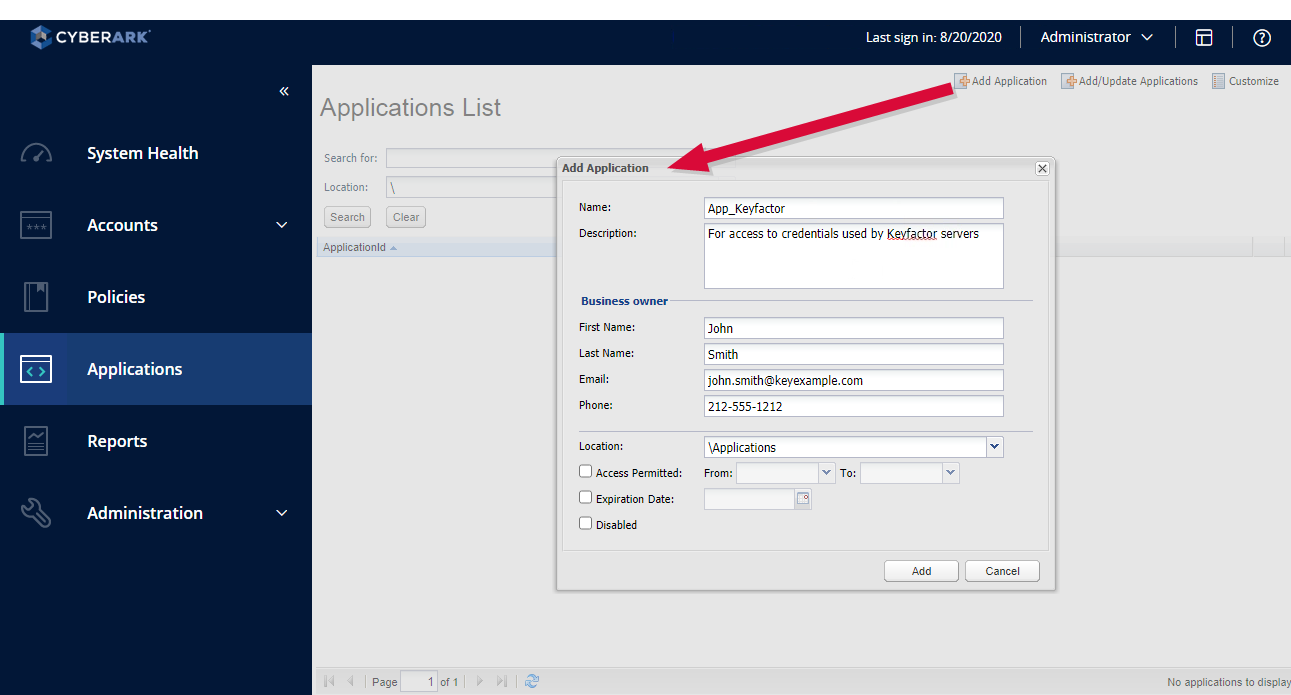
- In the Password Vault web portal, expand the left-hand menu and choose Applications > Add Application.
- On the Add Application page, enter a Name and Description for your application. If desired, enter Business owner information. Select Applications in the Location dropdown. No other configuration changes are required on this page for interoperability with Keyfactor Command, but you may have other configuration settings you may wish to make. Click Add to save the record.Important: The name you enter in the Name field should begin with App_ (e.g. App_Keyfactor). Make note of the name you enter here. This name becomes your application ID and you will need to reference this from Keyfactor Command.
You will need a CyberArk safe in which to store the certificate store credentials for Keyfactor Command that you wish to manage with CyberArk. You may either create a new one or leverage an existing one. This documentation assumes you will create a new one.
To create a safe in CyberArk:
- Open the CyberArk Password Vault web portal.
- In the Password Vault web portal, expand the left-hand menu and choose Policies > Access Control (Safes) > Add Safe.
- On the Add Safe page, enter a Safe name and Description for your safe. No other configuration changes are required on this page for interoperability with Keyfactor Command, but you may have other configuration settings you may wish to make. Click Save to save the record.
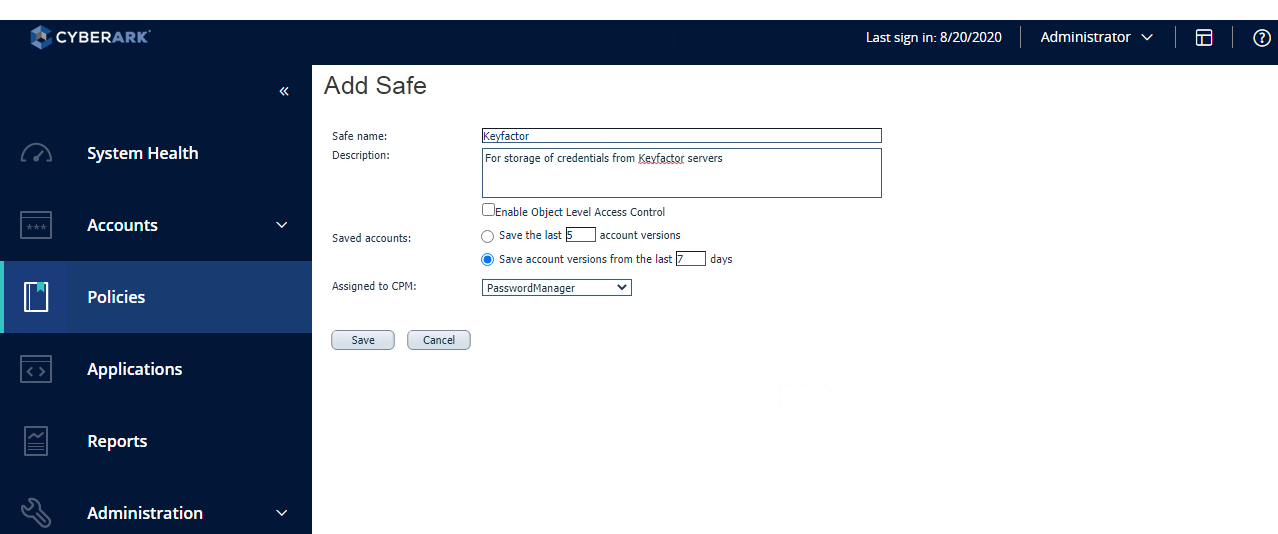
Figure 388: Create a CyberArk Safe for Keyfactor Command
Once an application account and a safe you will use for Keyfactor Command certificate store credentials have been created in CyberArk, you need to grant both the account and the credential provider user on the Keyfactor Command server appropriate permissions to the safe. You may immediately be informed of this upon creating the safe with a warning that "Object level access is not enabled" for the safe. If you receive this message, begin with step three of the instructions for granting permissions.
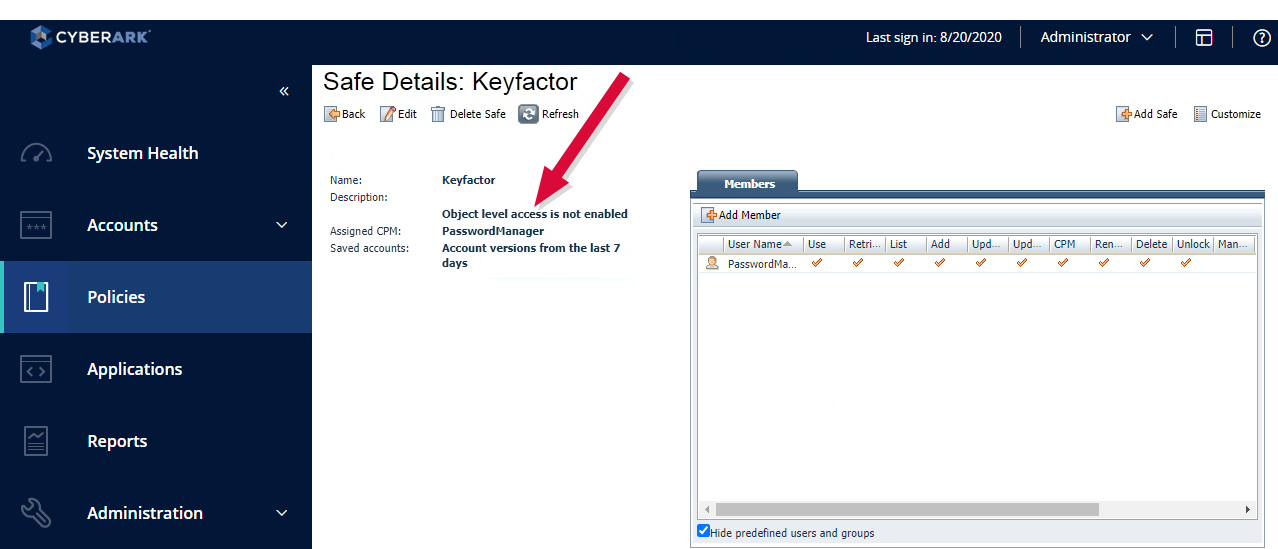
Figure 389: Warning that Access is Not Enabled for CyberArk Safe
To grant permissions to the safe in CyberArk:
- Open the CyberArk Password Vault web portal.
- In the Password Vault web portal, expand the left-hand menu, choose Policies > Access Control (Safes), and highlight the safe you created for Keyfactor Command credentials. On the lower right part of the screen, click the Members icon.
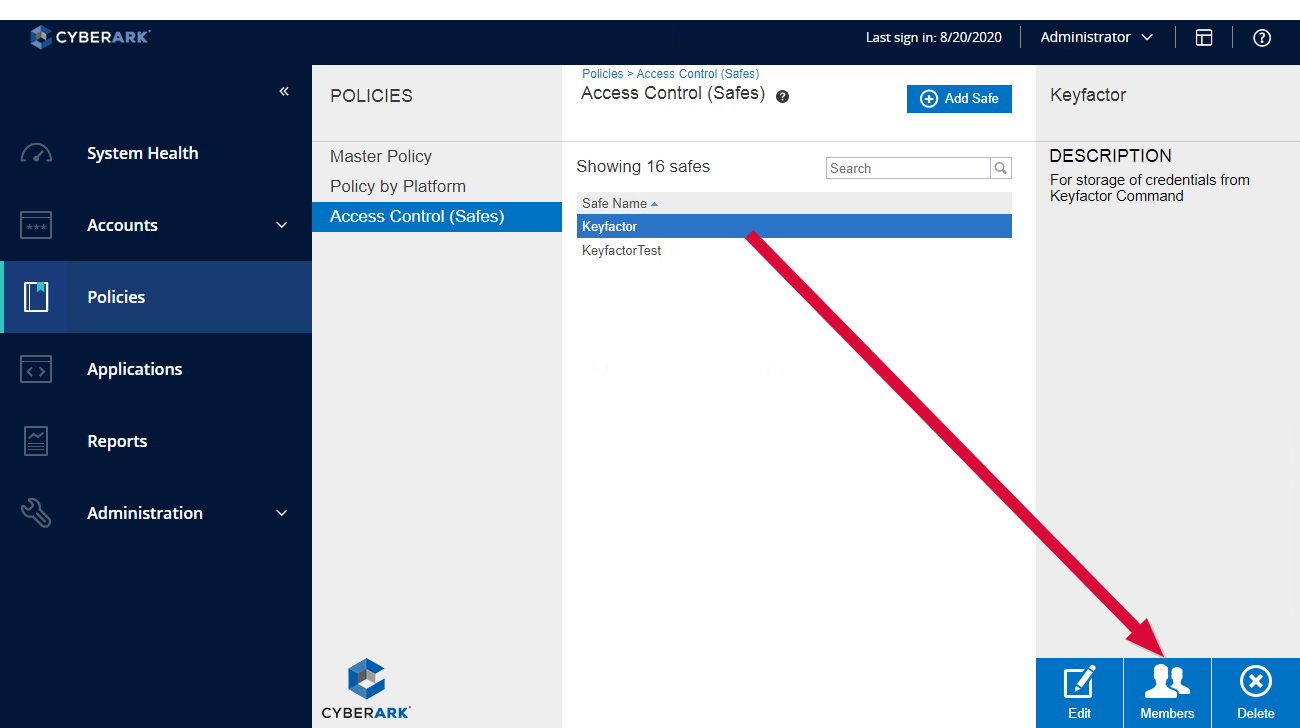
Figure 390: Open Members for the Application User on the Keyfactor Command CyberArk Safe
- On the Safe Details page in the Members section, click Add Member.
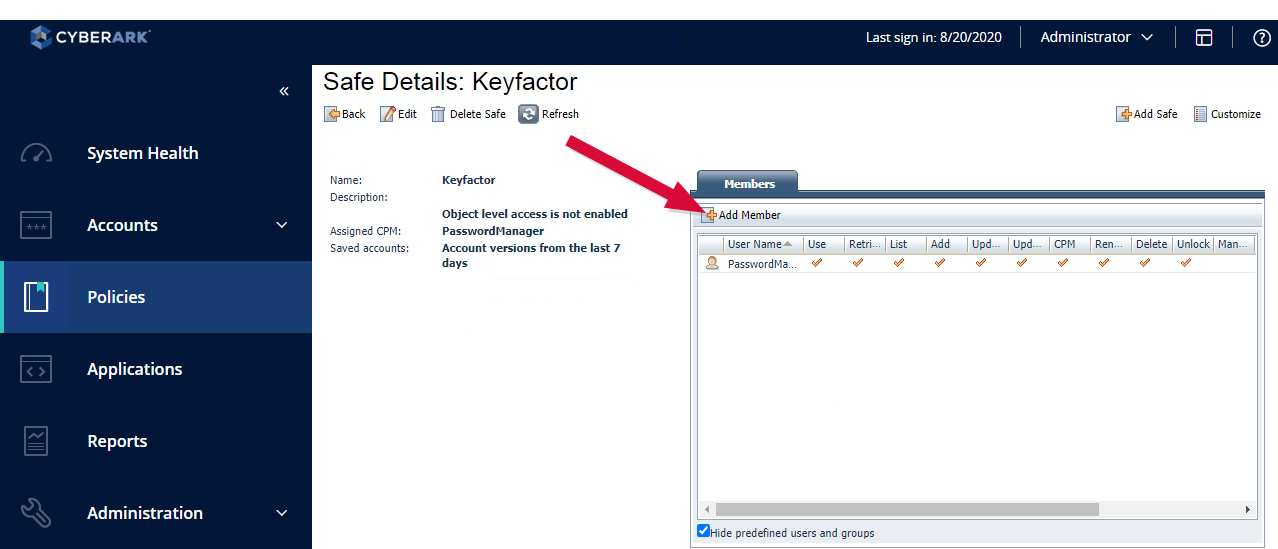
Figure 391: Safe Details for the Application User on the Keyfactor Command CyberArk Safe
- In the Add Safe Members dialog, search for your application user (e.g. App_Keyfactor), select it in the search results list, and grant the user at minimum the Retrieve accounts and List accounts permissions under Access and View Safe Members permission under Monitor. Click Add to save the permission settings.
Tip: Since Keyfactor Command is designed to read existing passwords from CyberArk and not write passwords to CyberArk, these permissions are sufficient for full functionality.
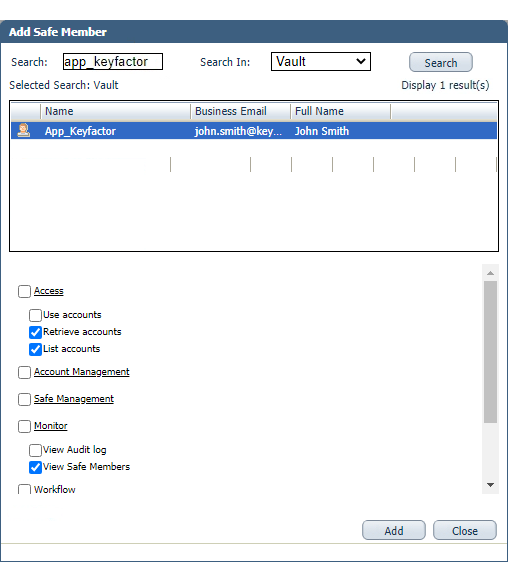
Figure 392: Grant Permissions for the Application User on the Keyfactor Command CyberArk Safe
- Repeat the previous step for the credential provider user. Typically, this username is Prov_HOSTNAME (where HOSTNAME is the short hostname
 The unique identifier that serves as name of a computer. It is sometimes presented as a fully qualified domain name (e.g. servername.keyexample.com) and sometimes just as a short name (e.g. servername). of your Keyfactor Command server). You can find the credential provider username in the AppProviderUser.cred file in the ApplicationPasswordProvider\Vault directory under your CyberArk credential provider directory.
You will need at least one CyberArk password for each certificate store in Keyfactor Command that you wish to manage with CyberArk.
To create a password in CyberArk:
- Open the CyberArk PrivateArk application and open your vault.
- In PrivateArk, locate your safe, right-click and choose Open and Step Into.
- Once the safe opens, optionally create a folder structure on the left under Root and drill down into it to the level where you would like to create your password (e.g. Root\ftp).
- In your selected folder, right-click in the main window on the right and choose New > PrivateArk Protected Object > Password.
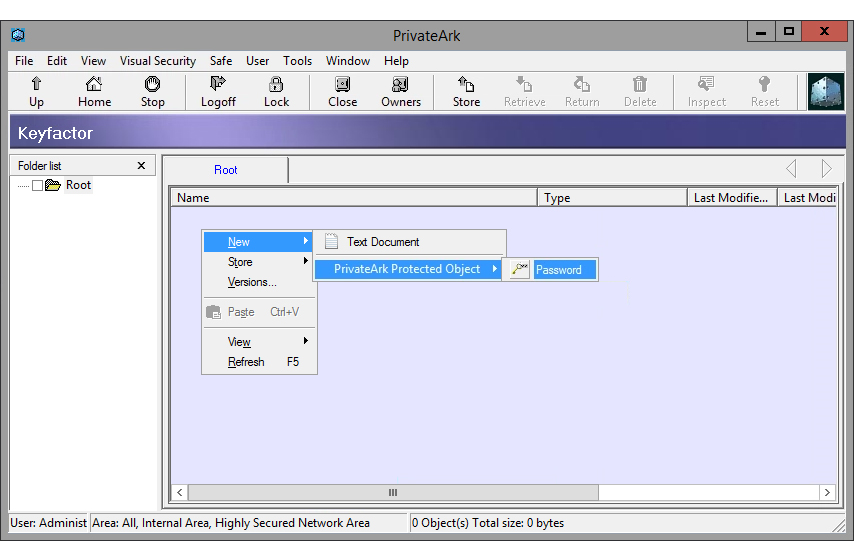
Figure 393: Create a Password for a Keyfactor Command Certificate Store in the CyberArk Safe
- Enter a name for the object and either generate or enter a password or username.
To register the CyberArk software on the Keyfactor Command server:
-
Acquire a copy of the CyberArk NetPasswordSDK.dll. This is one of the files installed with the CyberArk Credential Provider. Its installed location may vary depending on the CyberArk version and installation options. In some implementations it is found in:
C:\Program Files (x86)\CyberArk\ApplicationPasswordSdk\NetPasswordSDK.dll -
On the Keyfactor Command server, place a copy of the assembly in the WebAgentServices\bin, KeyfactorAPI\bin, WebConsole\bin, and Service directories under your Keyfactor Command installation directory. By default, the directory paths for these will be:
C:\Program Files\Keyfactor\Keyfactor Platform\WebAgentServices\binC:\Program Files\Keyfactor\Keyfactor Platform\KeyfactorAPI\binC:\Program Files\Keyfactor\Keyfactor Platform\WebConsole\binC:\Program Files\Keyfactor\Keyfactor Platform\Service - On the Keyfactor Command server, open a text editor (e.g. Notepad) using the "Run as administrator" option.
-
In the text editor, browse to open the web.config file in the WebAgentService directory. By default, this file is located in the following directory path:
C:\Program Files\Keyfactor\Keyfactor Platform\WebAgentServices\web.config - If you are using NetPasswordSDK versions 10.5.1.3 , or higher, in the web.config file, locate the assemblyBinding section and add a new dependentAssembly section containing the following code.
<dependentAssembly>
  <publisherPolicy apply="no" />
  <assemblyIdentity name="NetPasswordSDK" publicKeyToken="40be1dbc8718670f"  />
  <bindingRedirect oldVersion="10.5.1.0-10.5.1.3" newVersion="12.4.1.0" />
</dependentAssembly>
Important: The redirect newVersion is 12.4.1.0 for the DLL version 12.4.1.8. The 4th number for the build revision is omitted in the redirect and should be0instead for any version targeted. - In the web.config file, locate the container section and locate the commented out registration section containing the following code, as shown in Figure 394: Enable Registration Entry for CyberArk in web.config File:
<register type="IPAMProvider" mapTo="Keyfactor.Command.PAMProviders.CyberArkProvider, Keyfactor.Command.PAMProviders" name="CyberArk" />
Remove the comments to activate the registration section so that it appears exactly as the above code.
-
Repeat the previous two steps for the web.config files found in the KeyfactorAPI and WebConsole directories and the CMSTimerService.exe.config file found in the Service directory. By default, these files are found in the following directory paths:
C:\Program Files\Keyfactor\Keyfactor Platform\WebConsole\web.configC:\Program Files\Keyfactor\Keyfactor Platform\KeyfactorAPI\web.configC:\Program Files\Keyfactor\Keyfactor Platform\Service\CMSTimerService.exe.config

