
Certificates → Add Certificate
The add certificate tool is typically used to import certificates that are not brought in either via CA![]() A certificate authority (CA) is an entity that issues digital certificates. Within Keyfactor Command, a CA may be a Microsoft CA or a Keyfactor gateway to a cloud-based or remote CA. synchronization or by certificate store scans. The tool supports importing certificates with the following formats and extensions:
A certificate authority (CA) is an entity that issues digital certificates. Within Keyfactor Command, a CA may be a Microsoft CA or a Keyfactor gateway to a cloud-based or remote CA. synchronization or by certificate store scans. The tool supports importing certificates with the following formats and extensions:
-
DER
 A DER format certificate file is a DER-encoded binary certificate. It contains a single certificate and does not support storage of private keys. It sometimes has an extension of .der but is often seen with .cer or .crt. (Binary) or PEM A PEM format certificate file is a base64-encoded certificate. Since it's presented in ASCII, you can open it in any text editor. PEM certificates always begin and end with entries like ---- BEGIN CERTIFICATE---- and ----END CERTIFICATE----. PEM certificates can contain a single certificate or a full certifiate chain and may contain a private key. In general, extensions of .cer and .crt are certificate files with no private key, .key is a separate private key file, and .pem is both a certificate and private key. (Base 64): .cer or.crt
 -
PEM (Base 64): .pem
-
PKCS#7: .p7b
To assign a certificate owner (when none is set) or to change the existing default certificate owner, the user must have:
This tool has several purposes, including:
- It can be used to import certificates generated outside the enterprise PKI A public key infrastructure (PKI) is a set of roles, policies, and procedures needed to create, manage, distribute, use, store and revoke digital certificates and manage public-key encryption. environment—such as those purchased from a commercial certificate vendor or generated by a non-Microsoft or non-EJBCA CA.
- It can be used to import certificates that would not be automatically imported during a synchronization of configured Microsoft or EJBCA CAs such as root CA certificates that aren’t supported by synchronization.
- It can be used to import certificates acquired using CSRs generated by Keyfactor Command and issued by a CA not managed using Keyfactor Command to allow for ongoing management with Keyfactor Command.
- It can be used to push a certificate with the associated private key out to a certificate store when you have the appropriate .pfx or .p12 file available.
-
It can be used as a quick shortcut to push a certificate without a private key out to a certificate store when you have the certificate file in hand and don’t want to search for the certificate in Keyfactor Command in order to push it out to the certificate store.
Before you can add a certificate to a certificate store with this option, you must first add the certificate store in Keyfactor Command (see Certificate Stores) and install, start, and approve the orchestrator
Keyfactor orchestrators perform a variety of functions, including managing certificate stores and SSH key stores. (see Orchestrator Management and Orchestrators).
If you import a certificate that has either already been imported via a synchronization task or has been manually imported previously, the certificate will not be re-imported. You will receive a notification message, when you save it, if the certificate already exists in the Keyfactor Command database. Any metadata currently stored in the database for that certificate will be displayed in the metadata fields on the page, and any changes you make to the metadata on this page will overwrite the existing metadata for the certificate when you complete the import (for all certificate formats).
To use the add certificate tool
- In the Add Certificate section of the page, click the Upload button to open a browse window.
- In the browse window, browse to select the certificate you wish to import.
-
For a certificate with an encrypted private key, when prompted enter the password for the encrypted key and Save. This will open the Add Certificate page, which will allow you to change/add metadata and choose certificate locations to deploy the certificate to. Set Private Key Password allows you to reenter the password once you have uploaded the certificate.
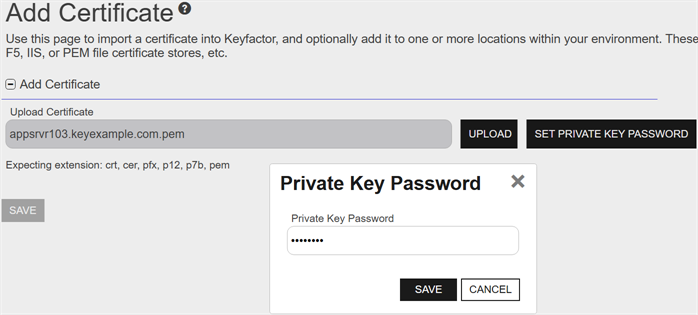
Figure 60: Add Password for Certificate with Encrypted Private Key
-
In the Certificate/PFX Details section of the page, review the certificate information.
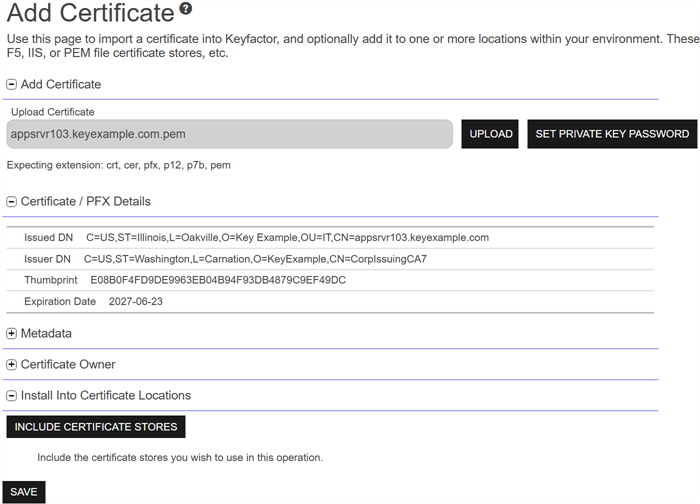
Figure 61: Add Certificate Information
-
In the
Email metadata fields will allow for multiple email addresses to be added via a pop-up text box where email addresses are entered separated by comma or semicolon. During entry the addresses will appear as a single row in the metadata grid. However, after saving each email address will be displayed on a separate row.
Tip: If a hint has been provided for a specific metadata field, it will display in parentheses to the right of the metadata label.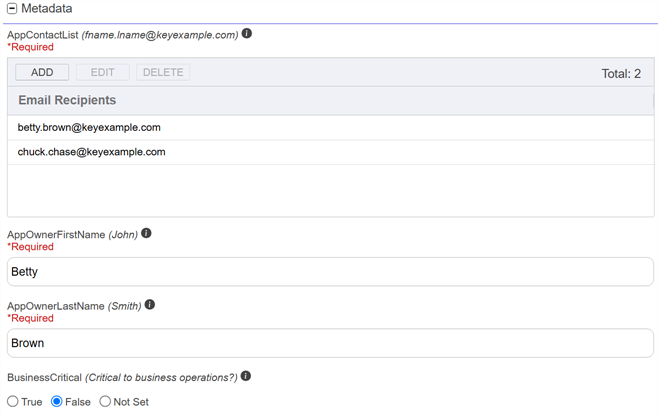
Figure 62: Populate Metadata Fields
-
The Certificate Owner refers to a security role, not an individual user, as defined in Security Roles and Claims. The Owner Role Name is a search select dropdown. To narrow the list of results in a search select dropdown, begin typing in the input field. Matching results will appear as you type, and you can scroll to locate a record. The roles available to choose from will depend on the certificate security configuration for the user (see security roles and permissions for Certificates).
The following permissions determine which roles
-
Expanded Change Owner Permission: A user with the Certificates > Expanded Change Owner permission can
The certificate search function allows you to query the Keyfactor Command database for certificates from any available source based on any criteria of the certificates and save the results as a collection that will be availble in other places in the Management Portal (e.g. expiration alerts and certain reports). level) if both are set.Note: To set the certificate owner using the Expanded Change Owner permission, the user must also have Security > Read permission in the permission set that contains the role being assigned as the new certificate owner. -
Collections > Change Owner Permission:
This permission allows a user to
-
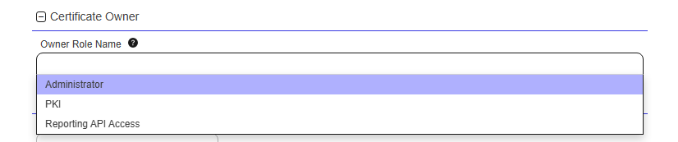
Figure 63: Select a Certificate Owner
Note: If the certificate being imported, or one of the certificates in its chain, already exists in the Keyfactor Command database and has an assigned certificate owner to which the user making the import request does not belong, the certificate owner will not be changed. -
-
In the Install into Certificate Locations section of the page, select each certificate store location to which you want to distribute the certificate, if desired. To do this, click the Include Certificate Stores button. This will cause the Select Certificate Store Locations dialog to appear. Make your certificate store selections in this dialog as described in Select Certificate Store Locations, below, and click Include and Close. You will then see some additional fields on the page. Populate these as per Add to Certificate Stores and Information Required for Certificate Stores, below.
Select Certificate Store Locations Dialog
The Select Certificate Store Locations dialog allows you to run queries against your certificate store list to select the store
Note: Certificate stores appear in the grid if:- They are compatible with the certificate type.
- They are in applications to which you have permissions (see Application Permissions).
Tip: You may change the search results by using the search fields at the top of the dialog. All of the Keyfactor Command grid search features are available to assist your search. See Using the Certificate Store Search Feature for more information on the available search fields. The default search criteria is AgentAvailable is equal to True.The actions on the Select Certificate Store Locations dialog are:
-
Include
Click this to add the selected certificate store
-
Include and Close
Click this to close the search dialog and add the selected certificate store
-
Close
Click this to cancel the operation and return to the main page with no certificate stores selected.
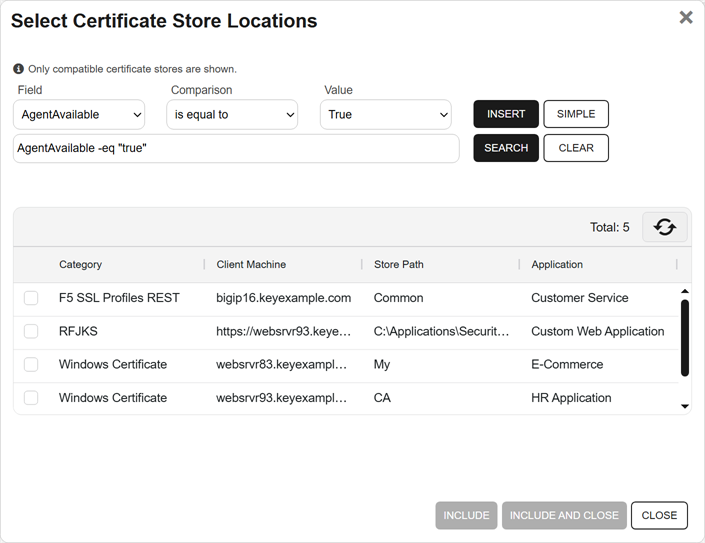
Figure 64: Select Certificate Store Locations Dialog
Add to Certificate Stores
The Add to Certificate Stores page appears once you select at least one certificate store to distribute your certificate to. It includes a grid section with a series of tabs that display a tab for each type of certificate store selected with a list of the selected stores under each tab. The header section of the dialog shows global options that apply to the add job as a whole:
-
Include Certificate Stores
You may return to the Select Certificate Store Locations dialog by clicking Include Certificate Stores above the grid. The current selections will be retained.
-
Schedule when to run the job for the certificate store
In the Schedule dropdown, select a time at which the job to add the certificate to the stores should run. The choices are Immediate or Exactly Once at a specified date and time. If you choose Exactly Once, enter the date and time for the job. A job scheduled for Immediate running will run within a few minutes of saving the operation. The default is Immediate.
Click Remove at the top of the grid to remove the selected certificate store from the page. The certificate will not be added to the store.
For each selected certificate store you can apply the following actions:
-
Overwrite
Check Overwrite below the grid to overwrite any existing certificate in the same location and with the same name or alias for the selected certificate store type.
-
Alias
Add an Alias below the grid, if applicable, for the certificate store type. See the Information Required by Certificate Store section, below, for more information.
The Alias field is a search select dropdown that lists all aliases associated with the selected certificate store.
- If an alias appears in multiple certificate stores, the number of locations is shown in parentheses next to the alias name. This indicator does not appear if the alias exists in only one selected store.
- Users can enter a new alias as long as Custom Aliases are not forbidden on the certificate store type Certificate Store Types.
- If you select an existing alias without checking Overwrite, the Save will fail and the certificate store(s) in which that alias already exists will be listed.
Note: The field will display an alert if an alias is required for the location. If Supports Custom Alias is set to Forbidden on the certificate store type, the Alias field will not display unless Overwrite is checked on this page.
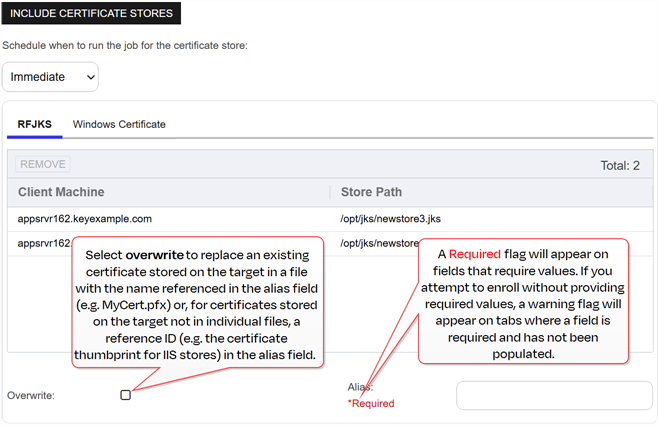
Figure 65: Add Certificate—Install into Certificate Locations

Figure 66: Alias Required Alert on Save
Information Required by Certificate Stores
Each type of certificate store has different requirements for providing an alias or other additional information. These are based on the configuration of the certificate store type.
The certificate store type fields that are relevant to certificate store use are:
-
Supports Entry Password
If your certificate store type has this enabled, you will have the option to enter a password for the certificate entry in the certificate store on the addition of an entry into the certificate store.
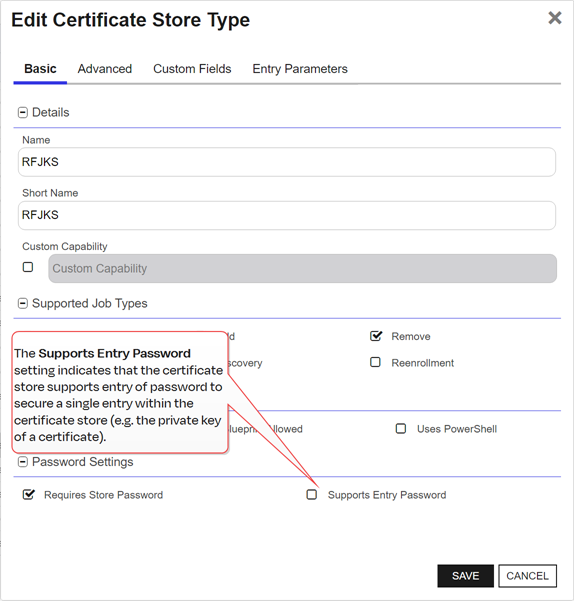
Figure 67: Certificate Store Type Configuration: Basic Tab
-
Supports Custom Alias
Certificate store types support three possible options for this setting:
- Forbidden: The Alias field will not display when adding a certificate to a certificate store unless Overwrite is checked on the add page. In this case, you’re not associating an alias with the certificate you’re adding to the store but rather specifying the alias of the certificate already in the store that you wish to replace (in function) with the new certificate you’re adding.
- Optional: This indicates an alias can be associated with the entry if desired.
- Required: This indicates that a custom alias will be required when a certificate is added to a certificate store.
The format of custom alias values varies depending on the certificate store type. In many cases, the alias is the thumbprint of the certificate. In some cases, it’s the file name of the certificate file or a custom alias provided at the time the certificate was added to the certificate store.
Tip: Keyfactor Command will automatically strip out any spaces between the octets in thumbprints in the alias field, so it does not matter whether you enter the thumbprint with or without spaces. -
Private Key Handling
This setting determines how certificates with an available private key are handled in Keyfactor Command. The supported options are:
- Forbidden: If the selected certificate has a private key, it will be ignored and only the public key In asymmetric cryptography, public keys are used together in a key pair with a private key. The private key is retained by the key's creator while the public key is widely distributed to any user or target needing to interact with the holder of the private key. will be delivered to the target.
- Optional: The private key may or may not be included when delivering the certificate to the target.
- Required: If the selected certificate does not have an associated private key, certificate stores set to Required will not appear as available stores to which the certificate can be added.

Figure 68: Certificate Store Type Configuration: Advanced Tab
- Forbidden: If the selected certificate has a private key, it will be ignored and only the public key
-
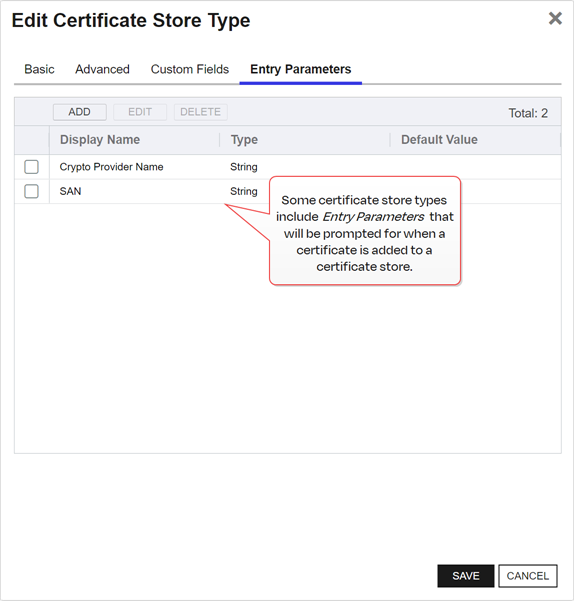
Entry Parameters
Not all certificate store types will have entry parameters. The ones shown in Figure 69: Certificate Store Type Configuration: Entry Parameters Tab are for the custom Windows Certificate type for the Keyfactor custom-built IIS Certificate Store Manager extension (see Installing Certificate Store Management Extensions).
- Click Save to import the certificate to Keyfactor Command
If an inventory job does not already exist for the certificate store, one will be added automatically to update Keyfactor Command with the changes to the certificate store. The inventory job will be configured to
You can also find Help in the Navigator![]() The Navigator is the Keyfactor Command left-hand (newer versions) or top (older versions) navigation menu. Certificate collections and reports can be configured to be added to the menu using user-defined Show in Navigator settings.. From here you can choose to open either the Keyfactor Software & Documentation Portal at the home page or the Keyfactor API Endpoint Utility.
The Navigator is the Keyfactor Command left-hand (newer versions) or top (older versions) navigation menu. Certificate collections and reports can be configured to be added to the menu using user-defined Show in Navigator settings.. From here you can choose to open either the Keyfactor Software & Documentation Portal at the home page or the Keyfactor API Endpoint Utility.
Keyfactor provides two sets of documentation: the On-Premises Documentation Suite and the Managed Services Documentation Suite. Which documentation set is accessed is determined by the Application Settings: On-Prem Documentation setting (see Application Settings: Console Tab).
Was this page helpful? Provide Feedback