When the alerts are run using workflow, there are two
Adding or Modifying an Expiration Alert
- On the Expiration Alerts page, click Add from the top menu to create a new alert, or Edit from either the top or right click menu, to modify an existing one (which will allow you to access the workflow configuration when editing).
-
In the Certificate Expiration Alert Settings dialog, select your Certificate Collection in the first dropdown.
-
In the Timeframe fields, select the warning timeframe by defining a number for either days, weeks, or months for the alert. For example, if you select three weeks, the expiration alerts will be sent automatically three weeks ahead of certificate expiration.
When the alert is stored in the database, weeks are converted to 7 days and months are converted to 30 days. - In the Monitoring Execution Schedule field, select either Off or Daily. If you select Daily, choose the time of day to run the alert. Each expiration alert is scheduled per alert, so not all alerts are on the same schedule.
- In the Display Name field, enter a name for the alert. This name appears in the list of expiration alerts in the
-
To use workflow to deliver the alerts, leave the Use Workflows toggle enabled. To use the legacy alerting system to deliver the alerts, toggle the Use Workflows to disabled.
The Configure Workflow button will be grayed out on new alerts until the new alert is saved. Configuring workflow on an existing alert may be done from the Edit or Configure Workflow action buttons.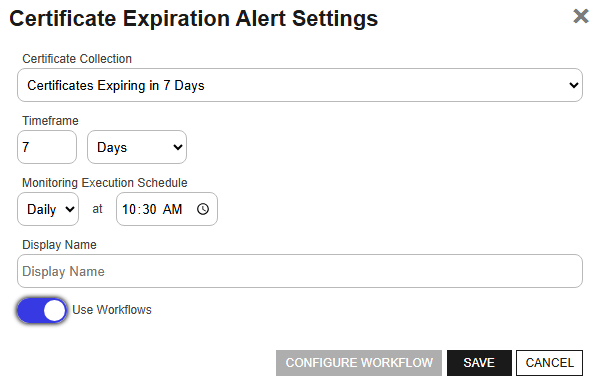
Create an Expiration Alert with Use Workflows Enabled
-
Click Save to save your workflow expiration alert.
For the Use Workflow option, if you are saving an alert that does not have a matching Expiration workflow, you will receive a notification indicating that a workflow needs to be created to match the alert. When you click OK to the notification, you will be redirected to a workflow configuration page with a new workflow open and pre-populated with the Name, Type, and Expiration Alert (key) appropriate to the alert you have saved. Configure the workflow as needed.
- In the Add/Edit Workflow Definition dialog on the Definition tab, enter a Description for your workflow.
- On the Workflow Configuration page, add a new step of type Send Email (see
- If desired, add other steps to the workflow for other functionality such as event logging (see the example
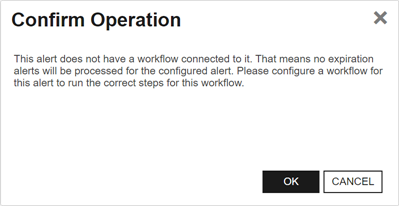
Workflow Required for Alert Notice
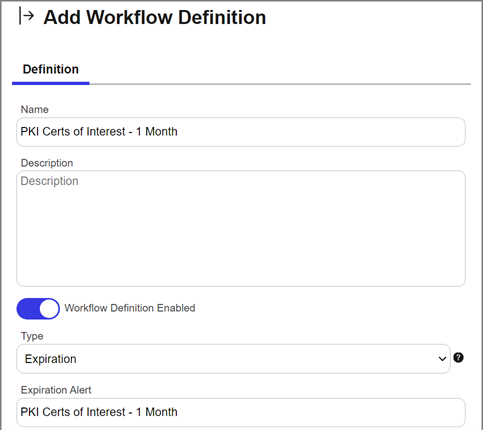
Workflow Pre-Populated for Expiration Alert
Legacy Alerts - Disabled Use Workflows
If you toggled the Use Workflows option to disabled, the legacy alert fields will display.
- In the Subject field enter a subject line for the email message that will be delivered when the alert is triggered. You can use substitutable special text in the subject line. Substitutable special text uses a variable in the alert definition that is replaced by data from the certificate or certificate metadata at processing time. For example, you can enter {cn} in the alert definition and each alert generated at processing time will contain the specific common name of the given certificate instead of the variable {cn}.
To add substitutable special text to the subject line; place your cursor where you would like the text to appear on the subject line, select the appropriate variable from the Insert special text dropdown, and click Insert. Alternately, type the special text variable enclosed in curly braces (e.g., {cn}).
-
In the Message box. Enter the body of the email message that will be delivered when the alert is triggered. You can use the Insert special text dropdown below the message window to add substitutable special text to the message. The metadata that appears in the dropdown will depend upon the custom metadata you have defined (see
DN: {dn}CN: {cn}UPN: {upn}Thumbprint: {thumbprint}Serial Number: {serial}With this HTML code:
<table><tr><td>DN:</td><td>{dn}</td></tr><tr><td>CN:</td><td>{cn}</td></tr><tr><td>UPN:</td><td>{upn}</td></tr><tr><td>Thumbprint:</td><td>{thumbprint}</td></tr><tr><td>Serial Number:</td><td>{serial}</td></tr></table>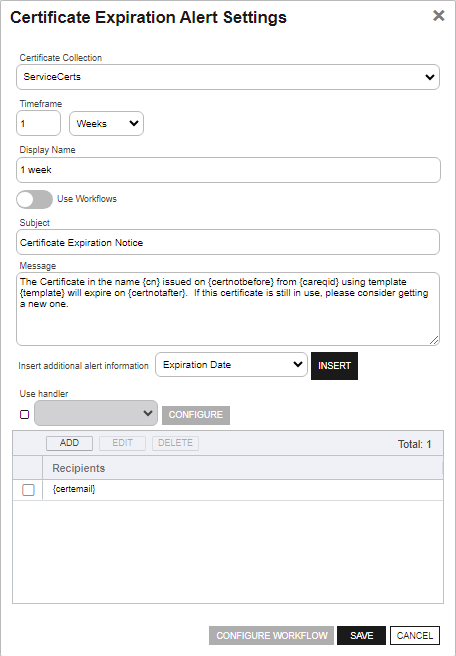
Create an Expiration Alert with Use Workflows Disabled
-
In the Use handler box. If
-
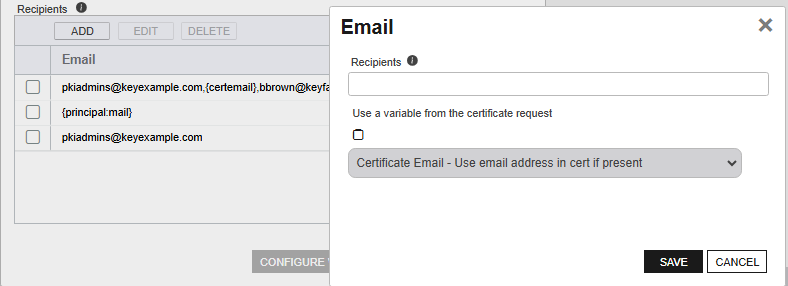
Expiration Alerts Recipients
Configuring a Workflow for an Expiration Alert
For alerts that use workflow, you can open the associated workflow for the alert using the Configure Workflow option.
- On the Expiration Alerts page, highlight a row in the alerts grid and click Configure Workflow from the grid header or right-click menu.
- You will be redirected to the workflow workspace for the workflow associated with the selected alert. If a workflow does not exist for the selected alert, one will be created and pre-populated with the Name, Type, and Expiration Alert (key) of the selected alert. Edit the workflow as needed (see
Deleting an Expiration Alert
You may delete one expiration alert at a time.
- On the Expiration Alerts page, highlight the row in the Expiration Alerts grid and click Delete at the top of the grid, or from the right click menu.
-
Copying an Expiration Alert
You may use the copy operation to create multiple similar alerts—for example, several alerts for the same certificate collection but with different warning timeframes.
- On the Expiration Alerts page, highlight the row in the expiration alerts grid and click Copy at the top of the grid, or from the right click menu.
- The Certificate Expiration Alert Settings dialog will pop-up with the details from the selected alert. The display name field will have - Copy tagged to the end of it to indicate it is a new alert. You may modify the alert as needed and click Save to add the new alert, or Cancel to cancel the operation.
Configuring an Expiration Alert Schedule
After adding your desired Certificate Expiration Alerts, you may configure an alert schedule. This schedule applies both to alerts run with workflow and alerts run with the legacy alerting system.
- In the
- On the Expiration Alerts page, click the Configure button at the top of the Expiration Alerts page to configure a monitoring execution schedule. This will apply for all the expiration alerts. This type of alert is scheduled for Daily delivery at a specified time. Select Off to stop the alerts.
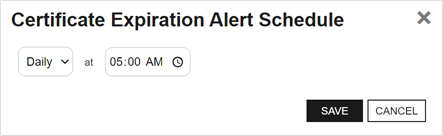
Expiration Alert Schedule
Testing Expiration Alerts
Once the alerts are configured, you may run a test of all, or selected, alerts to see if they are configured correctly.
- On the Expiration Alerts page, select an expiration alert in the grid and click Test from the top of the grid or the right-click menu.
-
In the Expiration Alert Test dialog, select a Start Date and End Date for the test period. This would be the period however many days, weeks or months prior to when the certificate are reaching expiration is configured in your alert. For example, if your alert is configured to notify 1 week before expiration and you wanted to simulate an automated run of the alerts today, you would select a date range of yesterday through today and the results would be certificates expiring 1 week from today.
Say you had experienced an outage and alerts that normally run daily at 5:00 pm did not run for two days. You wanted to test to see what to expect of the alerts once the system was up and running again. You are running your test on August 3rd for an alert that's configured to report at 30 days for collection A. The alert last ran on July 31. This means the alert has a Previous Evaluation Date of July 31. When running your test, set the Start Date to July 31st to match and set the End Date to the current date, August 2nd in this example, to simulate the results when the alerts are run today. The test results will include up to 100 certificates in collection A expiring between August 30th at 12:00 am UTC and September 1st at 12:00 am UTC. -
In the Expiration Alert Test: Select Targets dialog, select one or more certificates for testing. For alerts that do not use workflow, enable the Send Emails option if you would like to deliver email messages as part of the test. Alerts that do use workflow will generate workflow instances for each selected certificate.
You may see fewer certificates than you have certificates expiring in the selected time window for the certificate collection if you enabled one of the options to ignore duplicate certificates on the certificate collection (seeIf no certificates appear in the grid for testing, this indicates no certificates were found matching the criteria of the alert and test period selected for testing. - Click the Start Tests button to begin generating alerts. Depending on the number of users to process, this may take a few seconds.
-
In the Expiration Alert Test: Results dialog, you can review the generated expiration alerts to confirm that the substitutable special text is being replaced as expected and the recipients are as expected. Scroll the First, Previous, Next and Last buttons at the bottom of the dialog. The number of alerts generated will display between the navigation buttons.
The display results will vary depending on whether the alert uses workflow to deliver the alerts or the legacy alerting system.
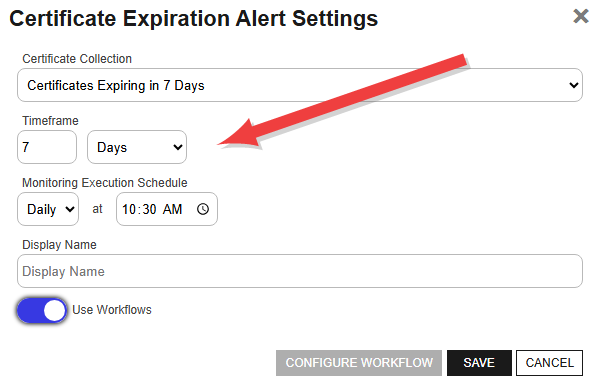
Expiration Alert Timeframe
By default, a
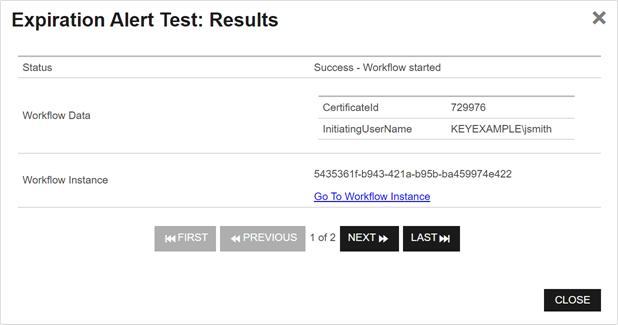
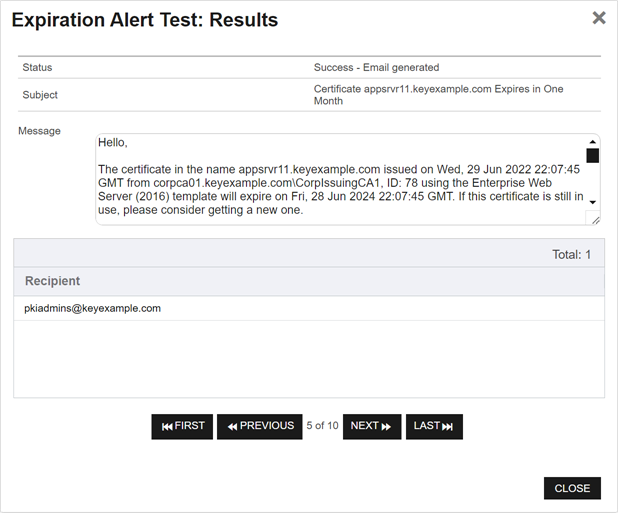
Expiration Alert Test Results With and Without Workflow