This section provides examples for creating workflow![]() A workflow is a series of steps necessary to complete a process. In the context of Keyfactor Command, it refers to the workflow builder, which allows you automate event-driven tasks when a certificate is requested or revoked. definitions. For instructions on creating a workflow definition, see Adding, Copying or Modifying a Workflow Definition.
A workflow is a series of steps necessary to complete a process. In the context of Keyfactor Command, it refers to the workflow builder, which allows you automate event-driven tasks when a certificate is requested or revoked. definitions. For instructions on creating a workflow definition, see Adding, Copying or Modifying a Workflow Definition.
 Update Additional Enrollment Field on Enrollment
This example uses the following step types:
-
Set Variable Data
- Accounting
- E-Commerce
- HR
- IT
- Marketing
- R & D
- Sales
If the value of Department is anything other than Accounting, the value of Code (a string field) can be any value. If the value of Department is Accounting, anything submitted in the Code field by the end user is discarded and replaced by the fixed value for Code provided in the script.
This example provides a solution using a Set Variable Data step type and demonstrates manually unpacking the JSON attribute string. One possible method of doing this is provided in the example. If you prefer, you may instead use the ConvertFrom-Json cmdlet similarly to the example for putting approval comments in a metadata![]() Metadata provides information about a piece of data. It is used to summarize basic information about data, which can make working with the data easier. In the context of Keyfactor Command, the certificate metadata feature allows you to create custom metadata fields that allow you to tag certificates with tracking information about certificates. field (see Copy Approval Comment to Metadata Field on Enrollment) and avoid the manual string manipulation steps.
Metadata provides information about a piece of data. It is used to summarize basic information about data, which can make working with the data easier. In the context of Keyfactor Command, the certificate metadata feature allows you to create custom metadata fields that allow you to tag certificates with tracking information about certificates. field (see Copy Approval Comment to Metadata Field on Enrollment) and avoid the manual string manipulation steps.
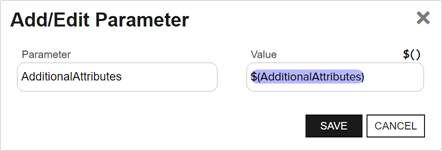
To create this, add Script Parameters to pull the additional attributes into the script as shown in Figure 205: Additional Attribute Update Example: Add Parameters
In the Insert PowerShell Script field, enter a script similar to the following:
# Declare your parameters at the beginning
param(
   [string]$AdditionalAttributes
)

# Trim brackets off incoming attribute string
$TrimmedAttributes = $AdditionalAttributes.Substring(1,$AdditionalAttributes.Length-2)

# Replace commas bracketed by quotes in attribute string with a temporary string to facilitate splitting (assumes no incoming values contain temp string)
$TempString = "`"######`""
$CleanAttributes = $TrimmedAttributes -replace "`",`"", $TempString

# Split the incoming attribute string into its component values at the temporary string
$SplitAttributes = $CleanAttributes.Split('######')

# Split the incoming attribute string key/value pairs
foreach($attribute in $SplitAttributes){
   $attributeComponents = $attribute.Trim() -split ":"
   $attributeComponents
   Switch($attributeComponents[0].Trim()){
      '"Department"' {$Department = $attributeComponents[1].Substring(1,$attributeComponents[1].Length-2)}
      '"Code"' {$Code = $attributeComponents[1].Substring(1,$attributeComponents[1].Length-2)}
   }
}

# Initialize a hashtable
$UpdatedAttributes = @{}

# Load original attributes in UpdatedAttributes for the else case
if(![string]::IsNullOrWhiteSpace($Code)) {
   $UpdatedAttributes['Code'] = $Code
}
if(![string]::IsNullOrWhiteSpace($Department)) {
   $UpdatedAttributes['Department'] = $Department
}

# If the value of Department is "Accounting", then the value of Code must be "G5N145"; override submitted value--if any--and use fixed value
if($UpdatedAttributes['Department'] -eq "Accounting") {
   $UpdatedAttributes['Code'] = "G5N145"
}

# Return the updated attributes to the workflow in the original parameter as a hashtable
$result = @{ "AdditionalAttributes" = $UpdatedAttributes }
return $result
The updated attributes will be submitted to the CA![]() A certificate authority (CA) is an entity that issues digital certificates. Within Keyfactor Command, a CA may be a Microsoft CA or a Keyfactor gateway to a cloud-based or remote CA. as part of the enrollment package and can be viewed in the workflow instance (see Viewing a Workflow Instance).
A certificate authority (CA) is an entity that issues digital certificates. Within Keyfactor Command, a CA may be a Microsoft CA or a Keyfactor gateway to a cloud-based or remote CA. as part of the enrollment package and can be viewed in the workflow instance (see Viewing a Workflow Instance).
 Update Revocation Comment
This example uses the following step types:
-
Set Variable Data
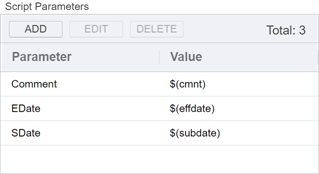
Figure 206: Revocation Comment Update Example: Add Parameters
In the Insert PowerShell Script field, enter a script similar to the following:
# Declare your parameters at the beginning ($Comment, $SDate, and $Edate)
param(
   [string]$Comment,
   [datetime]$SDate,
   [datetime]$EDate
)

# Append your additional text to the existing comment along with the submission and effective dates
$Comment += " - Revocation requested on " + $SDate.ToString("g") + " and effective on " + $EDate.ToString("g")

# Return the updated comment to the workflow in the original parameter as a hashtable
$result = @{ "Comment" = $Comment }
return $result
The resulting comment will look something like:
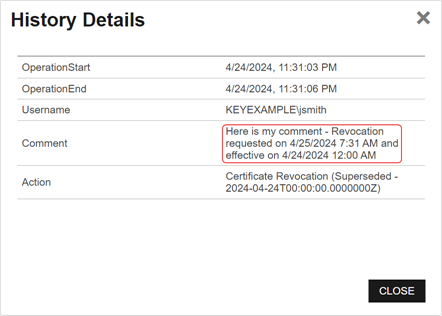
Figure 207: Revocation Comment Update Example: Results
You may reference the updated comment using the standard revocation comment token ($(cmnt)) in subsequent steps in your workflow and may view the updated comment wherever the revocation comment is available for viewing within Keyfactor Command.
 Copy Approval Comment to Metadata Field on Enrollment
This example uses the following step types:
-
Use Custom PowerShell
-
Require Approval
This example uses a Use Custom PowerShell step after the Require Approval step(s) in the workflow. You could use a Set Variable Data step instead, since the only PowerShell command called by the script (ConvertFrom-Json) is one supported by Set Variable Data. The Use Custom PowerShell step needs to come after the Require Approval step so that it can include comments gathered from the approve/deny requests.
To do this, first use the POST /Extension/Scripts API![]() A set of functions to allow creation of applications. Keyfactor offers the Keyfactor API, which allows third-party software to integrate with the advanced certificate enrollment and management features of Keyfactor Command. endpoint
A set of functions to allow creation of applications. Keyfactor offers the Keyfactor API, which allows third-party software to integrate with the advanced certificate enrollment and management features of Keyfactor Command. endpoint![]() An endpoint is a URL that enables the API to gain access to resources on a server. (see POST Extensions Scripts) to import your PowerShell script into the Keyfactor Command database before beginning to edit your workflow. Your script file prior to import should contain content similar to the following:
An endpoint is a URL that enables the API to gain access to resources on a server. (see POST Extensions Scripts) to import your PowerShell script into the Keyfactor Command database before beginning to edit your workflow. Your script file prior to import should contain content similar to the following:
# Declare your parameters at the beginning
param(
   [string]$ApprovalComment,
   [string]$SignalComment,
   [string]$Metadata
)

# Initialize a hashtable to contain your metadata fields and populate it
$UpdatedMetadata = @{}

$metaObject = $Metadata | ConvertFrom-Json -AsHashtable

foreach ($property in $metaObject.Keys) {
    $UpdatedMetadata[$property] = $metaObject[$property]
}

# Append your signal comment(s) to any existing comment in the ApprovalComments metadata field
if([string]::IsNullOrWhiteSpace($ApprovalComment)) {
   $UpdatedMetadata['ApprovalComments'] = $SignalComment
}else {
   $UpdatedMetadata['ApprovalComments'] = $ApprovalComment + ", " + $SignalComment
}

# Return the updated metadata fields, including ApprovalComments, to the workflow in the original parameter as a hashtable
$result = @{ "ApprovalComment" = $UpdatedMetadata }
return $result
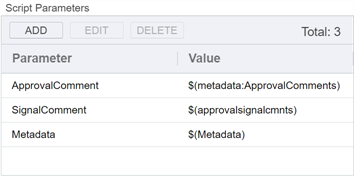
Once your PowerShell script has been imported into the Keyfactor Command database, you may begin creating your workflow. To create the Use Custom PowerShell step, add Script Parameters to pull any approval comments and the metadata field you're planning to store them in (in this example, a string field called ApprovalComments) into the script, along with the metadata bucket to include any remaining metadata values, as shown in Figure 208: Approval Comment Update Example: Add Parameters.
In the PowerShell Script Name field dropdown, select the script you uploaded to the database.
The resulting comment will look something like:
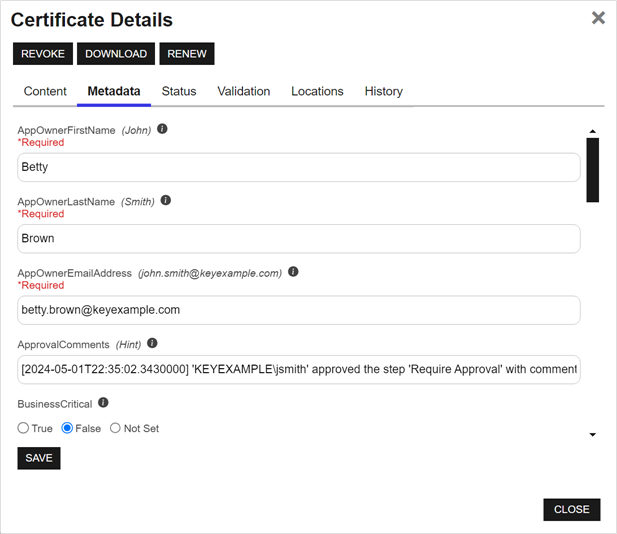
Figure 209: Approval Comment Update Example: Results
If the workflow requires multiple approvals or has multiple require approval steps, all the approval comments entered in the given workflow instance prior to the PowerShell step will be added to the metadata field. If you expect to have multiple comments, you may prefer to use a big text field rather than the string type fields shown here.
 Write to Windows Event Log with Expiration Workflow
This example uses the following step types:
-
Use Custom PowerShell
This step needs to be a Use Custom PowerShell step rather than a Set Variable Data step because it calls a PowerShell command (EventLog.WriteEntry) that exists outside the confines of Keyfactor Command.
To do this, first use the POST /Extension/Scripts API endpoint (see POST Extensions Scripts) to import your PowerShell script into the Keyfactor Command database before beginning to edit your workflow. Your script file prior to import should contain content similar to the following:
# Declare your parameters at the beginning
param(
   [string]$cn,
   [string]$issuedDate,
   [string]$CA,
   [string]$expireDate,
   [string]$template
)

$LogName = "Application"
$Message = "The certificate in the name $cn issued on $issuedDate from $CA using the $template template will expire on $expireDate."
$Source = "Keyfactor Command"
# EventId 6050 is designated for alert event logging; category 3 is "Monitoring" on the Keyfactor Command server
$EventID = "6050"
$EventType = "Information"
$Category = 3

# Write the event log messages to the Keyfactor Command server
$eventLog = New-Object System.Diagnostics.EventLog
$eventLog.Log = $LogName
$eventLog.Source = $Source
$eventLog.WriteEntry($Message, $EventType, $EventID, $Category)
Once your PowerShell script has been imported into the Keyfactor Command database, you may begin creating your workflow. To create the Use Custom PowerShell step, add Script Parameters to pull the CN![]() A common name (CN) is the component of a distinguished name (DN) that represents the primary name of the object. The value varies depending on the type of object. For a user object, this would be the user's name (e.g. CN=John Smith). For SSL certificates, the CN is typically the fully qualified domain name (FQDN) of the host where the SSL certificate will reside (e.g. servername.keyexample.com or www.keyexample.com)., issued date, CA, expiration date, and certificate template
A common name (CN) is the component of a distinguished name (DN) that represents the primary name of the object. The value varies depending on the type of object. For a user object, this would be the user's name (e.g. CN=John Smith). For SSL certificates, the CN is typically the fully qualified domain name (FQDN) of the host where the SSL certificate will reside (e.g. servername.keyexample.com or www.keyexample.com)., issued date, CA, expiration date, and certificate template![]() A certificate template defines the policies and rules that a CA uses when a request for a certificate is received. into the script.
A certificate template defines the policies and rules that a CA uses when a request for a certificate is received. into the script.
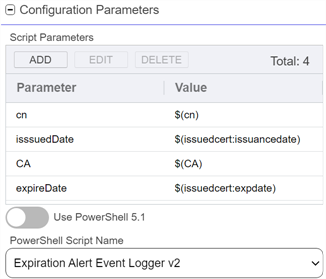
Figure 210: Expiration with Event Logging Example: Add Parameters
In the PowerShell Script Name field dropdown, select the script you uploaded to the database.
 Renewal and Email Notification on Approaching Certificate Expiration
This example uses the following step types:
-
Send Email
-
Expiration Renewal
You can choose to either send the email notifications before the renewal step or after the renewal step. If you choose to send the email after the renewal step and the renewal fails, no email will be sent.
First, create the Send Email step. In the configuration parameters, give your email a Subject that will help highlight the information:
Expiration Alert: Certificate $(cn) Expiring on $(expdate)In the main Message of the email, provide the required information using tokens:
Hello,

The certificate in the name  $(cn) issued on $(issuancedate) from $(CA) using the $(Template) template will expire on $(expdate). The certificate will automatically be renewed as part of this workflow.
The certificate details include:

   <ul>
      <li>Certificate ID: $(certid)</li>
      <li>CN: $(cn)</li>
      <li>DN: $(dn)</li>
      <li>SANs: $(sans)</li>
      <li>App Owner First Name: $(metadata:AppOwnerFirstName)</li>
      <li>App Owner Last Name: $(metadata:AppOwnerLastName)</li>
   </ul>

Thanks!
Your Certificate Management Tool
Add appropriate Recipients for the email.
Next add the Renew Expired Certificates step after the initial email step. In the configuration parameters for this step, select a certificate template and CA to use for requesting the new certificate. These do not need to match the certificate template and CA used on the original certificate(s).
If you want to send a notification that the renewal completed successfully, create another Send Email step after the renewal step with a Subject and Message similar to the following with appropriate Recipients:
Expiration Alert: Certificate $(cn) Successfully RenewedHello,
A renewal was requested for the certificate in the name $(cn) from $(CA) using the $(Template) template with the following result: $(RequestDisposition)
The certificate details include:
<ul>
<li>Original Certificate ID: $(certid)</li>
<li>New Certificate ID: $(RenewedCertId)</li>
<li>New Thumbprint: $(Thumbprint)</li>
<li>New Serial Number: $(SerialNumber)</li>
<li>CN: $(cn)</li>
<li>DN: $(dn)</li>
<li>SANs: $(sans)</li>
<li>App Owner First Name: $(metadata:AppOwnerFirstName)</li>
<li>App Owner Last Name: $(metadata:AppOwnerLastName)</li>
</ul>
Thanks!
Your Certificate Management Tool Deliver Certificate via Email at the Conclusion of Enrollment
This example uses the following step types:
-
Set Variable Data or Use Custom PowerShell
-
Send Email
To do this, first create the PowerShell step. Here we use a Set Variable Data step since no functions need to be called outside the confines of Keyfactor Command, though you could use a Use Custom PowerShell step instead. The Set Variable Data step needs to come after the EnrollStep in the workflow. Add a Script Parameter![]() A parameter or argument is a value that is passed into a function in an application. to pull the raw certificate into the script.
A parameter or argument is a value that is passed into a function in an application. to pull the raw certificate into the script.
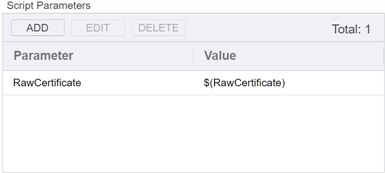
Figure 211: Deliver Certificate Example: Add Parameters
In the Insert PowerShell Script field, enter a script similar to the following:
# Declare your parameter at the beginning
param(
    [string] $RawCertificate
)

# Update certificate string with begin/end blocks
$RawCertificate = "-----BEGIN CERTIFICATE-----"+$RawCertificate+"-----END CERTIFICATE-----"

# Return the certificate to the workflow as a hashtable
$result = @{ "RawCertificate" = $RawCertificate }
return $result
Next, create the send email step. In the configuration parameters, give your email a Subject that will help highlight the information:
Certificate Enrollment Complete for $(issuedcert:cn)In the main Message of the email, provide the required information using tokens, including the certificate (see Substitutable Text Tokens for Workflow):
Hello,

A certificate using the $(template) template was requested by $(requester:displayname) from $(CA) on $(subdate).

The certificate details include:

   <ul>
      <li>CN: $(request:cn)</li>
      <li>DN: $(request:dn)</li>
      <li>SANs: $(sans)</li>
      <li>App Owner First Name: $(metadata:AppOwnerFirstName)</li>
      <li>App Owner Last Name: $(metadata:AppOwnerLastName)</li>
   </ul>

The certificate (without private key) is included here:

   $(RawCertificate)

 Copy this text to a file using a text editor and save it as:

   $(request:cn).crt

Thanks!
Your Certificate Management Tool
Delivery of private keys via email is not a secure practice. Emailing of certificates should be used only when the certificate file without private key is needed.
 Require Approval on Enrollment for Selected Domains
This example uses a condition and the following step types:
-
Set Variable Data or Use Custom PowerShell
-
Require Approval
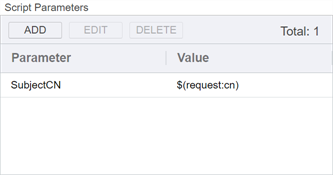
To do this, first create the PowerShell step. Here we use a Set Variable Data step since no functions need to be called outside the confines of Keyfactor Command, though you could use a Use Custom PowerShell step instead. Add a Script Parameter to pull the request CN into the script.
In the Insert PowerShell Script field, enter a script similar to the following:
# Declare your parameter at the beginning
param(
   [string]$SubjectCN
)

# Initialize a variable for the response
$shouldRun = @()

# Check to see if the requested CN ends with keyexample.com and require approval in the next step if it does not
$Suffix = "keyexample.com"

if ($SubjectCN.EndsWith($Suffix))
{
   $shouldRun = "False"
}else {
   $shouldRun = "True"
}

# Return the true/false value to the workflow as a hashtable
$result = @{ "shouldRun" = $shouldRun; }
return $result
Next, create the require approval request step with $(shouldRun) as a condition like so:
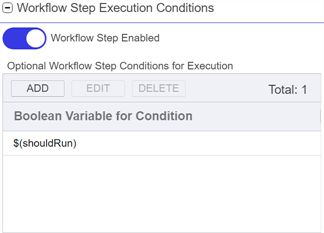
Figure 213: Conditions Example: Add Conditions for Require Approval Step
This condition on the require approval step will cause the approvals configured in the step to be required only if the CN submitted in the request does not end with “keyexample.com”, so a request for “CN=mycert.keyother.com” will require approval but a request for “CN=mycert.keyexample.com” will not.
 DNS Lookup to Add Extra IP SAN Plus Add Two DNS SANs on Enrollment
This example uses the following step types:
-
Use Custom PowerShell
This step needs to be a Use Custom PowerShell step rather than a Set Variable Data step because it calls a PowerShell command (Resolve-DnsName) that exists outside the confines of Keyfactor Command.
To do this, first use the POST /Extension/Scripts API endpoint (see POST Extensions Scripts) to import your PowerShell script into the Keyfactor Command database before beginning to edit your workflow. Your script file prior to import should contain content similar to the following:
# Declare your parameters at the beginning ($InputCN, $Domain1, $Domain2, and $InputSANs)
param(
   [string]$InputCN,
   [string]$Domain1,
   [string]$Domain2,
   [string]$InputSANs
)

# Load incoming SANs into a hash table
$SANTable = $InputSANs | ConvertFrom-Json -AsHashtable

# Initialize variables for the two types of SANs we're handling
$DnsSans = @()
$IpSans = @()

# Check if SANTable has properties 'dns' and 'ip4' and assign if they exist
if ($SANTable.ContainsKey("dns") -and $SANTable["dns"]) {
    $DnsSans = $SANTable["dns"]
}

if ($SANTable.ContainsKey("ip4") -and $SANTable["ip4"]) {
    $IpSans = $SANTable["ip4"]
}

# Check to see if the incoming CN ends with keyexample.com and, if so, add some SANs.
$Suffix = "keyexample.com"

if ($InputCN.EndsWith($Suffix))
{
   # Load just the portion of the CN without the domain name into a variable.
   $CNName = $InputCN.SubString(0,$InputCN.Length - $Suffix.Length)

   # Do a lookup on the requested CN to find its IPv4 address.
   $IPResult = Resolve-DnsName -Name $InputCN -Type A -ErrorAction SilentlyContinue

   # If an address is found, add that address as a SAN.
   # Also add SANs built with the contents of Domain1, Domain2, and the leading part of the CN
   # (e.g. mycert.my-first-other-domain.com and mycert.my-second-other-domain.com).
   if ($IPResult -ne $null)
   {
      $SAN1 = $IPResult.IPAddress
      $SAN2 = $CNName + $Domain1
      $SAN3 = $CNName + $Domain2
      $DnsSans += $SAN2
      $DnsSans += $SAN3
      $IpSans += $SAN1
   }
   # If an IP address is not found, add only the SANs featuring Domain1 and Domain2.
   else {
      $SAN2 = $CNName + $Domain1
      $SAN3 = $CNName + $Domain2
      $DnsSans += $SAN2
      $DnsSans += $SAN3
   }
}

# Load the resulting IPv4 and DNS SANs into the SANS variable
$UpdatedSANs = @{}

if(![string]::IsNullOrWhiteSpace($DnsSans)) {
   $UpdatedSANs.dns = $DnsSans
}

if(![string]::IsNullOrWhiteSpace($IpSans)) {
   $UpdatedSANs.ip4 = $IpSans
}

# Return the updated SANs to the workflow as a hashtable (case matters in the return value name "SANs" in order
# to reload the results back into the SANs token)
$result = @{ "SANs" = $UpdatedSANs; }
return $result
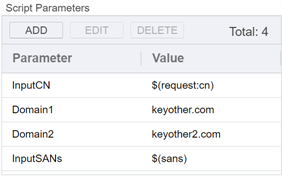
Once your PowerShell script has been imported into the Keyfactor Command database, you may begin creating your workflow. To create the Use Custom PowerShell step, add Script Parameters to pull the $(request:cn) and $(sans) into the script as shown in Figure 214: Update SANs Example: Add Parameters, and add to static values to pass in your two additional domain names.
In the PowerShell Script Name field dropdown, select the script you uploaded to the database.
Your enrollment will complete using the updated list of SANs, including any SANs you added manually on the PFX![]() A PFX file (personal information exchange format), also known as a PKCS#12 archive, is a single, password-protected certificate archive that contains both the public and matching private key and, optionally, the certificate chain. It is a common format for Windows servers. enrollment page or in the CSR
A PFX file (personal information exchange format), also known as a PKCS#12 archive, is a single, password-protected certificate archive that contains both the public and matching private key and, optionally, the certificate chain. It is a common format for Windows servers. enrollment page or in the CSR![]() A CSR or certificate signing request is a block of encoded text that is submitted to a CA when enrolling for a certificate. When you generate a CSR within Keyfactor Command, the matching private key for it is stored in Keyfactor Command in encrypted format and will be married with the certificate once returned from the CA.. You may reference the updated SANs using the formatted SANs token ( $(sansformattedprint) ) or standard SANs token ($(sans)) in subsequent steps in your workflow and may view the complete SAN list wherever the SANs are available for viewing within Keyfactor Command.
A CSR or certificate signing request is a block of encoded text that is submitted to a CA when enrolling for a certificate. When you generate a CSR within Keyfactor Command, the matching private key for it is stored in Keyfactor Command in encrypted format and will be married with the certificate once returned from the CA.. You may reference the updated SANs using the formatted SANs token ( $(sansformattedprint) ) or standard SANs token ($(sans)) in subsequent steps in your workflow and may view the complete SAN list wherever the SANs are available for viewing within Keyfactor Command.
- Include an Update Certificate Request Subject\SANs step in your workflow (see Update Certificate Request Subject\SANs for Microsoft CAs). This is Keyfactor's preferred solution for workflow due to the limited risk profile.
- Use Keyfactor's SAN Attribute Policy Handler. This opens security risks as well, which can be mitigated, however, this is not Keyfactor's preferred solution for workflow.
 Retrieve Requester’s SSH Info with REST Request on Enrollment
This example uses the following step types:
-
Set Variable Data or Use Custom PowerShell
-
Invoke REST Request
-
Send Email
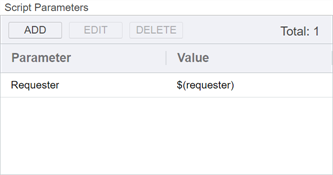
To do this, first create the PowerShell step. Here we use a Set Variable Data step (see Set Variable Data) since no functions need to be called outside the confines of Keyfactor Command other than those that are supported within Set Variable Data, though you could use a Custom PowerShell Script step instead. Add Script Parameters to pull the requester into the script (see Figure 215: Requester Lookup Example: Add Parameters).
In the Insert PowerShell Script field, enter a script similar to the following to build the query that we’ll use in the REST request:
# Declare your parameters at the beginning
param(
   [string]$Requester
)

#Convert the requester to JSON
$RequesterJSON = ($Requester | ConvertTo-Json)

# Build the query for the REST step
$Query = "Username -eq $RequesterJSON"

# Return the query to the workflow as a hashtable
$result = @{ "Query" = $Query }
return $result
Next, create the REST request step with the following values:
Headers: The GET /SSH/Users method has a version 2 with additional features. To access version 2, this version must be specified in the header.
Copy{
"x-keyfactor-requested-with": [
"APIClient"
],
"x-keyfactor-api-version": [
"2"
]
}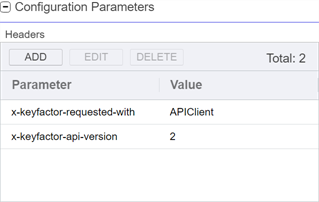
Figure 216: Requester Lookup Example: Add Headers for REST Request
Variable to Store Response in: MyResponse
Verb: GET
URL: Note that the $(Query) from the PowerShell step is provided in the URL (keyfactor.keyexample.com is your Keyfactor Command server name).
Copyhttps://keyfactor.keyexample.com/KeyfactorAPI/SSH/Users?QueryString=$(Query)Content-Type: application/json
Request Content: None (The request is provided in the URL; there is no body for this endpoint.)
This REST step takes the Query built in the PowerShell step, containing the requester’s username, and submits it to the GET /SSH/Users endpoint. The response contains all the information from the user’s SSH key record.
Next, create the Send Email step. In the configuration parameters, give your email a Subject that will help highlight the information:
Certificate Enrollment Request for $(request:cn)In the main Message of the email, provide the required information using tokens, including the information retrieved from the GET /SSH/Users endpoint (see Substitutable Text Tokens for Workflow):
Hello,

A certificate using the $(template) template was requested by $(requester:displayname) from $(CA) on $(subdate).

The certificate details include:

   <ul>
      <li>CN: $(request:cn)</li>
      <li>DN: $(request:dn)</li>
      <li>SANs: $(sans)</li>
      <li>App Owner First Name: $(metadata:AppOwnerFirstName)</li>
      <li>App Owner Last Name: $(metadata:AppOwnerLastName)</li>
   </ul>

The requester’s SSH information includes:

   <ul>
      <li>ID: $(MyResponse.Result[0].Key.Id)</li>
      <li>Email: $(MyResponse.Result[0].Key.Email)</li>
      <li>Comments: $(MyResponse.Result[0].Key.Comments.[*])</li>
   </ul>

Thanks!
Your Certificate Management ToolIn the Recipients, add all the email recipients who should receive this information.
 Update Metadata Field with Revocation Code and Comment
This example uses the following step types:
-
Set Variable Data or Use Custom PowerShell
-
Invoke REST Request
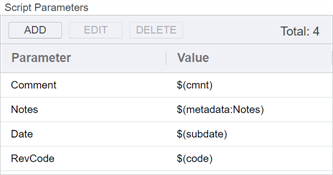
To do this, first create the PowerShell step. Here we use a Set Variable Data step (see Set Variable Data) since no functions need to be called outside the confines of Keyfactor Command, though you could use a Custom PowerShell Script step instead. Add Script Parameters to pull the revocation comment, submission date, revocation code, user making the revocation request, and the metadata field into which you will place your updated comment (Notes in this example) into the script. Figure 217: Metadata Update Example: Add Parameters shows only four of these. The metadata field Notes is a BigText type field in this example (see Metadata Field Operations).
In the Insert PowerShell Script field, enter a script similar to the following:
# Declare your parameters at the beginning ($Comment, $Notes, $RevCode, $Date, and $RevokeBy)
param(
   [string]$Comment,
   [string]$Notes,
   [string]$RevCode,
   [datetime]$Date
   [string]$RevokeBy
)

# Append your additional text to the existing text in the metadata Notes field along with the revoker (removing
# the leading 'DOMAIN\' part), submission date, revocation code, and comment entered at revocation,
# and beginning the entry with a newline.
$Notes += "`nRevoked on " + $Date.ToString("MMMM d, yyyy") + " by " + $RevokeBy.SubString($RevokeBy.IndexOf('\')+1) + " with revocation option '" + $RevCode + "' and comment '" + $Comment + "'."

# Return the updated metadata Notes value as MyNotes to the workflow as a hashtable
$result = @{ "MyNotes" = $Notes }
return $result
Next, create the REST request step with the following values:
Headers: The API version does not need to be stated since version 1 is the default.
Copy{
"x-keyfactor-requested-with": [
"APIClient"
]
}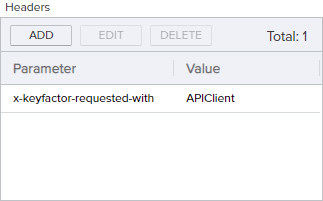
Figure 218: Metadata Update Example: Add Headers for REST Request
Variable to Store Response in: None (there is no output from this command on a success)
Verb: PUT
Client ID: The client ID from your identity provider implementation (see Authenticating to the Keyfactor API). For example:
Keyfactor-API-Workflow-UserClient Secret: The client secret from your identity provider implementation (see Authenticating to the Keyfactor API). For example:
WDBvGypDWuquyOmQQneeQp4IvmPDebz4Token Endpoint: The token endpoint from your identity provider implementation. For example:
https://my-keyidp-server.keyexample.com/realms/Keyfactor/protocol/openid-connect/tokenURL: (Where keyfactor.keyexample.com is your Keyfactor Command server name.)
Copyhttps://keyfactor.keyexample.com/KeyfactorAPI/Certificates/MetadataContent-Type: application/json
Request Content:
Copy{
"Id": "$(certid)",
"Metadata": {
"Notes": "$(MyNotes)"
}
}
This REST step takes the MyNotes output from the PowerShell step and updates the metadata Notes field to match that value. The resulting value in your Notes field will look something like this (assuming lines one, two and three were preexisting):

Figure 219: Metadata Update Example: Results
 Update Certificate Owner with REST Request on Certificate Enters Collection
This example uses the following step type:
-
Invoke REST Request
To do this, first create the REST request step with the following values:
Headers: The PUT /Certificates/{id}/Owner method has only a version 1, so the version does not need to be specified in the header.
Copy{
"x-keyfactor-requested-with": [
"APIClient"
]
}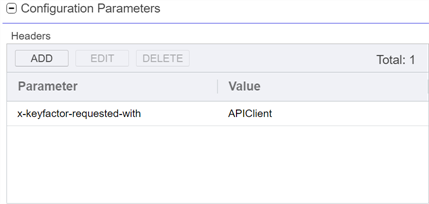
Figure 220: Update Certificate Owner Example: Add Headers for REST Request
Variable to Store Response in: No response is expected from this request.
Verb: PUT
URL: Note that the $(certid) token is provided in the URL to make the request on the specific certificate entering the collection (keyfactor.keyexample.com is your Keyfactor Command server name).
Copyhttps://keyfactor.keyexample.com/KeyfactorAPI/Certificates/$(certid)/OwnerContent-Type: application/json
Request Content: Specify a security role (e.g. Power Users) to assign as the certificate owner. This security role must exist.
Copy{
"NewRoleName": "Power Users"
}
This REST step takes the certificate ID of each certificate entering the collection and, using that, updates the certificate with the specified certificate owner. The certificate owner is updated to the new value whether it was blank previously or contained an alternate value previously.
 Update Enrollment Request Requiring Approval with Certificate Store Info Using Embedded REST Request
This example uses the following step types:
-
Use Custom PowerShell
-
Require Approval
-
Send Email
This step needs to be a Use Custom PowerShell step rather than a Set Variable Data step because it calls a Keyfactor API method in a loop within the script. Since the API method needs to be called in a loop to retrieve multiple pieces of data, it’s not practical to do this as a separate Invoke REST Request step.
To do this, first outside of Keyfactor Command create your PowerShell script containing content similar to the following:
# Declare your parameters at the beginning
param(
   [string]$StoreData,
   [string]$TimeData
)

# Pick one authentication mechanism for the Keyfactor API
# Basic authentication credentials to authenticate to the Keyfactor API
$user = 'KEYEXAMPLE\APIUser'
$pass = 'APIUserSuperSecretPassword'

# Encode Basic authentication credentials
$pair = "$($cred.Username):$($cred.GetNetworkCredential().Password)"
$encodedCreds = [System.Convert]::ToBase64String([System.Text.Encoding]::ASCII.GetBytes($pair))
$basicAuthValue = "Basic $encodedCreds"

# Token authentication credentials to authenticate to the Keyfactor API (uncomment the below 9 lines and update appropriately to use token authentication)
#$TokenBody = @{
#   grant_type = "client_credentials"
#   client_id = "Keyfactor-API-Workflow-User"
#   client_secret = "WorkflowAPIClientSecret"
#}
#$TokenHeaders = @{
#   'Content-Type' = 'application/x-www-form-urlencoded'
#}
#$TokenURL = "https://appsrvr18.keyexample.com:1443/realms/Keyfactor/protocol/openid-connect/token"

# Request token from Keyfactor Identity Provider for token authentication (uncomment the below line to use token authentication)
#$TokenValue = Invoke-RestMethod -Method Post -Uri $TokenURL -Headers $TokenHeaders -Body $TokenBody

# Pick an authentication type for the header
$headerAuth = $basicAuthValue
#$headerAuth = "Bearer " + $TokenValue.access_token

# Build the headers for the API request
$headers = @{
   "Authorization"=$headerAuth
   "Accept"="application/json"
   "x-keyfactor-requested-with"="APIClient"
}

# Convert incoming data from JSON
$StoreDataInfo = $StoreData | ConvertFrom-Json
$TimeDataInfo = $TimeData | ConvertFrom-Json

# Initialize Variables introduced in script
$JobTime = ""
$JobTimeHuman = ""
$TimeMessage = ""
$StoreMessage = ""
$StoreList = New-Object System.Collections.Generic.List[System.Object]
$CommandServer = 'keyfactor.keyexample.com'

# Evalulate the scheduled delivery time for the certificate store management job, if present, and populate a return message based on the content
if ("Immediate" -in $TimeDataInfo.PSobject.Properties.Name)
{
   $TimeMessage = "The certificate has been scheduled to be delivered at the next orchestrator run."
}
elseif ("ExactlyOnce" -in $TimeDataInfo.PSobject.Properties.Name)
{
   # Convert the certificate store job time to a human readable date/time
   $JobTime = [DateTime]($TimeDataInfo.ExactlyOnce.Time)
   $JobTimeHuman = $JobTime.ToString("M/dd/yyyy h:mm tt")
   $TimeMessage = "The certificate has been scheduled to be delivered at the following time: $JobTimeHuman."
}
else
{
   $TimeMessage = " "
}

# Pull out the display names of the certificate stores based on the store IDs in the incoming store info
foreach ($Store in $StoreDataInfo){
   $response = Invoke-WebRequest -Uri "https://$($CommandServer)/KeyfactorAPI/CertificateStores/$($store.StoreId)" -Method:Get -Headers $headers `
      -ContentType "application/json" -ErrorAction:Stop -TimeoutSec 60
   $responseContent = $response.Content | ConvertFrom-Json

   #Add the store to the store list
   $StoreList.Add($responseContent.DisplayName)
}

# Evaluate whether any stores were returned and build a message that includes the store list if so, and an alternate message if not
if ($StoreList.Count -gt 0)
{
   $StoreMessage = "If approved, the certificate will be delivered to the following stores:<br /><br />" + ($StoreList -join "<br />")
}
else
{
   $StoreMessage = "If approved, the certificate will be available for download in the Keyfactor Command Management Portal. It has not been scheduled for delivery to any certificate stores."
}

# Return the time message and store message to the workflow as a hashtable
$result = @{ "TimeMessage" = $TimeMessage; "StoreMessage" = $StoreMessage }
return $resultNext, use the POST /Extension/Scripts API endpoint (see POST Extensions Scripts) to import your PowerShell script into the Keyfactor Command database before beginning to edit your workflow.
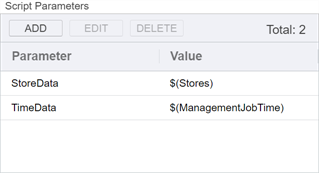
Once your PowerShell script has been imported into the Keyfactor Command database, you may begin creating your workflow. To create the Use Custom PowerShell step, add Script Parameters to pull the certificate store data—$(Stores)—and schedule time for the management job to add the certificate to the certificate stores—$(ManagementJobTime)—into the script as shown in Figure 221: Use Custom PowerShell with Embedded REST Request: Add Parameters. The $(Stores) and $(ManagementJobTime) tokens are not among those that appear in the dropdown.
In the PowerShell Field Name field, in the dropdown select the script you uploaded to the database.
Next, create the Send Email step. In the configuration parameters, give your email a Subject that will help highlight the request:
ACTION REQUIRED: Certificate Enrollment Request for $(request:cn)This tells your users that they need to do something and includes the CN of the requested certificate in the subject line.
In the main Message of the email, tell your users what they need to do and provide the information from the request that will allow them to make an informed decision using tokens (see Substitutable Text Tokens for Workflow) and the certificate store information returned from the PowerShell script:
Hello,

A certificate using the $(template) template was requested by $(requester:displayname) from $(CA) on $(subdate). $(StoreMessage)

$(TimeMessage)

The certificate details include:

   <ul>
      <li>CN: $(request:cn)</li>
      <li>DN: $(request:dn)</li>
      <li>SANs: $(sans))</li>
      <li>App Owner First Name: $(metadata:AppOwnerFirstName)</li>
      <li>App Owner Last Name: $(metadata:AppOwnerLastName)</li>
   </ul>

Please review this request and issue the certificate as appropriate by going here:

$(reviewlink)

Thanks!
Your Certificate Management ToolIn the Recipients, add all the email recipients who could possibly approve or deny the request.
Now create your Require Approval step. The step does not need any Conditions. In the Configuration Parameters, enter a value of at least 1 for the Minimum Required Approvals. Give the Denial Email Subject a value something like:
Certificate Enrollment Request Denied for $(request:cn)And the Approval Email Subject a value something like:
Certificate Enrollment Request Approved for $(request:cn)Enter an appropriate message for the Denial Email Message. You may use tokens, including the returned values from the PowerShell script. You may want to deliver this message to the requester, so a message similar to this might be appropriate:
Hello $(requester:givenname),

The certificate you requested on $(subdate) in the name $(request:cn) has not been issued for the following reason:

$(approvalsignalcmnts)

The certificate details include:

   <ul>
      <li>CN: $(request:cn)</li>
      <li>DN: $(request:dn)</li>
      <li>SANs: $(sans))</li>
      <li>App Owner First Name: $(metadata:AppOwnerFirstName)</li>
      <li>App Owner Last Name: $(metadata:AppOwnerLastName)</li>
   </ul>

For assistance, please contact <a href="mailto:support@keyexample.com">support@keyexample.com</a>.

Thanks!
Your Certificate Management System
Enter an appropriate message for the Approval Email Message. This message would also likely go to the requester and might look similar to:
Hello $(requester:givenname),

The certificate you requested in the name $(request:cn) on $(subdate) was successfully approved with the following comment:

$(approvalsignalcmnts)

The certificate details include:

   <ul>
      <li>CN: $(request:cn)</li>
      <li>DN: $(request:dn)</li>
      <li>SANs: $(sans))</li>
      <li>App Owner First Name: $(metadata:AppOwnerFirstName)</li>
      <li>App Owner Last Name: $(metadata:AppOwnerLastName)</li>
   </ul>

You will receive an update when it has been issued. For assistance, please contact <a href="mailto:support@keyexample.com">support@keyexample.com</a>.

Thanks!
Your Certificate Management SystemIn the Recipients for both the approval and denial emails, enter the token for the requester’s email—$(requester:mail).
In the Signals for the Require Approval step, select the security role(s) to which the users responsible for approving or denying the request belong.
Finish off the workflow process by configuring an issued certificate request alert to let the requester know when the certificate has been issued (see Issued Certificate Request Alerts).
 Update Subject and SANs on Enrollment
This example uses the following step types:
-
Set Variable Data or Use Custom PowerShell
-
Update Certificate Request Subject\SANS for MSFT CAs
To create this, add Script Parameters to pull the $(request:dn![]() A distinguished name (DN) is the name that uniquely identifies an object in a directory. In the context of Keyfactor Command, this directory is generally Active Directory. A DN is made up of attribute=value pairs, separated by commas. Any of the attributes defined in the directory schema can be used to make up a DN.) and $(sans) into the script as shown in Metadata Update Example: Add Parameters and add two static values to pass in your two domain names.
A distinguished name (DN) is the name that uniquely identifies an object in a directory. In the context of Keyfactor Command, this directory is generally Active Directory. A DN is made up of attribute=value pairs, separated by commas. Any of the attributes defined in the directory schema can be used to make up a DN.) and $(sans) into the script as shown in Metadata Update Example: Add Parameters and add two static values to pass in your two domain names.
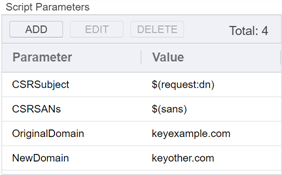
Figure 222: Update SANs and Subject Example: Add Parameters
In the Insert PowerShell Script field, enter a script similar to the following:
# Declare your parameters at the beginning
param(
   [string]$CSRSubject,
   [string]$CSRSANs,
   [string]$OriginalDomain,
   [string]$NewDomain
)

# Load incoming SANs into a hash table
$SANTable = $CSRSANs | ConvertFrom-Json -AsHashtable

# Initialize variable for the dns SANs
$dnsList = @()

# Load original subject in NewSubject for the else case
$NewSubject = $CSRSubject

# Replace escaped commas in the subject temporarily with a string to facilitate splitting
$TempString = "######"
$CleanSubject = $CSRSubject -replace "\\,", $TempString

# Split the incoming Subject string into its component values
$SplitSubject = $CleanSubject.Split(',')

# Initialize variables for the components of the subject
$SubjectCN = @()
$SubjectO = @()
$SubjectOU = @()
$SubjectL = @()
$SubjectST = @()
$SubjectC = @()
$SubjectE = @()

# Load subject values
foreach($element in $SplitSubject){
   $SplitElement = $element.Split('=')
   Switch($SplitElement[0]){
      "CN" {$SubjectCN = $SplitElement[1]}
      "O" {$SubjectO = $SplitElement[1]}
      "OU" {$SubjectOU = $SplitElement[1]}
      "E" {$SubjectE = $SplitElement[1]}
      "L"{$SubjectL = $SplitElement[1]}
      "ST"{$SubjectST = $SplitElement[1]}
      "C"{$SubjectC = $SplitElement[1]}
   }
}

# Check to see if the incoming CN ends with $OriginalDomain and, if so, add it as a SAN with $NewDomain and update the Subject with $NewDomain (assumes non-null CN)
if ($SubjectCN.EndsWith($OriginalDomain))
{
   # Load just the portion of the CN without the domain name into a variable
   $CNName = $SubjectCN.SubString(0,$SubjectCN.Length - ($OriginalDomain.Length + 1)) # +1 to account for the '.'

   # Build new DNS SAN
   $NewSAN = $CNName + "." + $NewDomain

   # Check if SANTable has property 'dns' and assign if so
   if ($SANTable.ContainsKey("dns") -and $SANTable["dns"]) {
       $dnsList = $SANTable["dns"]
   }

   if ($dnsList -notcontains $NewSAN) {
      $dnsList += $NewSAN
   }

   # Load the resulting IPv4 and updated DNS SANs into the updated SANs variable
   $UpdatedSANs = @{}

   if(![string]::IsNullOrWhiteSpace($dnsList)) {
       $UpdatedSANs.dns = $dnsList
   }

   if(![string]::IsNullOrWhiteSpace($SANTable["ip4"])) {
      $UpdatedSANs.ip4 = $SANTable["ip4"]
   }

   # Build new Subject with $NewDomain
   $NewSubject = "";

   if(![string]::IsNullOrWhiteSpace($SubjectCN)){
      $NewSubject += "CN=" + $CNName + "." + $NewDomain + ","
   }

   if(![string]::IsNullOrWhiteSpace($SubjectO)){
      $NewSubject += "O=" + $SubjectO + ","
   }

   if(![string]::IsNullOrWhiteSpace($SubjectOU)){
      $NewSubject += "OU=" + $SubjectOU + ","
   }

   if(![string]::IsNullOrWhiteSpace($SubjectL)){
      $NewSubject += "L=" + $SubjectL + ","
   }

   if(![string]::IsNullOrWhiteSpace($SubjectST)){
      $NewSubject += "ST=" + $SubjectST + ","
   }

   if(![string]::IsNullOrWhiteSpace($SubjectC)){
      $NewSubject += "C=" + $SubjectC + ","
   }

   if(![string]::IsNullOrWhiteSpace($SubjectE)){
      $NewSubject += "E=" + $SubjectE + ","
   }

   $NewSubject = $NewSubject.Remove($NewSubject.Length - 1) # remove the last ','

   # Replace temporary string with escaped commas in Subject
   $NewSubject = $NewSubject -replace $TempString, "\,"
}

# Return the updated subject and SANs as NewSubject and NewSANs to the workflow as a hashtable
$result = @{ "Subject" = $NewSubject; "SANs" = $UpdatedSANs }
return $result
Add an Update Certificate Request Subject\SANs for Microsoft CAs step at a point in the workflow after your PowerShell step but before the enroll step to allow the request to be re-signed before it is submitted to the Microsoft CA for enrollment.
Your enrollment will complete using the updated list of SANs, including any SANs you added manually on the PFX enrollment page or in the CSR, and the updated subject. You may reference the updated SANs using the standard SANs token ($(sans)) or formatted SANs token ( $(sansformattedprint) ) and updated subject using the standard DN token ($(request:dn)) in subsequent steps in your workflow and may view the subject and complete SAN list wherever the subject and SANs are available for viewing within Keyfactor Command.
